Showing posts with label freezer bread. Show all posts

Friday, July 14, 2017

Freezer Friday! Video 3 Ways to use Sprouted Wheat dough: Cinnamon rolls, Dinner Rolls and Sticky Buns


Episode 3 Season 2 Cooking with Chef Tess as seen on the Heartland TV Network in Las Vegas! Here's last week's episode and recipes. 

Freezer to Oven Sprouted Grain Cinnamon Rolls, Dinner Rolls and Sticky Buns

Make the Dough
·       3 cups water (no hotter than 110 degrees)
·       2 Tbsp. active dry yeast
·       ½ cups Organic coconut sugar
·       4 ½ cups Organic Grains bread flour
·       4 ½ cup  Organic Grains sprouted white wheat flour 
·       1 Tbsp. salt
·       ¾ cup coconut oil or Ahuacatlan Avocado Oil 
·       2 egg
Combine everything in one large bowl or mixer. I like that. Knead 5 minutes by hand or 3 minutes in a mixer on medium setting. This is a less developed dough as far as gluten is concerned. Form into a ball and place in a bowl covered with plastic or a lid for 1 hour, or until doubled in size. Punch down dough and divide into 3 equal pieces.

Cinnamon Rolls
Roll out in rectangle on a lightly floured surface. 

Smear:
½ cup sugar
½ cup butter
2 Tbsp cinnamon or Chef Tess  Wise Woman of the East Spice blend


Cut into 8 rolls. Place 4 roll per 8 inch pan. Raise 45 minutes. Freeze.

Oven-Ready Stuffed Sticky Buns

Caramel Topping:
1 c brown sugar
1/2 chopped real bacon bits
 1/3 c maple syrup
¼ c butter, melted

Cream Filling:
1/2 package (4 oz) cream cheese, softened
¼  c shredded coconut (okay...how evil is that?!)
 2 Tbsp.  powdered sugar
 1 Tbsp.  butter, softened
 1 tsp vanilla

 Spread topping in the bottom of each pan.
Combine all cream filling ingredients and beat until well mixed; set aside.
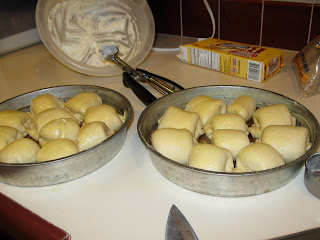
Punch dough down and divide into 6 equal pieces. Flatten each piece of dough into a small circle, about 4 to 5 inches in diameter. Place a scant T of cream filling in the center. Pinch edges of dough together and form into a ball; It looks like a little cheese tortellini. Place in prepared pans, pinched side down. Cover and let rise until doubled, about 30 to 45 minutes. Yes, let them raise before freezing! That is the secret! (if freezing, put in freezer at this point. To prepare pull from freezer straight to the oven and add 20 min to bake time for room temp dough) Bake at 350°F for 25 to 30 minutes or until deep golden brown (45-50 minutes from frozen). Cool on rack for only 1 minute; invert onto serving platters. Remember, allow to cool only one minute before inverting onto a platter. Be careful, it's hot and that goo is delicious...but not in a molten mass attached to your arm. Oh my stars!


 Making Dinner Rolls

 I kind of put them in a log form. this helps to keep things pretty even. You can get science-like and weigh the dough and then divide it into 12 equal portions, but on most given days, I just eyeball it. I may go to baker's heck for saying that.
Now, lightly (I do mean lightly) dust the counter top with a little flour...just a little. We don't want the rolls sticking too much. On the other hand, we don't want so much flour that they just roll all over the place. The point is, we want a little tacky stuff so they form correctly. Take the dough piece and pinch the sides together...
Then turn it over so the pinched side is down.
You don't want it to look loose like this...
You want the dough balls to look like they have a skin holding them together. Like this picture below. Place the rolls on a pan lined with parchment paper (or a freezer friendly pan for easy make and bake). If you use metal pans, you don't have to worry about the glass shattering going from the freezer to the oven. I may mention that again.
Allow to raise at room temperature, uncovered for 35-40 minutes, until the rolls are touching if originally placed 1/2 an inch apart. Cover with foil and place in the freezer. Keep frozen up to one month. Removing them from a pan once frozen and placing directly in a freezer bag will save space in your freezer...big time!

 Bake, Serve. Wrap Up
When you want fresh rolls, preheat oven to 375 degrees. Remove pan from the freezer. Important note...don't place glass pans directly from the freezer to the oven, they will shatter. If you keep rolls frozen in freezer bags, place frozen rolls on pan and then place in the oven.
Bake 375 degrees 20-25 minutes until golden brown.
Try not to eat them all in one sitting...alone. 

Special thanks to Organic Grains for sponsoring this episode!

 There you go! Make some awesome buns!


Always My Very Best,
Your Friend Chef Tess


Tuesday, March 23, 2010

Cream Cheese Filled Caramel-Nut Pull Apart Bread (Freezeable!)


It's Tuesday. Yes, I know. It's evil. Don't blame me, it was Auntie Em's idea to stuff the caramel nut pull apart monkey bread with a wicked cream cheese filling. With Easter coming and all the cream filled eggs out there, why not add cream filled sticky buns to the list of things to make. Why?! OH Auntie Em, what are you thinking?! Pure genius! Yes...she is in fact my evil twin sister. Well, we are a year apart in age, but that didn't stop the folks from calling us the "sunshine twins" back in grade school. Recently Em wrote me asking my advice on not only making this dessert...but making it freezable. The kind of freezable that would be able to bake the day of her family event (with the mother in law coming) and still get a good review. What do you think? Does it look like it worked? Pictures today are brought to you by the letter "E". Em, Eats, Evil. Triple threat. However, if you string the "E's" together, it looks more like a gleeful expression of utter bliss, "EEEEEEeeeeee".


Kick off you shoes and run though a meadow of wild flowers. It's time for the step by step instructions. Special thanks to Auntie Em! Smooooches!!

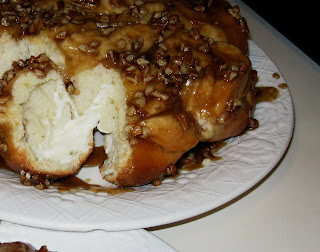
Auntie Em's Caramel Nut Pull Apart Bread, Cream Filled and freezable EVil Genius
Dough:
1/4 c warm water
1 T active dry yeast
4-1/4 to 4-1/2 c all-purpose flour
1/3 c sugar
1/2 tsp salt
3/4 c milk
1/3 c butter, cut in chunks
1 egg
Caramel Topping:
1 c brown sugar
1/2 c chopped pecans
1/3 c Corn Syrup
1/4 c butter, melted
Cream Filling:
1 package (8 oz) cream cheese, softened
1/2 c shredded coconut (okay...how evil is that?!)
1/4 c powdered sugar
2 T butter, softened
1 tsp vanilla

Combine water and yeast in a small bowl; set aside.
Combine 2 c flour, sugar and salt in large mixer bowl. Heat milk and butter until warm (100° to 110°F) - butter does not need to melt.
Add milk mixture, yeast mixture and egg to dry ingredients. Beat 30 seconds on low speed to blend; beat an additional 2 minutes on medium speed. Stir in enough remaining flour to make a soft dough. Knead on lightly floured surface until smooth and elastic, about 8 to 10 minutes.
Place in a greased bowl, turning once to coat.Cover and let rise in a warm, draft-free place until nearly doubled, about 1 to 1-1/2 hours. (Note: this rich dough rises slowly, and probably will not double).

Combine all caramel topping ingredients together.
Grease two 9-inch round cake pans. Spread half the topping in the bottom of each pan.
Combine all cream filling ingredients and beat until well mixed; set aside. Punch dough down and divide into 20 equal pieces. Cover and let rest 10 minutes.
Flatten each piece of dough into a small circle, about 4 to 5 inches in diameter.
Place a scant T of cream filling in the center.

It looks like a little cheese tortellini.


Pinch edges of dough together and form into a ball; place in prepared pans, pinched side down, 10 rolls per pan. Cover and let rise until doubled, about 30 to 45 minutes.
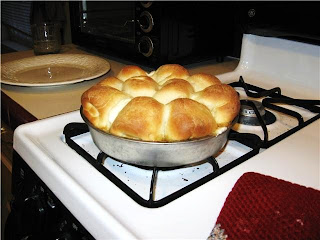
Yes, let them raise before freezing! That is the secret!.(if freezing, put in freezer at this point. To prepare pull from freezer straight to the oven and add 20 min to bake time for room temp dough) Bake at 350°F for 25 to 30 minutes or until deep golden brown (45-50 minutes from frozen). Cool on rack for only 1 minute; invert onto serving platters.

Remember, allow to cool only one minute before inverting onto a platter. Be careful, it's hot and that goo is delicious...but not in a molten mass attached to your arm.


Oh my stars!

There you go! Thank Auntie Em for those extra pounds. Not me. I have to go jogging just thinking about this stuff. Thanks a lot! Smooches anyway sista'. You know I love you!

Wednesday, February 24, 2010

Frozen Bread Dough Success with Ceri


I receive a lot of great email and I try to answer everyone. Sometimes life as a wife and mother gets crazy. It's taken me a couple of weeks since this letter to finally post our grand adventure. This was a letter from a gal named Ceri. As I had been working on freezer rolls and bread, this letter came in perfect timing. I had to join forces with Ceri on her quest for freezer to oven bread dough that wouldn't require a rise before she baked it. I'd been working on a recipe that I had found success with, and shared it with her. I think her letter was pretty cool. It read, "Dear Chef Tess,I love your blog (and consequently your Facebook page), and hope you can help me with my current quest:
it is my turn to provide snack for my daughter's 4th grade class this week and I thought it would be fun to bring fresh baked bread. It's not fun enough to get up at 4am, though, so I am wondering about the best way to make the dough the night before and refrigerate it.
Some background: I've tried no-knead bread and even thought that would be a solution I am not crazy about the consistency of that bread and the dough is finicky to handle. I do not have a heave duty mixer. I have a new, heave duty 14c Cuisinart food processor and make my bread in that. I've tweaked a recipe that came with it to now include whole wheat and rye flour.
So: do I make the dough, let it rise, then just put int the fridge until morning, shape and transfer to rising baskets then? Rise and punch down, then put in the fridge? Rise, shape, put in the rising baskets then put int the fridge? I'm stumped and don't have the time to do a bunch of tests.
Hope you can help me and thanks in advance,
Ceri "
To Ceri, I wrote:
Ceri,
Well, perhaps we can help each other. I need a home testing outside of myself to see if my results are accurate. I have some dough I'm working on today that is transferable straight from the freezer to the oven to bake. No defrosting or raising required. I have had a good amount of success just taking it after it is formed into loaves and raised, and letting it go about 20 minutes less of a final proof. Instead of baking, place in the freezer. Then when ready to bake, transfer into baking pans and bake 375 degrees 45-50 minutes. Not defrosting, just baking. The recipe is very similar to the one I use for the freezer to oven dinner rolls, but using whole wheat, so it's very healthy. You can do the kneading by hand and increase the kneading time as you would for bread, 600 strokes by hand or 3-4 minutes in your food processor, as that is less time than a mixer.
Here's my recipe. Let me know what you think:

2 1/2-3 cups water (no hotter than 110 degrees)
4tsp yeast (2 packet) rapid rise
1/4 cup sugar (2T honey)
8 1/2 cups whole wheat bread flour
1T salt
1T baking powder
1/2 cup oil
3 egg

Combine the honey and 1 cup water with the yeast, to be sure the yeast is alive. Then, combine everything in one large bowl or mixer. I like that. Knead 600 strokes by hand or 3 minutes in a food processor. You may need more or less liquid depending on the moisture content of the flour. Form into a ball and place in a bowl covered with plastic or a lid for 1 1/2 hour (dough at 90 degrees), or until doubled in size. Form into 3 loaves and place in parchment lined loaf pans ( 8 inch by 4 inch silicone loaf pans have a great use here...though I don't like baking in them. Freezing in them is cool, because they peel right off when the dough is frozen.) Allow to raise 40-45 minutes until just rising above the top of the loaf pan. Freeze immediately (about 2 hours until solid). Dough will be good up to one month. When ready to bake, transfer frozen dough from freezer to oven ready pans that have been lightly oiled. Bake without defrosting 375 degrees 45-50 minutes.


This is what I got back from Ceri. Some great pictures and some great response!

"Stephanie,
success all the way around! I am so excited! Can't wait to hear how the kids liked it.
So: your recipe I mixed, 1st rise, punched down, short rest, shaped, 2nd rise (but only about 20 min since it was going well over the edge of the pan), in freezer. Once frozen I took it out of the pan, took off parchment paper, wrapped in plastic and back in freezer. This morning I prepped pan by buttering and coating with semolina flour, put frozen dough in and baked for 45 min. You can see in the picture called "sliced" how nice the texture was.
"

This is the bread before the rise in the pan.
This is the frozen dough, ready to bake.
Here it is after baking.
Ceri is an artisan baker and shared a great recipe for artisan bread with me. Our next quest was to see if she could bake her artisan bread using the similar technique of letting it raise in the artisan baskets, freezing and then baking. Ceri said, "For my dough I got scared that the ice block of dough would crack my stone so I put it from the freezer in the fridge last night to thaw (still in baskets, but it came out of the basket easy, even when frozen), then took it out of the baskets this morning onto parchment paper to come to room temp while yours were baking. Then upped the heat and baked mine on the stone. "
Here's how they looked baked. Not bad at all, don't you think?
Her final email gave me great joy, "No problem at all. And between 19 kids and two teachers there was not a crumb left. The kids told me (unprompted) how much they liked it as soon as I walked in, and Cloe told me how much they loved it. One teacher asked me for the recipes, too (-:
Thanks again for making this possible
,

Ceri (-:"
Ceri, Thank YOU! I had so much fun on our little project via email, and once again, find so much joy in helping others find success. Best wishes always. To everyone else...
There you go.