Showing posts with label 52 Method Printables. Show all posts

Monday, September 17, 2012

3 New Convenient Breakfast Meals in a Jar or Mylar


I promised these new convenient hot cereal breakfast meals for emergency preparedness and everyday use. I know...that promise came 2 weeks ago...and then pneumonia got the better of me and I tried to not over-do. Needless to say, you get them now. I don't think you'll mind waiting. If this is your first time visiting the blog you want to know all the safety on home vacuum packing...you'll need to read the post here. This is not home-canning. It is home vacuum packing for longer-term storage so there are some tips and tricks to know. However, the main thing is to remember to have fun! These are great for any day of the week and have been so helpful as I've recently had illness. They're simple enough that my 9 and 13 year old boys can make them. Don't ask my husband to boil water...he's still working on that. Grin.
The word I've heard back from all of you on the Peanut Butter Cup Cereal has been amazing!

 Thank you for keeping me in the loop as you try the meals and offering me your suggestions and ideas! It not only makes me smile, but also reminds me why I do what I do!
I will of course, remind y'all that I under-sweeten the cereals. If you want them sweeter, test the recipe and adjust as needed. 


1st up...

 9 grain carrot cranberry orange glazed pudding!
 This is made with 9 wholesome cracked grains coupled with  carrots in a spiced amaretto buttery pudding with tart yet sweet sun-dried cranberries drizzled with a creamy orange glaze.


9 Grain Carrot-Cake Cranberry 
Orange Glazed Breakfast Pudding

1/4 cup dehydrated shredded or diced dehydrated carrots
3/4 cup 9 9 grain cracked cereal
1/4 cup granulated honey
1/2 tsp Chess Tess Wise Women Blend
1/4 tsp almond powdered flavoring
1/4 tsp salt
Glaze snack bag:
1/2 cup powdered sugar
1/4 tsp orange powdered flavor
cranberry  snack bag:
1/2 cup dehydrated orange infused cranberries

Put ingredients in a pint jar for a single serving. Top with an Oxygen Absorber and seal tightly for the jar to be shelf stable up to 3 years. Or, if you are going to use the jars, they are shelf-stable up to a year without an oxygen absorber. To keep glaze separate for a topper/drizzle place ingredients in a snack-size zip bag and place in the jar to prepare for later.

Directions to prepare cereal: Combine dry ingredients with 3 cups boiling water and cook 10-15 minutes. Mix orange glaze with 1T cool water and stir until smooth. Sprinkle dried cranberries over hot cereal mixture.
Serve hot. Yield 4 servings.

 Next up is Cussin' Granny's
 Buttermilk lemon-vanilla custard! 

It is everything warm and inviting about grandma's creamy-smooth lightly spiced Buttermilk Custard Tart...with the convenience of a quick cooking breakfast cereal.

Granny's Buttermilk Breakfast Custard

1/3 cup buttermilk powder 
1/4 cup sugar
1/2 cup farina (cream-of-wheat)
1/4 tsp Chef Tess Wise Women Blend
1/4 tsp lemon powder flavor
1/2 tsp vanilla powder flavor
1/2 tsp butterscotch powder flavor

Put ingredients in a half-pint jar. Top with an Oxygen Absorber and seal tightly for jar to be shelf stable up to 5 years. Or, if you are going to use the jars, they are shelf-stable up to a year without an oxygen absorber.
Directions to prepare cereal: Combine dry ingredients with 2 cup boiling water and cook 3-4 minutes. Or, microwave with 1 1/4 cup water for 2 minutes. Stir, and cook 1 additional minute. 
Serve hot. 

 Next up...
6 grain Double chocolate hazelnut truffle cup. 
The way the chocolate chunks simply melt in luscious divinity over the warm gooey sinful pile of happiness might be too much for your heart.  


6 Grain Double Chocolate 
Hazelnut Truffle Cup


1/2 cup 6 grain rolled cereal
2 Tbsp. Hazelnut creamer powder
2 Tbsp. baker's cocoa powder
pinch of salt
1/2 tsp butterscotch powder flavor

Put ingredients in a half-pint jar for a single serving. Top with an Oxygen Absorber and seal tightly for jar to be shelf stable up to 5 years. Or, if you are going to use the jars, they are shelf-stable up to a year without an oxygen absorber.

Directions to prepare cereal: Combine dry ingredients with 1 1/4 cup boiling water and cook 3-4 minutes. Or, microwave with 1 1/4 cup water for 2 minutes. Stir, and cook 1 additional minute.  Serve hot. You may top with chopped chocolate if desired.

There you go. 3 new breakfast meals in a jar/Mylar.

Yes they can be made in Mylar bags as well! The tutorial for that is here.


Always My Very Best,
Your Friend Chef Tess

Monday, April 23, 2012

Scalloped Potatoes and Ham Au Gratin Skillet Meal in a Jar (52 Method continues)

           
Mondays are the day I try to share some great information and meals to make for food storage. I was raised growing a garden and making food from scratch so I try to offer budget-friendly ideas. Sometimes I will also offer meals in a jar or things for longer-term storage for those interested in just having convenient meals on hand. These will usually be meals that cost around 6-8$ a jar if you use jars you already have on hand and if you make them according to my directions. They are generally shelf stable 5-7 years (or more) depending on the meal.   Today's meal is shelf stable up to 10 years. 

           So this week I wanted to add these comforting scalloped potatoes Au Gratin.  I'm not gonna lie. I love scalloped potato casserole. Add cheese and ham with some garden vegetables and I'm in total comfort food heaven! If I don't have to fire up my oven to have the casserole...what's not to love about that?! If I can do it low fat and still have it taste delicious. Yes. I'm going to do that.  Dude. Arizona is hot. I am not a fan of cooking in the summer. So this is the heat-saver version. Even though this meal will work beautifully in my Solar oven or even the heat retention cooker the convenience of having a skillet meal is not to be overlooked. In this recipe I use real freeze dried Ham. One can of the ham will make about  20 of this meal because you use only 1/2 cup of the meat. This cannot be substituted with TVP ham in this meal because the the veggie ham will go bright pink when cooked for a long time in liquid. For the record. If you're having a fairy princess party and want pink potatoes, be my guest. 

           This meal ends up costing just over 6$ a meal if you break up the cans of ingredients. This time I listed how many meals each can will make if you use that portion from the can.  This particular recipe for one meal makes 4 servings (1 1/2 cup of casserole).  1.50$ a serving. We usually serve it with a big fresh salad and a slice of whole grain bread.  The use of the freeze-dried vegetables gives this dish a more "fresh" flavor compared to the dehydrated vegetables. I really recommend using them. 

         If you are new to the meals in a jar, go: here and get some details on how the meals are done as well as the basic safety guidelines. If you scroll through the rest of the  posts, there are a lot more recipes, ideas, and helpful tips when making the meals. I answer a lot of questions in the comment sections as well. 


This meal fits in a regular quart size jar for a family of 4.


Chef Tess Country-Style 
Scalloped Potatoes and Ham Au Gratin Skillet Meal

2 1/2 cups Dehydrated Potato Slices              (one can make approx. 5 meals)
1/2 cup  
freeze dried Ham* (no substitutions) (one can make approx 20 meals)
2/3 cup all-purpose flour or ultra gel (modified corn starch)
1/4 cup  powdered cheese sauce                      (each can makes approx 41 meals)
1/2 cup  instant milk                                           (one can make approx 16 meals)
2T  Freeze Dried Onion                                       (one can make approx 80 meals)

2T Freeze Dried Celery                                       (one can make approx 80 meals)
1/2  Cup Freeze Dried Bell Peppers                           (one can make approx 28 meals)
2T butter powder                                                   (one can make 51 meals)
1 tsp Chef Tess All Purpose Seasoning              (one bottle makes about 24 meals)

To Make jars: Layer ingredients in the order that they are listed, shaking the powder ingredients into the bulkier ingredients. Once the jar is full, top with an oxygen absorber packet and seals tightly, making sure that the absorber is low enough in the jar that it doesn't overlap the rim of the jar.  Store in a cool, dry place. 


To Prepare Meal:
Combine dry ingredients in a 12-inch deep skillet with a lid. Add 6 cups cool water. Stir well and bring to a slow boil over medium heat. Once boiling, lower heat to very low for 12-15 minutes, uncovered. Stir every few minutes. After 15 minutes, turn off heat. Cover pan and let sit for 5-10 minutes after cooking until all the potatoes and ham are completely tender. Serve hot with your choice of vegetables. Top with additional cheese if desired. * Ham is optional. If you make it without meat, reduce water to 4 1/2 cups.


Enjoy another delicious meal in a jar!

Always My Very Best,
Your Friend Chef Tess

Wednesday, March 28, 2012

Yankee Pot Roast Gravy and Butter-Garlic Mashed Potatoes (52 Method Continues)


How can I possibly top this meal? I mean...can I? What in the name-of-all-that's-freakish am I thinking with this meal other than the fact that some red-blooded-American boys are going to just want to kiss me! This is about as meat-n-'taters as one can get when it comes to a meal...and add to that the fact that it is shelf stable 3 years! It's loaded with real tender beef, mushrooms and onions in a savory gravy... Oh dear. Bless my ever-prepared-heart.  Speaking of that, I'd like to thank my darling friends at  Honeyville for providing the bulk of  ingredients used in today's post! They have been so kind as to ask me to write their food storage cook book and many of my meal-in-a-jar recipes will be included in that book.
My  Meals in a jar will be the theme all week! So, if you like what you  see, plan on visiting all week. I'll try to have at least 4 new posts up this week with new recipes and some that I've re-vised to be more natural and user-friendly. If you are new to the meals in a jar, go here and get some details on how the meals are done as well as the basic safety guidelines. If your scroll through the rest of the  posts, there are a lot more recipes, ideas, and helpful tips when making the meals. I answer a lot of questions in the comment sections as well. If I had to re-cap each detail in each  new post, it would take a lot of time and space. So. That being said there are a few things I will always re-cap in each post.   
First, however, I'm gonna say, "Duuuuude! I got that Yankee Pot Roast Gravy and Butter-Garlic Mashed Potatoes right out of this jar." I know...it's hard to believe how cool this is.  Try not to pass out. This ends up making 4 cups of thick buttery-garlic mashed potatoes and 4 cups of this  savory pot roast gravy with mushrooms and onions. It's a hearty filling meal. Bet you'd never believe so much food could come out of this little space right?!


So what's the down-low on the jars?!

1. You will be using a method  some have called "dry pack canning" but it's actually called Vacuum packing. No liquid or pressure canning is necessary. If you opt to use the freeze dried meat in the recipes  NOTE: The repacking of Freeze Dried Meat must be done within 24-48 hours of opening the can and must be done in a dry environment. Once repacked you must use an oxygen absorber to make sure there is a vacuum oxygen free environment. I recommend using a 300 cc oxygen absorber for each jar. This will make the vacuum packing effective. You can use a food Saver with a jar attachment for this in place of the oxygen absorber, but will need to make sure your machine is designed to be used with the jar attachment. Some of the food Savers are called "meal savers" and are actually not designed to use with the attachment. I called the FoodSaver company myself to be sure that the attachment I had was right for the machine I was using


2. You can also pack in mylar bags (the ones that are silver-colored), but again need to use the oxygen absorber. This size I use is designed to absorb a gallon size amount of air, but I'd rather err on the side of over-vacuum than not enough. No. You can't use the foodSaver clear plastic bags for long term storage. They are not designed for that purpose. When I say "long term" I'm talking 3-5 years. 


Chef Tess' Yankee Pot Roast Beef and  Gravy 
Over Butter Garlic Mashed Potatoes
Gravy Ingredients:
1/4 cup ultra gel or cornstarch
2 tsp Haco Beef Base (no msg, lower sodium and great flavor)
1 tsp dehydrated minced garlic
1 tsp Chef Tess All Purpose Seasoning
Mashed Potatoes:
1 1/2 cup  Potato Pearls
1 tsp granulated garlic

To make the Quart size jars:
Put the gravy ingredients in the bottom of a quart size jar, making sure it is a very dry day when re-packing the meats. Shake the powdered ingredients into the solid ones.

 To add the potato layer, place a sandwich size zipper bag inside the jars.
I'm not going to lie. I'm a huge fan of the Potato Pearls. They make a more compact "bang for the buck" in the small space we have in the jars. Flakes will work but it will take about 2 cups of those and you will need to add seasoning. Potato pearls are already pretty buttery and have a good flavor. They don't have as long a shelf life as other potatoes, thus the 3 years instead of 7-10 as we've had with other meals. 
Place the pearls in the baggie while it is in the jar and add the butter powder and the garlic.  You can find these at the Honeyville retail stores but not at their online store. 

Seal up the bag and then put an oxygen absorber at the top of the jar, being sure it is inside the jar and not at all on the rim.  Oxygen absorbers need to be done all at once at the very end of packing since once you open the package of absorbers, they start chemically bonding with air. They are a ONE TIME use. Once they've done their job, the make a dramatic-swooning exit and will never be alive again. So...plan accordingly. They need to be packed within 20 min to an hour of opening the bag from whence they came. Swoon. Swoon. Top with a new clean lid and tighten the canning ring as tight as you can. In about an hour, the jar lid will pop, letting you know a vacuum has been achieved. 
To prepare the meal:
Carefully remove the bag of potato pearls by opening the bag and emptying a little into a 2-quart metal bowl and then easing the baggie out of the jar. Pour the entire contents of the potato baggie into the bowl.  
Pour the gravy mixture into a 2-quart pot. Add 4 cups of very hot water to the gravy mix. Whisk well.  Place on a stove and bring to a simmer 15-20 minutes. Turn off the heat and leave covered 5 additional minutes. While the gravy sits, heat 3 cups of water in a separate pan. Bring the water to a boil and pour into the potatoes, stirring well. 
Scoop potatoes onto a plate and top with the hot, chunky, meaty, luscious, savory, divine-ambrosia of beef...Pass out. Wake up with mashed potato on your face and some beef in your eyebrow hairs. Mmm. Pretty.

If you decide to use a fork, it's probably better, but I think it would be very manly and cool to just stick your face into that pile of gravy-stuff and freestyle.  Oh dear. Ladies, however, can be delicate if they desire. {Picture me with a very delicate-looking expression on my face...right below the chunks of beef in my eyebrows. Twitching. }

3. There you go!  Enjoy. 
4. How many calories?  365 calories a serving (1 cup potatoes, 1 cup gravy) 

Share these recipes with your friend! Get the word out that they are here!  PLEASE...make sure my name stays with the recipes.  Try to think how it would feel if you had worked on the recipes yourself. You'd want not only the credit, but also a way for people to contact you if they had questions. I ask you to please be mindful of that. Plus, they are my copy-written work and that is just the law. Thanks.


Always My Very Best,
Your Friend Chef Tess


Tuesday, March 27, 2012

White Chicken Chili Verde...Meal in a Jar (52 Method Continues)


This is a new one! How can a jar, packed with dry ingredients (including beans and real chicken!) be shelf stable 7-10 years and...
 ...end up looking like this in 20-25 minutes?  I didn't even have to cook the meat or anything! Savory with a hint of lime juice, green chiles, and lean white meat chicken. It's a hearty satisfying meal that will stick with you for a while. Add to that the fact that it's also very low fat and freak! Freak! Freak! I'm a totally happy girl!

My  Meals in a jar will be the theme all week! So, if you like what you  see, plan on visiting all week. I'll try to have at least 4 new posts up this week with new recipes and some that I've re-vised to be more natural and user-friendly. If you are new to the meals in a jar, go here and get some details on how the meals are done as well as the basic safety guidelines. If your scroll through the rest of the  posts, there are a lot more recipes, ideas, and helpful tips when making the meals. I answer a lot of questions in the comment sections as well. If I had to re-cap each detail in each  new post, it would take a lot of time and space. So. That being said there are a few things I will always re-cap in each post.

1. You will be using a method some have called "dry pack canning" but it's actually called Vacuum packing. No liquid or pressure canning is necessary. If you opt to use the freeze dried meat in the recipes  NOTE: The repacking of Freeze Dried Meat must be done within 24-48 hours of opening the can and must be done in a dry environment. Once repacked you must use an oxygen absorber to make sure there is a vacuum oxygen-free environment. I recommend using a 300 cc oxygen absorber for each jar. This will make the vacuum packing effective. You can use a Food Saver with a jar attachment for this in place of the oxygen absorber but will need to make sure your machine is designed to be used with the jar attachment. Some of the food Savers are called "meal savers" and are actually not designed to use with the attachment. I called the FoodSaver company myself to be sure that the attachment I had was right for the machine I was using

2. You can also pack in mylar bags (the ones that are silver-colored), but again need to use the oxygen absorber. This size I use is designed to absorb a gallon size amount of air, but I'd rather err on the side of over-vacuum than not enough. No. You can't use the foodSaver clear plastic bags for long term storage. They are not designed for that purpose. When I say "long term" I'm talking 3-5 years. 

3. Enjoy. Share these recipes with your friend! Get the word out that they are here!  PLEASE...make sure my name stays with the recipes.  Try to think how it would feel if you had worked on the recipes yourself. You'd want not only the credit, but also a way for people to contact you if they had questions. I ask you to please be mindful of that. Plus, they are my copy-written work and that is just the law. Thanks. 

Today I'm sharing my newest recipe for White Chicken Chili Verde!
Troy at Preparing Wisely in Mesa, AZ had these quick cook Whole navy beans in the store. I was so excited to see them! I know I'm a food storage geek when I squeal in a store over beans. For the record, Troy still can't hear out of his left ear. I bought two cans of them a week ago and have enjoyed playing with them in my recipes. I'm totally impressed with how firm and perfect the little beans turn out when cooked. Yes, they also only take 20 minutes to cook so they're perfect for the meal-in-a-jar scenario. 


Here's what they look like in the can. 
 If you want to make your own quick cook beans from beans you have on-hand, see my tutorial here.  One thing Troy also had was Freeze Dried Green Chiles! Holy cow! That's awesome! My brain just started thinking of all the recipes I use every day that call for those little bad-boy green chiles of love. Oh so stinkin' excited! They are made by THRIVE and yes, no added chemicals or preservative.  
I've used Chicken bullion in a few of my recipes. The one I prefer is called HACO chicken base because it is vegetable based, lower in salt and has no MSG. It's also got a really good flavor. It costs more than the big brown jars...but the flavor is remarkably better. To me, it's worth the extra cost because of how much better it tastes. 
 The Green chiles are pretty fine chopped, but also don't have the seeds, so the heat is a lot lower than if they were packed with their seeds.  You may need to make the recipe once and see if you need to adjust your heat level.  
Chef Tess' White Chicken Chili Verde in a Jar
2 cups quick cook white navy beans
1 cup Freeze Dried Chicken
1/2 cup Freeze dried diced green chilies
1/2 cup dehydrated onion
1/4 Freeze Dried Celery (dehydrated will work, I just prefer the flavor of the freeze-dried here)
1tsp HACO chicken base
1T Lime Juice Powder 
1T Chef Tess Southwest Fajita Seasoning
Jar Directions: Layer ingredients in a wide mouth quart size mason jar, top with an oxygen absorber (note that oxygen absorbers need to be sealed within 20 minutes of opening the package so that they will still absorb air in your jar!). 
To prepare: Combine the contents of the jar with 6-7 cups of water, depending on how thick or thin you like your chili. Simmer in a 3 quart heavy pot, 20-25 minutes until beans are tender. Yield 6 cups hearty chili.

Garnish with fresh cilantro if desired. It's also amazing with avocado, cheese, and sour cream!

There you go. White Chicken Chili in a Jar! 


I'm a fan of the nutritional content as well. This one yields about 7 cups of hearty chili. That's 4 servings (1 3/4 cup each). Each serving gives you 240 lean calories, 28 grams of fiber, 2.5 grams of fat and 110mg of sodium. 

Always My Very Best,
Your Friend Chef Tess


Monday, March 26, 2012

Polynesian Sweet and Sour Chicken Baked Beans (52 Method Continues)


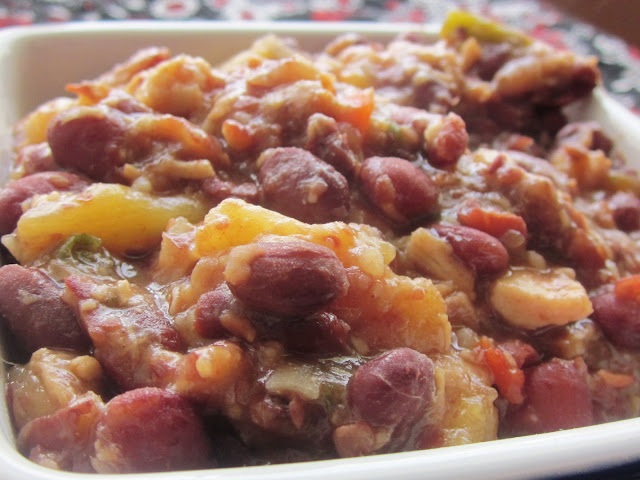
 Today I'm sharing my newest recipe for Polynesian Sweet and Sour Chicken baked beans.  The original recipe on my blog is here ( using the solar oven to bake them).   The jar recipe is different. It cooks on the stove in 20-25 minutes and looks and tastes um...(what's the word?)...pretty! Colorful! Delightful! It has a sweet, sour, tangy, luscious, slightly peppery sauce. I love the sweet chunks of pineapple with the fresh taste of the peppers, garlic and onions. The chicken is chunky and firm. The beans are perfectly tender. Serve it over rice and it's a "topper" or serve it with a chunk of sweet homemade Maori Bread

My  Meals in a jar will be new all week! So, if you like what you  see, plan on visiting all week. I'll try to have at least 4 new posts up this week with new recipes and some that I've revised to be more natural and user-friendly. If you are new to the meals in a jar, go here and get some details on how the meals are done as well as the basic safety guidelines. If your scroll through the rest of the  posts, there are a lot more recipes, ideas, and helpful tips when making the meals. I answer a lot of questions in the comment sections as well. If I had to re-cap each detail in each new post, it would take a lot of time and space. So. That being said there are a few things I will always re-cap in each post.

1. You will be using a method some have called "dry pack canning" but it's actually called Vacuum packing. No liquid or pressure canning is necessary. If you opt to use the freeze dried meat in the recipes  NOTE: The repacking of Freeze Dried Meat must be done within 24-48 hours of opening the can and must be done in a dry environment. Once repacked you must use an oxygen absorber to make sure there is a vacuum oxygen free environment. I recommend using a 300 cc oxygen absorber for each jar. This will make the vacuum packing effective. You can use a food Saver with a jar attachment for this in place of the oxygen absorber, but will need to make sure your machine is designed to be used with the jar attachment. Some of the food Savers are called "meal savers" and are actually not designed to use with the attachment. I called the FoodSaver company myself to be sure that the attachment I had was right for the machine I was using. Thanks Mom (yes my mother bought me one!) for the big FoodSaver! I love it!! It's shiny and silver and fun, fun, fun! Yes. I'm planning on doing a tutorial on making the jars with one! 


2. You can also pack in mylar bags (the ones that are silver-colored), but again need to use the oxygen absorber. This size I use is designed to absorb a gallon size amount of air, but I'd rather err on the side of over-vacuum than not enough. No. You can't use the foodSaver clear plastic bags for long term storage. They are not designed for that purpose. When I say "long term" I'm talking 3-5 years. 


3. Enjoy. Share these recipes with your friend! Get the word out that they are here!  PLEASE...make sure my name stays with the recipes.  Try to think how it would feel if you had worked on the recipes yourself. You'd want not only the credit, but also a way for people to contact you if they had questions. I ask you to please be mindful of that. Plus, they are my copy-written work and that is just the law. Thanks. 


Preparing Wisely in Mesa, AZ had these quick cook Whole navy beans in the store. I was so excited to see them and use them! I bought two cans of them a week ago and have enjoyed playing with them in my recipes. I'm totally impressed with how firm and perfect the little beans turn out when cooked. Yes, they also only take 20 minutes to cook so they're perfect for the meal-in-a-jar scenario. 
 When I  the white beans to make the Polynesian sweet and sour chicken baked beans...they looked awesome. They tasted awesome. I'm a fan. 

 I got a few new things to play with for my meals in a jar too.  dehydrated Jalapeno, dehydrated minced garlic  Golden Balsamic Vinegar Powder and   NOH terriyaki powder in a bulk bag. I also use ultra gel and dehydrated honey in this recipe. Honeyville  carries the ultra gel and dehydrated honey in their retail stores but not their online store. 


Polynesian Sweet and Sour Chicken Baked Beans in a Jar 
2 cups Quick Cook Red Beans or Quick cook Navy Beans
1/4 cup Dehydrated onion 
1/2 Cup freeze dried  bell peppers Freeze Dried Bell Peppers
1/2 cup Freeze Dried Pineapple
1/4 cup  NOH terriyaki powder ( get packets here OR 1/4 cup seasoning from the bulk bag)
1/4 cup dehydrated honey 
1 tsp dehydrated Jalapeno (optional)
2T Ultra gel OR cornstarch

Jar Directions: Put ingredients in a WIDE mouth quart jar, shaking the powdered ingredients in before adding the bell pepper and pineapple. Top with a 300 cc oxygen absorber and a new canning lid.  
The re-use of canning lids from wet packed goods like jams and fruit is not recommended by the jar companies, as a vacuum seal can't be guaranteed. I actually asked the experts at our local extension office about that! They said that anywhere we wanted to ensure a good seal, to NEVER re-use the lids from wet canned items. Again, if you use a FoodSaver with the jar attachment, make sure it is for the jar you are using and that the machine is not a "mealsaver" but the actual FoodSaver machine with the attachment port.  This meal will be shelf stable 5-7 years. 

To prepare the meal: 
Add 5 cups of water and simmer on low for 30 minutes. Solar cooker, same amount of time in direct sunlight.

There you go! 
Make sure my name stays with the picture if you do decide to share it or  

Come back soon for more! I'll be here all week. 

Always My Very Best, 
Your Friend Chef Tess

If you share, be sure you have my name in the description when you .