Showing posts with label herbs. Show all posts

Friday, July 20, 2012

Do You Know about Purslane Salad and the Omega's in your weeds?


There has been a lot written lately on using Purslane As Food. This is what Purslane looks like my darlings. Have you been pulling it from your garden and throwing it away? Well...have you?
The new trend it to actually plant Purslane for Omega 3′s in your garden! Who knew? Once a weed, now a healthy garden green. It is actually really unique in flavor and delightful!  When the owner of Harper's Nursury  (John Harper) here in Arizona asked me to share my fabulous  Purslane Recipe with his readers I was excited! Today we went on down and picked some purslane up from their nursury. Every time we are there at Harper's, my boys insist on feeding the dolphins goldfish in their pond. It is amazing how big those bad-boys are! The fish...not my kids.
 One of them actually comes out of the water and is almost on the land when one of us comes to the edge.
 While I was there I also noticed the 7 varieties of basil that they had! Wow!! In light of the fact that I'm teaching a herb and spice class tomorrow at Honeyville farms on the the medicinal and culinary uses of herbs and spices...this was just awesome to see!

Look at this basil!


Shall we make Thai food tonight?!
I'll probably save it for the class tomorrow and be giving some of them away!
 Between the gorgous herbs at Harper's and the Love Grow's Farms organic veggies...we're good to go!
 Here is my Purslane Recipe

Chef Tess’ Citrus-Mustard Grilled Zucchini Salad with Purslane and Tomatoes
 • 2 teaspoon finely grated fresh lemon zest
• 1 tsp orange zest
• ¼ c fresh lemon juice
• 1 tablespoon finely chopped shallot
• 1 tsp Dijon mustard
• 1/2 teaspoon salt
• 1/3 cup extra-virgin olive oil plus additional for brushing zucchini
• 1/4 teaspoon black pepper
• 3 tablespoons chopped fresh flat-leaf parsley
• 4 zucchini (1 3/4 to 2 lb total), halved lengthwise
• 12 oz purslane, thick stems removed (4 cups)
• 10 oz pear or cherry tomatoes, halved lengthwise

Make dressing:
Whisk together zest, lemon juice, shallot, mustard, and salt in a small bowl. Add oil in a slow stream, whisking until dressing is emulsified. Whisk in pepper and parsley.
Grill zucchini:
Lightly brush zucchini all over with oil. When fire is hot (you can hold your hand 5 inches above rack for 1 to 2 seconds), grill zucchini, cut sides down first, on lightly oiled grill rack, uncovered, turning once, until zucchini are just tender, 8 to 12 minutes total. Transfer to a cutting board and cool slightly, then cut diagonally into 1/2-inch-thick slices.
Toss zucchini with purslane, tomatoes, and dressing in a large bowl. Serve immediately.

There you go! Make some weed purslane salad! Isn't it cool to try new things?!

Always My Very Best,
Your Friend Chef Tess

Thursday, April 19, 2012

Savory 10 grain, Quinoa and Herb French Onion Muffins


My friend Stephanie F. made some quinoa muffins for me to taste recently and I loved the idea of making a whole grain muffin using cooked quinoa in the batter so much! The little chewy pieces in the muffins add a great chewy texture as well as a great amount of complete protein and fiber. So. Thank you darling Stephanie's for the idea!  I decided to use some cooked quinoa (How to Cook Quinoa Tutorial) and some of my homemade French Onion Soup Mix to prepare some rather righteous muffins (If I do say so myself). They're lightly sweet but have just the right balance of hearty grain and onion. You get just a hint of French herbs when you make the soup mix with Herbs de Provence instead of parsley. I always make it that way. 

Serve them hot with crisp cool salad or a bowl of soup and you'll be happy. I promise. I can also promise that Ace ate 5 muffins in one sitting and had so much fiber that he...um...never-mind. 
Chef Tess 
Savory 10 Grain, Quinoa and Herb French Onion Muffins
3 cup Chef Tess 9 Grain All Purpose Baking Mix
1/2 cup granulated erythritol (zero calorie natural sweetener)
2 cup cooked quinoa (measure one cup after cooking)
1/4 cup homemade  French Onion Soup Mix 
1 1/3 cup water
2T garlic or lemon infused olive oil
1/2 tsp  Chef Tess Romantic Italian Seasoning

Directions:  Preheat oven to 350 degrees. Combine baking mix, erythritol, cooked quinoa and onion soup mix in a quart size bowl.  Add water and mix just until combined. Scoop into oiled muffin tins, each muffin 3/4 way. Bake in a hot even 20-25 minutes until golden brown and muffins spring back when touched gently. In a small bowl, combine olive oil and Chef Tess seasoning. Brush the tops of the muffins with the olive oil combination. Serve warm. Keep any left overs in the freezer for later use. 


There you go. Make some warm divine muffins of love and glory. Try not to pass out. 

Always My Very Best,
Your Friend Chef Tess

Saturday, August 27, 2011

Whole grain Kamut Bread with Teff and Black quinoa (Herb and Spice loaves 101)


Kamut Point. Right here.  If you have no idea what that word means...I'm going to give you the simple words:  Kamut is the ancient Khorasan variety of wheat. Now you're smart.  Kamut is 1/3 longer than regular wheat and high protein. Kamut is the name that is registed by the man who started farming it here in America back in the early 50's when his son sent him 32 grains of the wheat from Egypt where it was found, reportedly, in a tomb. It must be grown organically, have a protein range of 12-18%, be 99% free of contamination varieties of modern wheat and 98% free of all signs of disease. Even though this wheat variety contains gluten, it has been found to be more easily digested by people with slight allergic tendencies to modern wheat. Excellent for making pasta and bread because of that protein! So I use it for bread on a regular basis. It's remarkably awesome!

Whole grain bread need not be dry, lifeless and flavorless. On the contrary! It should be boldly going where you mouth is and full of so many grains that they sing and dance on the surface of the loaf! So...I added Teff. Teff is a grain the comes to us from Ethiopia.  It takes 150 grains of teff to equal one grain of wheat in size. So they're small...yet they pack a nutritional punch! Lots of fiber as you can well imagine. 2 grams per ounce of grain (That's almost 10% of your daily  needs in one ounce baby!). Plus...there's a high amount of quality protein and a good source of iron, magnesium, phosphorus and copper. For more nutritional facts on Teff, look here .   
I also added some cooked black Quinoa. I used it yesterday in the cool salad Here
Today I'm going to show you how to take a magnificent dough like this and transform the flavor of almost any loaf INSTANTLY by rolling in herbs, spices, nuts, seeds...basically anything you want! It's remarkable! I think you'll fall out of your seat...if you are cool and baker-like.


 Whole Grain Kamut bread with Teff  and black Quinoa


2 tsp active dry yeast
1/2 cup cool water (not cold, but cool to the touch)

 5 Cups Kamut® flour
1/3 cup whole grain teff
2/3 cup cooked black quinoa 
2 tsp salt


2 1/4 cup lukewarm water
2 T honey
1/4 cup oil


Flavor agents:
2T lemon zest (Optional)
1T fennel seed (Optional)
Black pepper to taste (optional)

Directions:Dissolve the yeast in the 1/2 cup warm water. Mix the flour and salt in a large bowl make a well in the mixture. Dissolve the honey in the 2 1/4 cup water and add the oil of your choice. Pour the liquid and the yeast mixture into the well of flour. Stirring from the center, first combine the ingredients to make a smooth batter, then fold in the remaining flour from the sides of the bowl, mixing them together into a soft dough. Soft dough is the key!! Add the teff and quinoa. Since the whole grain flour takes a while to absorb water, wait 10 minutes--then evaluate the dough. Add water or flour if more is required, but do this slowly as it will probably take less flour than you think. If you want really good bread--best keeping quality, flavor, and rise--knead the dough about 600 strokes without adding any more flour. The dough should remain soft and should become elastic and smooth. Rest whenever you want, but aim for 600 strokes. This is about 6 minutes on medium speed in a Kitchen-Aid mixer. This may seem like an amazing and outrageous requirement, but after many hundreds of loaves, I'm convinced that thorough kneading makes the critical difference. As you continue to work the dough, toward the end of the kneading, it will become lustrous, utterly supple and elastic. It should actually be white if you look closely, with brown bran flecks clearly visible against pale gluten. Form the dough into a ball and put in an un-greased crock or food grade food storage bucket. Cover tightly with plastic wrap or a lid and allow to ferment. At about 80 degrees, this will take 1 1/2 hours to 2 hours. Wet your finger and poke it into the dough (called the ripe test). If your finger goes in without very much resistance and the hole remains when your finger is removed, the dough is ready to be punched down. For best results, do not wait until it sighs and collapses when poked. Gently press out the accumulated gas. Turn the dough out onto a lightly floured table and keeping the smooth surface, carefully unbroken, deflate the dough by pressing it with wet or floury hand from one side to another.
 Turn the dough out onto a lightly moistened table (yes I use water instead of flour at this point. It keeps the dough moist!) keeping the smooth surface, carefully unbroken, deflate the dough by pressing it with wet  hand from one side to another. Cut it in half and form each part gently int a round ball, still preserving the smooth surface on the outside. Roll dough into a rectangle and fold into thirds.  Now...this is where I get creative. Today I made the bread into a lemon fennel bread by adding a tablespoon of fresh lemon zest and 1 1/2 tsp of fennel seed at this stage. 
I gently press the flavor agents into the dough.
Then I form the loaf accordingly...in thirds.


Roll, pinch, and form into a loaf. Place in greased loaf pan (standard size only! 8inch by 4 inch--or loaves will be squat-ty). Loaves should take 35-45 minutes for their final rise (called proof)--I cover them with a loose gallon size bag. Make sure the surface doesn't get dry or the top crust will separate from the loaf when baking. I gently drizzled this loaf with lemon infused olive oil and sprinkled the top with more fennel and lemon zest.  
I made some plain bread, some with fresh Herbes de Provence and sea salt as well. You can make any kind of bread from a plain dough using this method! Again, be sure to cover and let raise until doubled before baking.
Preheat oven to 425 degrees. When oven is hot and only then, place loaves in the oven. If all has gone well, the loaves will arch over the top of the pan, touching the sides all the way up! The dough feels spongy but not soggy. Place in hot oven. After 15 minutes, reduce heat to 325 degrees for 30-35 minutes, until internal temperature is over 175 degrees (can be measured with a chef style meat thermometer). Allow to cool before placing in a bag. Keeps 3-4 days if you kept the dough soft.


There you go. One crazy cool idea from a crazy cool chef! 
Let me know how your bread is coming along folks! I'd love to help in any way I can! Look at some of my other bread basics here:


basic bread recipe 
5 day bread dough


freezer rolls {and doughs}


There you go.
Your friend, 
Chef Tess

Wednesday, April 20, 2011

Culinary Herb and Spice Remedies 101 (The Alchemy behind the flavors)


Last week I taught an herb and spice alchemy class at Preparing Wisely in Mesa, Arizona and promised to share a few of the things I would be teaching my students during the class here on the blog for the people around the world who obviously couldn't attend.  It was pretty comprehensive and full of great recipes on matching spices and herbs to complement ethnic flavors. If you want to read more about those recipes go here. The other side of the class was the whole medicinal use of culinary herbs in food.  

I think a lot of times this "herb and spice" side of eating is completely  misunderstood as just perhaps a "flavoring".  Adding herbs and spices traditionally was not only for flavor, but also for health.  I hope today I can share some of the bare basic homeopathic uses for some of the most common culinary spices and herbs. These are probably remedies your great grandmother used long before there were modern medicines. None of these statements have been reviewed by the FDA. FYI. That's not saying that they don't work, it's just saying they are not tested yet.

  For general information, I store my spices whole and grind them fresh so I don't lose any of the essential oils or nutritional value of the spices. I keep them in a cool dark place in non-porous glass containers. I also grow my own herbs organically in my garden.  The pictures you see, are all my own.  Seriously, these are the short descriptions. This is also a short list. There are many herb and spices not listed.  There are long books on this subject so I'm just scratching the surface here.  Shall we begin then? We'll start with Spices, the seeds and barks of edible aromatic plants. Then we'll move on to the herbs (leaves, stems and flowers).
Spices 
 Allspice. It is a sweet spice generally used in cakes, cookies and desserts.
 The natural oil is used topically as a pain reliever and the powder is an antioxidant with what is believed to be antic-cancer action.
 Cardamom seed— A sweet  spice with lemon notes.  I use it often when I mill my flour. It adds a light fresh taste to pastry and cakes. It is also used in many Indian dishes.  Medicinally  it is favored as a carminative  to ease digestive gas, cramping and flatulence.
Clove--Sweet Spice  used in desserts and in some sauces. Medicinally— essential oil used as an aromatic and pain suppressant (I used it sparingly on teething baby and it worked) , antiseptic, powder to alleviate vomiting (antispasmodic)
 Nutmeg--Sweet spice used in cakes, pastries, and some sauces. Medicinally used as an —antispasmodic, anti-inflammatory, digestive aid, gastric stimulant, prevent vomiting, and help boost appetite.
 Cinnamon--Sweet Spice used in desserts, cakes, pastries and teas. Medicinally used as a digestive aid , antiseptic, uterine stimulant (cramps), help regulate blood sugar levels in diabetics.
 Dill Seed---from the dill weed plant Weee! This actually happened in my garden folks. I loved seeing the dill go to seed. Licorice notes used in pickles, sauces and many ethnic dishes. Medicinally the seeds are used mashed and then infused for stomach ills, colic, diarrhea, anti-bacteria, and a carminative. I actually used mashed dill seed infused in a tea  and then strained and cooled for my colic babies and it helped immensely.
Fennel seed used in sweet cakes  and savory applications like fennel sausage with a  pronounced licorice note.  Medicinally it is used for colic,as a digestive aid, to normalize appetite, as a liver cleanser,  to reduce uric acid and to soothes gout.
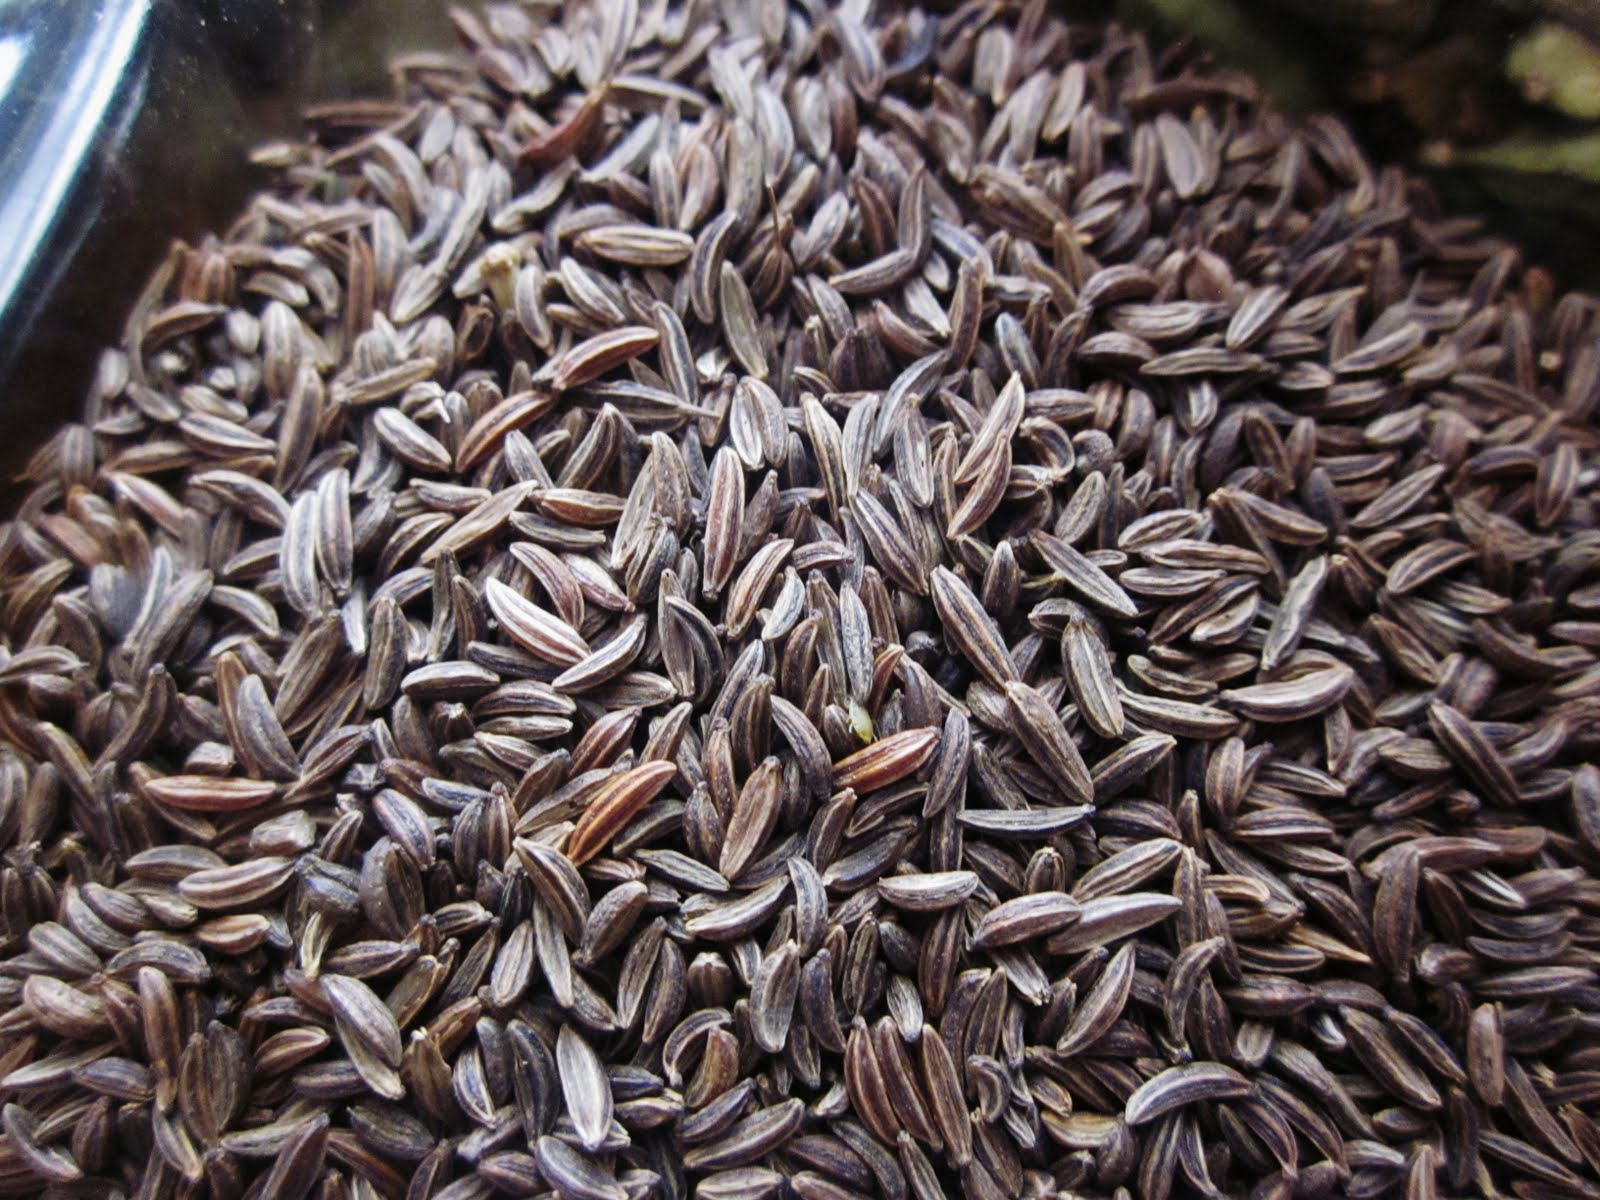
 Coriander Seed used ground in Spanish, Indian  and Oriental cooking with heavy lemon notes. It is the seed that produced the fresh herb cilantro!—Medicinally it is used for it's properties as an antioxidant, anti-inflammatory, anti-bacterial, digestive aid, colic, joint pain reliever.
 This is my cilantro that went to seed. Yes folks. I did grow my own coriander this year too! How cool is that?

 Caraway seed gives rye bread it's distinct flavor and is also often used in sauerkraut. Medicinally it is a stimulating expectorant for congestion, antispasmodic, digestive stimulant, and the oil is an antiseptic.
 Black Pepper is used ground  in savory dishes and breads.  Medicinally it's used for coughs, heartburn and indigestion, toothache and canker sores.
 Cumin seeds  used ground. When you smell it you'll think, "Mexican food". Medicinally they are good carminatives which help to relieve abdominal distension. It helps to digest food and improve peristalsis. Another use which is very rarely known is that it helps to minimize the abdominal pain during menstrual periods when consumed for 2 weeks prior to the date of menstruation. It is good to consume with warm water. Read more: here

 Herbs

Tarragon is used in sauces and breads most often in French cooking. I think it's one of the Kings of herbs. I can't list all it's medical uses but it's often used as a diuretic, antidepressant, to promote appetite, fight fatigue, calm nerves, and has been used to aid sleep as a mild sedative. Read more about it here.
Rosemary is used in sauces, soups and teas. Most often in Italian and Greek cooking but also French. It couples great with chicken and is often one of the first ingredients in poultry seasoning (or chicken soup). It is used medicinally antispasmodic, relaxant, stimulant to circulation and nerves, cardiac tonic.
 Thyme used in sauces, soups and poultry. Medicinally it's used as a uterine stimulant, antiseptic, expectorant, diuretic, antibiotic, astringent
Dill used for salads and in Greek and French cooking. It also makes the most amazing  Cottage Dill Bread. Medicinally it's used  for stomach ills, colic, diarrhea, anti-bacteria, and a carminative.

Oregano used in sauces, soups and salads most often in Italian, French, and Mexican dishes. 
Medicinally:
To soothe colic, make a tea, leave to cool, then strain the herb to leave a clear liquid. Feed the baby a little
at a time. Try the same preparation for to relieve coughs in adults. Additionally, prevent or relieve a heavy chest by eating lots of oregano at key times. Hay fever sufferers may find some relief by sprinkling the dried herb on salads, whilst eating oregano in winter dishes can help loosen phlegm during the long months of the common cold. 
I use Oil of Oregano in my olive oil for dressings and also as a supplement in gel caps.It is one of the strongest and most effective broad spectrum antibiotics known to man. It is natural and safe to use. It will not create more mutant strains of bacteria. It effectively kills bacteria of every variety using only tiny amounts. It is also effective against fungus, parasites and viruses. More on that to come but I'm seriously happy I won these  Essential Oils  from Joni Lang during a Giveaway at Identity magazine. I'm so blessed that I  have been able to use them!  More to come on these. 


 Parsley  is used fresh to impart new life and flavor to dry herbs (add at the end of cooking just before serving). Fresh parsley is loaded with LIFE! Medicinally it is used for—Kidney and bladder problems, anticancer properties, antioxidants,  stimulate the nervous system, adrenals, and liver function. It's also good for killing bad breath...but that's just a side note.
Basil most famously used in pesto and Italian cooking but also used in French and Oriental cooking.
 Medicinally it is used as an antiseptic and antidepressant. It restores and calms.


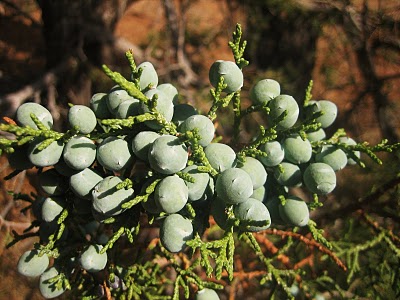
Juniper Berries used in mulling spices, pickling spices and some savory spice blends.
 Probably most famous from my post on using Pine Cones for Dinner! ha! This is what they look like on the tree. When they dry they will be a deep almost black purple. Medicinally they help with a kidney cleanse, removing blood toxins, destroying fungi,  improving the optic nerves, brain function, easing colic
and  easing digestion.


 I did a great post on the Edible Flowers of the Sonora Desert. Edible flowers are also in the "herb" category and have to share my two favorites. I use them often as a hint of flavor but many don't realize that I am also using them relax and sooth my guests. I'm most famous for using my lavender and rose petal in my Wise Woman of the East Spice Blend to add sophistication and vintage charm to pastries and desserts. It's used anywhere one would use cinnamon. Seriously though...it's also a nerve tonic. It will make you happy. See...and you thought it just tasted good. BE sure you use FOOD GRADE flowers only. Many of the "craft store" branded flowers have been treated with chemicals that are harmful for human consumption.  If you don't grow your own I've been know to  get mine at Penzey' or a local health food store that carries herbs called The Good Apple.
 Lavender flowers used aromatically and also ground in desserts and some French cooking. I adore it in Tapioca. Medicinally it is used as a relaxant, antispasmodic, circulatory stimulant, diuretic, nerve tonic, uterine stimulant. 

Rose Petal  used in desserts, frostings and aromatherapy. Medicinally used as an antidepressant, calming sedative, digestive aid , aniti-inflamitory,  and anti-viral agent.

Like I said before, this isn't a complete list, not even by a long shot. I do hope however that it has given you some good ammunition when facing herbs and spices in the homeopathic world. It's really quite exciting to think that those amazing flavors can actually help heal and bless the lives of those you love. It's not just food...it's a whole healing art.

There you go.

Thursday, April 7, 2011

Cottage Dill Corn and Millet Sourdough Bread (100% whole grain and sugar free)


 Cottage Cheese Dill rolls are and will forever be my first love when it comes to dinner rolls and what brought me to my obsessive compulsive need to have bread in my life...and to the love and dear friendship of Tara  ...my Evil Twin. I have many things to say about her. All good.  In culinary school I also met this stuff. My sheltered life. Tarragon. Who knew? It took school for me to know what this little herb was. 

 So, don't feel oddly if you have not ever met my friend Millet. He's a cutie, but he's not very well known in America if you're not a bird lover. It's sad really. Such a lovely grain should get more attention...affection...praise...perhaps a wall sconce in it's honor? Is that too Martha Stewart? How do you make a millet wall sconce anyway? What the carp is a wall sconce?!
 I digress. So. In my garden I have a freak-fest of this crazy dill. It's taller than me. Literally over my head. It's actually getting to be kind of epic. I might start a whole Star Trek episode in it's honor...because every time my son sees it he says, "By captain Kirk's Nipple's! It's incredible!"  You all needed to know that.
 Yes...that is my neighbor's roof...and my dill.

 The last time I went to be on  Valley Dish I was so desperate  eager to share the love that I took  some to the studio.
Decidedly it was time to start drying some of the epic mount of dill weed...and start baking. So, here we go.


Cottage Dill Millet Sourdough Bread 
with Onion and Garlic
1/4 tsp yeast (optional)
1/2 cup cold water 
1 1/3cups whole wheat Prairie Gold bread flour
2/3 cup Hulled Millet  
1/2 tsp  Real Sea Salt  
Combine all ingredients in an 8 cup mixing bowl (non metal works best)...about 5 minutes. Cover and leave in a cool room until you are ready to bake the bread, 12-18 hours. If you will be leaving it for more than 18 hours, it may be stored in the fridge part of the time, or stir after 8 hours. This will keep the yeast happy, moving it to greener pastures and evaporate any alcohol produced by the fermentation process that would otherwise hurt the yeast's ability to raise the bread.
After 12-18 hours it will be really puffy and smell like a good yeasty bread dough. Remember to keep it rather cool during this overnight period.


Get out your liquid measuring cup...the one that is clear with writing on the side. You will also need a measuring spoon. The ones made with writing on them for baking, not just the flowers or whatever on your silver spoons...


To your bucket or bowl add 1 cup Luke warm water, 1 cup cottage cheese 2 T honey and 2 tsp yeast (optional). Note: if you omit the yeast, it will take the dough about 12 hours to raise.


Put that sponge you started 12-18 hours ago in the bowl.
 Wash your hands. Now don't be scared. You will have to touch the dough. Actually you will have to really get in there and mix it up with your fingers. Break it down.


This may be my favorite part.
Woosh it around (very technical term I know) until it is smooth and batter-like. Yea. Batter-like is a word.
Now get out your whole wheat bread flour I use Prairie Gold wheat from Wheat Montana. It is by far my favorite bread wheat and flour. I don't even work for them. I grind my own (Flour making day...flour power.), but you can buy it. As long as it is fresh.Here's a peek into my flour bin. We're gettin' a little low...
Don't mock me, but I am going to show how to measure flour. Someone asked me and I don't want to assume too much of anyone reading my blog. If you are seeing this for the first time, I'm glad to help. The rest of you can just sit tight and humor me. I love everyone wherever they are in the learning process here. So here's how it's done:
Lightly scoop up the flour...don't bang it or try to pack it in there.

Get a butter knife.
Set it up on it's spine so the blade is pointed up:

Hold it flush to the top of the measuring cup and push off the extra flour so it is flat:

Like this. See?

Add 3 cups whole wheat bread flour, 1 cup cornmeal,  and 1/4 cup oil (preferably expelled pressed or extra virgin) and 2 tsp salt, 1/4 cup dry minced onion, 2 T minced dill, 1T minced tarragon, 1/2 tsp fresh cracked pepper
 1 1/2 tsp fresh pressed garlic, about 1 large clove


 The dough should take only 10 minutes of efficient kneading to attain supple perfection--600 strokes by hand. Form into a ball. This makes a balloon like structure that helps hold in the fermenting gasses and helps the texture of the bread. Place in bowl smooth side up.

(From here on I'm using a few older pictures...)
Then I lightly spray the top of the dough with water. This helps it to stay moist, which ensures no lumps of crusty dough in my bread, just a nice even dough.

Keep that spray bottle around too. I use it a few times during bread making.


Get it pretty wet. Look how shiny. Oooo. I'm easily entertained.


Cover with plastic wrap and allow to raise at room temperature (75-80 degrees) about 1 and 1/2 hours. Sometimes it takes 2 hours if the room is cold. It helps to measure the temperature of the dough if you want to be sure. This can be done with a meat thermometer. This one was right at 85 degrees internal temperature so it took almost exactly 1 and a half hours. If it is cooler it will take longer.


It has raised about 2 inches from the top of the bowl. See the tiny belly button dot where I poked it with a meat thermometer?

When you just can't resist it anymore, go ahead and giggle and poke it with your finger.

If you don't have to use much effort, it gets those creases right around your finger, and it leaves a hole when you remove your finger, then it is ready to punch in the head.

So, punch it down already. Expel as much air as possible. This moves the yeast to greener pastures, releases trapped alcohol, and evens out the dough temperature. It's not just for the fun of punching something (though it is elating to punch something sometimes).


Reform into a ball and place back into the bowl. Spray with water again and cover with plastic. Allow to raise again. This time it should take about 1 hours. Less if your house is warm.


I had to show how the gluten strands are showing here. It's really something wild to see...

Like an alien in my kitchen...that we eat. Toasted. Mmm. Alien...

Okay, so cover the ET blob with plastic. In the meantime, lightly oil 2 standard size loaf pans. I also lightly coat them with a little cornmeal. I use 8inch by 4 inch almost without exception. This size makes great shaped loaves (see:Sandwich Loaf Molding and baking for more details on this phenomenon).


Once the dough has risen to within 2 inches of the top of the bowl again, or passes the finger poke test (yea, I know, not again a technical term). The actual technical term is the "ripe test". Just poke it. It works...
Take the dough out of the bowl and place on a clean counter top that has been lightly misted with WATER.

Why did this picture just make me giggle with joy? I'm either really nuts or really love bread. Not sure which... Please look at this and find joy...
Mmm. Dough. Okay. Now get giddy crazy and divide the dough in half. It should look like this if you get on your knees and peek up over the edge of your countertop...

Now go here: Sandwhich Loaf Molding and baking . It will lead you in all things right and good with makig this bread into a sandwich loaf. Go ahead now. Don't be scared. I will still hold your hand and walk with you.

The killer delight is the millet nibbles. They just make me giddy. Oh millet. I love theeeeeeee.

Look at all that crusty delightfulness. Don't you just want to make some right now?!

There you go.