Showing posts with label grab-n-go. Show all posts

Monday, March 11, 2013

Almond-pistachio breakfast nutri-bars. Grain-free, gluten-free, guilt-free


A while ago I shared my delicious healthy version of Homemade whole grain Nutri-bars for breakfast.  Since then, I've learned about some lovely gluten-free, grain-free options for making these bars that also make them lower glycemic, no sugar added and completely delicious. I don't miss the sugar.  I will admit, I do miss my sanity sometimes. 

 To my dear sister Auntie Em...these are for you! I could just picture her in her little car driving past the wind and waves of the Great Salt Lake while munching one of these in the morning...and it made me smile. It also made me terribly happy. Love you girlie. Love you.

Chef Tess' Almond-Pistachio Breakfast Nut-ri Bars 
 Ingredients:
1 3/4 cups Blanched Almond Flour
1/2 cup natural pistachio butter or almond butter

1/2 cup  granular erythritol
2 Eggs (vegan omit egg and use 1/2 cup water plus 1/2 tsp xanthan gum)
2 tsp vanilla bean paste
1/2 tsp salt

1 tsp xanthan gum 
1/2 tsp baking powder

1 cup naturally sweetened 100% fruit jam 


Directions:
Preheat Oven to 350 degrees. In a large bowl, combine dry ingredients. In a medium bowl, whisk together wet ingredients. Stir wet ingredients into dry mixture until thoroughly combined. 


I make my own fruit jam but you can easily use any low calorie sugar-free fruit jam, as long as it is really fruity.  
 Oh. Special shout-out to Superior Nut Company for the divine happiness of pistachio butter . Holy cow. I'm in love.  
 Take dough and roll out on a baker's mat or an oiled baking sheet. This is a half-sheet pan. 
 Roll into a rectangle, 16 inches by 20 inches.  Cut into 4 sections, 5 inches by 16 inches each. 
 Very gently ease a long cake-spatula under the edge of the cookie and roll it over the filling, just overlapping the two sides by about half an inch. This always makes me break into singing "Roll-roll-roll your boat"...and I'm really weird. Merrily...Merrily...scarilly...scarilly...Chef Tess is insane...
Pinch them closed. cut in half. 
 Gently roll over so the logs are seam-side down. 
Bake 350 degrees 17-20 minutes. Allow to cool on the pan. 
Remove from pan and wrap for breakfast...or eat them all in one sitting. Whatever you want. 

There you go! Some awesome breakfast grabs for the very coolest ever! YOU! Onward and upward my darlings!!


Always My Very Best,
Your Friend Chef Tess

Tuesday, September 4, 2012

Personal Lunch or Dinner Meal in a Jar or Mylar. Peanut Sweet Potato Chicken Stew


Today marks day two of our week of meals in a jar or mylar for personal sized meals. I've done a lot of family sized meals on the blog noted as my 52 jar method initially. If you want to see how it is done, I'd suggest seeing the 52 jar method video tutorial for the jars. If you want to make shelf-stable bag meals, I'd suggest looking at the post on the 52 method mylar bags. Many of them are already in PDF format and can be found under the 52 Method Printables . I'm happy to report that the book is coming along nicely and the Gourmet Food Storage Handbook, by Chef Stephanie Petersen (yes that's me) will be out in December 2013. The second book, the meal in a jar handbook...is well underway and over half written. So, it will follow shortly thereafter. I'm personally hoping by May or June. Obviously, all this stuff takes time and effort. 


What about today's recipe then?
This recipe is particularly special to me. Why? Well, Evil Tara shared this recipe link with me about a year ago for Peanut Sweet Potato Soup with Jicama Slaw. It sounded brilliant...but I didn't ever try making it. Then, of course, I did make it...6 times. I loved it!  My sophisticated spagettios-eating husband could care less if he ever saw this one again. So, it came to this. I, Chef Tess, needed to make this a meal all for myself. It is my selfish delight. Sue me. That being the case, I didn't want to make a huge batch and have it sit in my fridge or freeze it either. I wanted to take it with me to glamorous places...like my hotel rooms when I travel so I could have a healthy homemade meal and watch the "Ya-Ya Sisterhood" and weep like a sissy. So, I decided I needed to adapt it to a meal in a mylar for when I travel or visit Tara. Oh. I also needed to make it a meal in a mylar so I could take it in my checked luggage on the plane. I'm weird. It is official.  On my last trip to beautiful California, I discovered a very handy friend. I call her (quick pinkie finger lift and eyebrow raise...) "Mini-Me." Okay..."Mini Meal". One person sized crock pot for the desk...or fancy hotel room. Oh, I hope that doesn't make me officially lame for not eating out on my travel trips. Yes. It is pink. How totally predictable could I be? Oh...no polka-dots. How sad.  I'll have to fix that flaw. Oh...remember the 52 Method Thai Chicken in Spicy Peanut Sauce? Yes. This is a cousin. 


So for the amazing soup, here's the adapted shelf-stable Chef Tess version of this meal. It is now one of my favorite go-to meals on the go (or any day of the week when Ace wants spaghettios).  I happen to adore sweet potatoes and even grew some  Sweet Potatoes From Outer Space. I don't know where that obsession came from, but I'm blaming my very southern-rooted great-great grandpa from Virginia for it. Freeze Dried Sweet Potatoes{different from dehydrated varieties} are big chunks of lovely very southern sweet potatoes. Not yams. 


In this beautiful peanut sweet potato stew they are the perfect contrast of texture. 

Chef Tess' Peanut Sweet Potato Chicken  Stew
2T dehydrated onion
1 1/2 tsp minced garlic
1 1/2 tsp Chef Tess' Gingham Masala Spice Blend
2T freeze dried celery
2T Dehydrated Carrot
1T red bell pepper granules
1/4 cup Freeze Dried Sweet Potatoes
1 tsp chicken bouillon (no msg)
1/4 cup Freeze Dried Chicken (optional)
2T powdered peanut butter
1 1/2 tsp dehydrated cilantro
1/3 cup Tomato Powder

Follow the directions for making into 52 method mylar bags or jars. Top each with an oxygen absorber. I get mine here for the smaller pouches. 
To prepare the stew: Add 2 cups water to the dry ingredients and simmer over low heat 15-20 minutes. Or, put in a mini-crockpot and cook 1 hour. Or, microwave with 2 cups waters high 2 minutes. Stir. Cover and cook 50% heat 5 minutes more. Allow sitting 6 minutes before serving. 

One last word on the spices today...
Gingham Masala Spice Blend is my own delightful blend of Indian spices. It is perfectly balanced with enough heat and depth to really make this meal remarkable. Plus, I actually donated this whole spice formulation to a very noble cause. 

 It is a spice recipe by me, but any and all sales go to directly benefit ophan children of HIV victims and families in impoverished India through the efforts of the The Gingham Project!


There you go. Make some personal Lunch or dinner. This recipe is one of my favorites! Be sure to come back tomorrow for more personal meals! 

Always My Very Best,
Your Friend Chef Tess


Wednesday, July 25, 2012

Waffly-Cool Breakfast Sandwiches

 Here's a quick fun idea! We've been making waffle breakfast sandwiches. I usually make them with my Homemade 9 grain all-purpose baking Mix. They're a quick way to have whole grain on hand. While the waffles are cooking, you scramble the eggs and make your sandwhich fillings. My personal favorite is a smear of pesto on the inside of the sandwich with some garlic cream cheese and fresh garden tomatoes. They're just cool. Yes you can make them with pancakes too...but it isn't as zany-cool to tell pancakes jokes.
Yup. That's right. I haven't got a single pancake joke. They're all married.   Benjamin Franklin said it isn't polite to laugh at your own jokes. He obviously wasn't very funny.

Whenever we eat these sandwhices we also say as many lame waffle puns as we can. You know the ones? They're almost as good as my pancake jokes.
  • These sandwiches are waffle.
  • There's a waffle lot of cheese on this.
  • What's so waffle about this pun?
  • Mom is waffly cute and totally out of dad's league. Wait. That  one was yesterday's post.
  • Wait...you're just using the word "waffle" instead of "awful"...You're a dork mom.
  All I know is that these are a fun way to add some jokin' to your morning...or dinner. We've been known to have them for dinner as well.
Some personal favorites:
There you go. Make some Waffly-Cool Breakfast sandwiches! What's your favorite breakfast sandwich?

Always My Very Best,
Your Friend Chef Tess

Tuesday, January 31, 2012

Homemade Soft Sweet-n-Salty Whole Grain-n-seed Pretzels

It's Tutorial Tuesday!

Have you ever wondered how to make homemade pretzels? How about heart shaped ones?! We love them here. Soft Chocolate Pretzels were the featured Valentine's Day project last year. This year I'm going all whole grain all the way.  This recipe has been a blessing. Seriously. They're a great grab-n-go snack for kids after school and for me on the run for work. We especially love them when they're sprinkled with a little sugar and salt. It's a sweet-n-salty soft-n-chewy flavoragious Tessalicious treat. Seriously, the biggest complaint I hear from people starting out with whole grain is the dough being dry. These are not that dough. They raise nicely and have awesome flavor. If you're looking for a vegan  whole wheat soft pretzel look here. If you want the multi-grain, just don't use the egg wash.  I'm doing these ones the traditional way, because they taste amazing! If you've never  taken the pretzels for a dip in a boiling water bath, you'll notice the difference in taste. I use baking soda in the water and it completely changes the flavor...in a good, very traditional way.  I don't know why I haven't shared this traditional method on the blog before today,especially with all the pretzel recipes I've shared over the years.
Chef Tess' Homemade Soft Sweet-n-Salty 
Whole Grain-n-seed Pretzels


2 cups warm water, (no hotter than 110 degrees)
1 T sugar
1/4 cup olive oil
1T active dry yeast (one package)
22 oz (4 1/2 cups) Mountain Mills Whole Wheat Flour
1/4 cup  Teff
2T sesame seeds
2T Flax Seeds
2 tsp salt


Prep equipment:
parchment paper
10 cups water
2/3 cup baking soda
1 large egg yolk
Pretzel salt or Kosher salt
Crystal cake decorating sugar (Any color! Be creative)


Directions: Combine the water, sugar oil and yeast in a small bowl. In a one gallon bowl combine the flour, teff, seeds and salt. Knead 5 minutes by hand or 4 minutes by machine. 


Form dough into a ball and place in a gallon size bucket or bowl with a lid. Allow to raise 1 hour (until your finger inserted in the dough leaves a hole.)


Preheat oven 450 degrees.  Line 2 sheet pans with parchment paper and lightly brush with vegetable oil. Set aside. Bring 10 cups of water with the baking soda to a rolling boil in an 8 quart 14 inch deep skillet.
The finished dough will weigh about 41 oz. Give or take. 
Divide the dough into 8 portions for large pretzels. Fold each into a rectangle. 
Roll tightly using your magical skilled nimble-fingers...and pinch as you go. Roll into a 24 inch strand of dough. 
If you want to see the tutorial on how to make them into pretzels go here.  Place the pretzels on a parchment lined cookie sheet. Raise 15 minutes. 
To make them heart shaped...Pinch them at the base...like this...


Place in boiling water for 30 seconds or so. Really that's not too long. It's just long enough. 
I use a large slotted spatula to remove them from the water and drain well. Place the moistened pretzels back on the cookie sheets, 4 to a tray. 
Whisk the egg yolk with a teaspoon of water and whisk well. With a pastry brush, carefully paint the tops of the pretzels with the egg yolk mixture. Then...we sprinkle ours with some colored sugar and kosher sea salt. Don't feel like you have to use the colored stuff...I just think it looks really fun!


I know it's pretty.  It's like a movie-star getting ready to dance. Boom-chicka-waa-waaa...(I digress).
Transfer trays to your 450 degree oven and bake 15-17 minutes.  Dip in nutella or Chocolate Fudge Honey sauce aka Chocolate Buzz.


There you go! Make some fabulous happy-heart pretzels! Valentine's day is coming and I know what I'm making!
Always My Very Best,
Your Friend Chef Tess

Friday, January 13, 2012

11 Grain Peanut Butter Blackberry Rolls with Vanilla Honey Glaze


"Be the conquering hero!" I tell myself this every day and when it comes to my kids lunch boxes, I want to make it fun. I want to be "that mom" who does crazy cool lunch box ideas that dazzle second graders. I'm not that mom but if you are...then you know who you are. The ones who look at pinterest for hours and lose sleep thinking of new lunch ideas. I love you. Just so you know.  Don't get me wrong. I do have my moments. In fact, I secretly love it when my boys come home and say, "My friend wants you to make his lunches. His are boring. " Sadly, I have to admit, that I'm not even close to being "that mom" yet. I do pack pretty healthy meals with some fun ideas most of the time. Sometimes, it's just veggie corn dogs and some homemade healthy cookie. Apple. I'm boring myself just typing it. {Blah, blah, blah...} Come on lady! Get to the point.

I asked myself, "Why not be the mom who sent a sweet roll for lunch?!" I mean, it's almost as good as dad giving them chocolate cake for breakfast. Right? Please say I'm right. Okay, it's hard to top cake for breakfast as being excited about a lunch. I promise these are better though. They're made with 11 grain dough, natural peanut butter and freeze dried blackberries. They're drizzled with a vanilla honey when they are still warm and that stuff just melts right into the dough so the buns stay soft and moist. Now that I think about it...It does make me a conquering hero. Please don't think I'm that chick who rocks the lunch boxes and gives the kids sandwiches cut out with cookie cutters to look like sea horses to go with goldfish crackers.  I'm the mom who thinks ahead enough every couple of weeks to make freezer Grab-n-Go Lunchbox Ideas. My kids for now, think it's cool. They may not feel that way as teenagers. Lunch box with napkin note that says, "Mom loves you! Xoxo! (smiley face)".

 So. Lunch box hero, let's get down to business. 
 You will need a half batch of the  11 Grain Molasses Bread dough. When it's ready to be formed into a loaf, simply roll it out on a lightly floured counter top that's been dusted with flour. 
It should be 24 inches by 18 inches. I generally roll the roll the short way so I can make about 24 1 inch slices in the the finished roll. You can do a dozen instead and make them big-honkin' wedges if you want. For kids, this size is just perfect. 
Spread dough with a very thin layer of natural peanut butter. I just want a hint of flavor, not an oozing mess of melting peanut butter. Too much, and it will be funky. I used about 1/2 cup for the whole deal. So...plan accordingly.
I sprinkle the peanut butter with 1/2 cup crystal xylitol (you can use sugar I just wanted it lower sugar today) and then I crumbled 1/2 cup Freeze Dried Blackberries over the peanut butter. You can use blackberry jam but I liked how these baked and added a really pronounced blackberry flavor to the rolls. 
Roll into a large log thing. You know what I mean when I say that right?
Cut into 24 wedges of happiness with a sharp knife and place on 2 parchment lined baking sheets. Lightly spray with oil and cover to raise 1 1/2 hour.
Bake 350 degrees 25-30 minutes until  cooked through. 
To make vanilla honey glaze, combine 1/2 cup honey with  and 1 tsp vanilla. Stir until well combined. When rolls are still warm, spread the glaze using a pastry brush. 

Put each roll in a sandwich bag and place the bags in a gallon size freezer bag. This gives you 24 little self contained peanut butter lunch-rolls from the conquering hero! Waawhhoo. Wow. I just said Waawhhoo. That's pretty cool to feel that way about making lunch! 


There you go. Make some amazing rolls of love for the family...or for yourself. 
Always My Very Best,
Your Friend Chef Tess


Wednesday, March 30, 2011

Pocket Sandwich and Chocolate Dipped Strawberry Stuffed Pretzel Class with the Ladies

Today I had the chance to do a personal cooking coaching session with Emily . She did a giveaway on her blog a few months back for the class, and we just this week got to do it. Emily's co-class winner was one of her blog readers named Kim who has the joy of having nine children in her home. Kim was in need of some practical kid friendly and fun foods she and her children could make. So...we set to work making pocket sandwiches for lunches and stuffed pretzels for snacks.


The first thing you need to know is that we used my recipe for Oven rise pizza dough . We used whole wheat flour and increased the water by 1/2 cup.  The good thing about that dough is that if you choose not to bake the pretzels or sandwiches right away, you can also put them uncooked in the freezer on a plastic lined sheet pan until frozen. They go directly from the freezer to the oven on a lightly oiled pan and bake like "oven rise" pizza...but they're pretzels and pocket sandwiches. Pretty ding-a-dang-dong handy dandy if you ask me. Whole grain, made at home and low fat?! Yup. We're pretty happy about that. 
First up, we made some 
Chocolate Dipped Strawberry Stuffed Pretzels.  


Using half of the Oven rise pizza dough
Roll a rectangle, 2 feet by 18 inches, about 1/4 inch thick on a lightly floured board or counter top.
Cut strips of dough the entire length of the dough, about finger width apart.


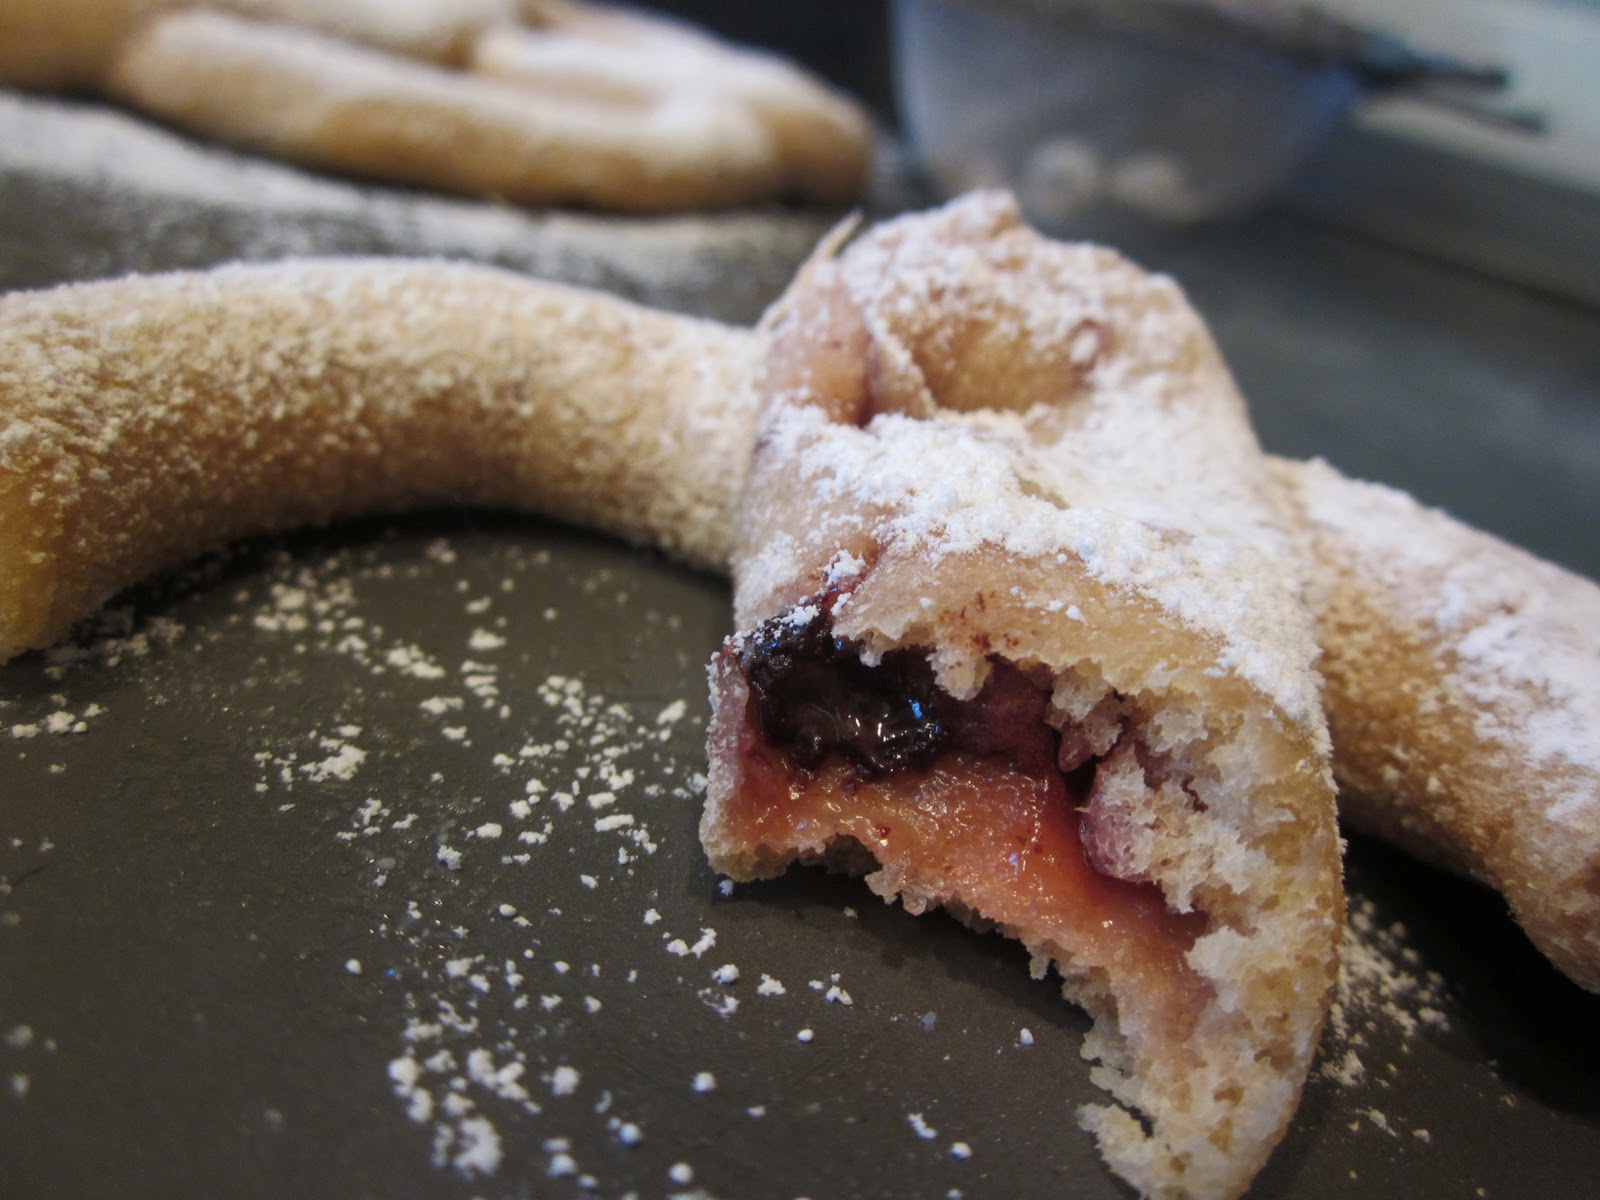
I used 3/4 cup homemade Freezer Jam
Putting the entire contents in a pastry bag, put a line of jam right down the middle of the pretzel. This also works for peanut butter...almost any soft spread. Top with chocolate chunks.
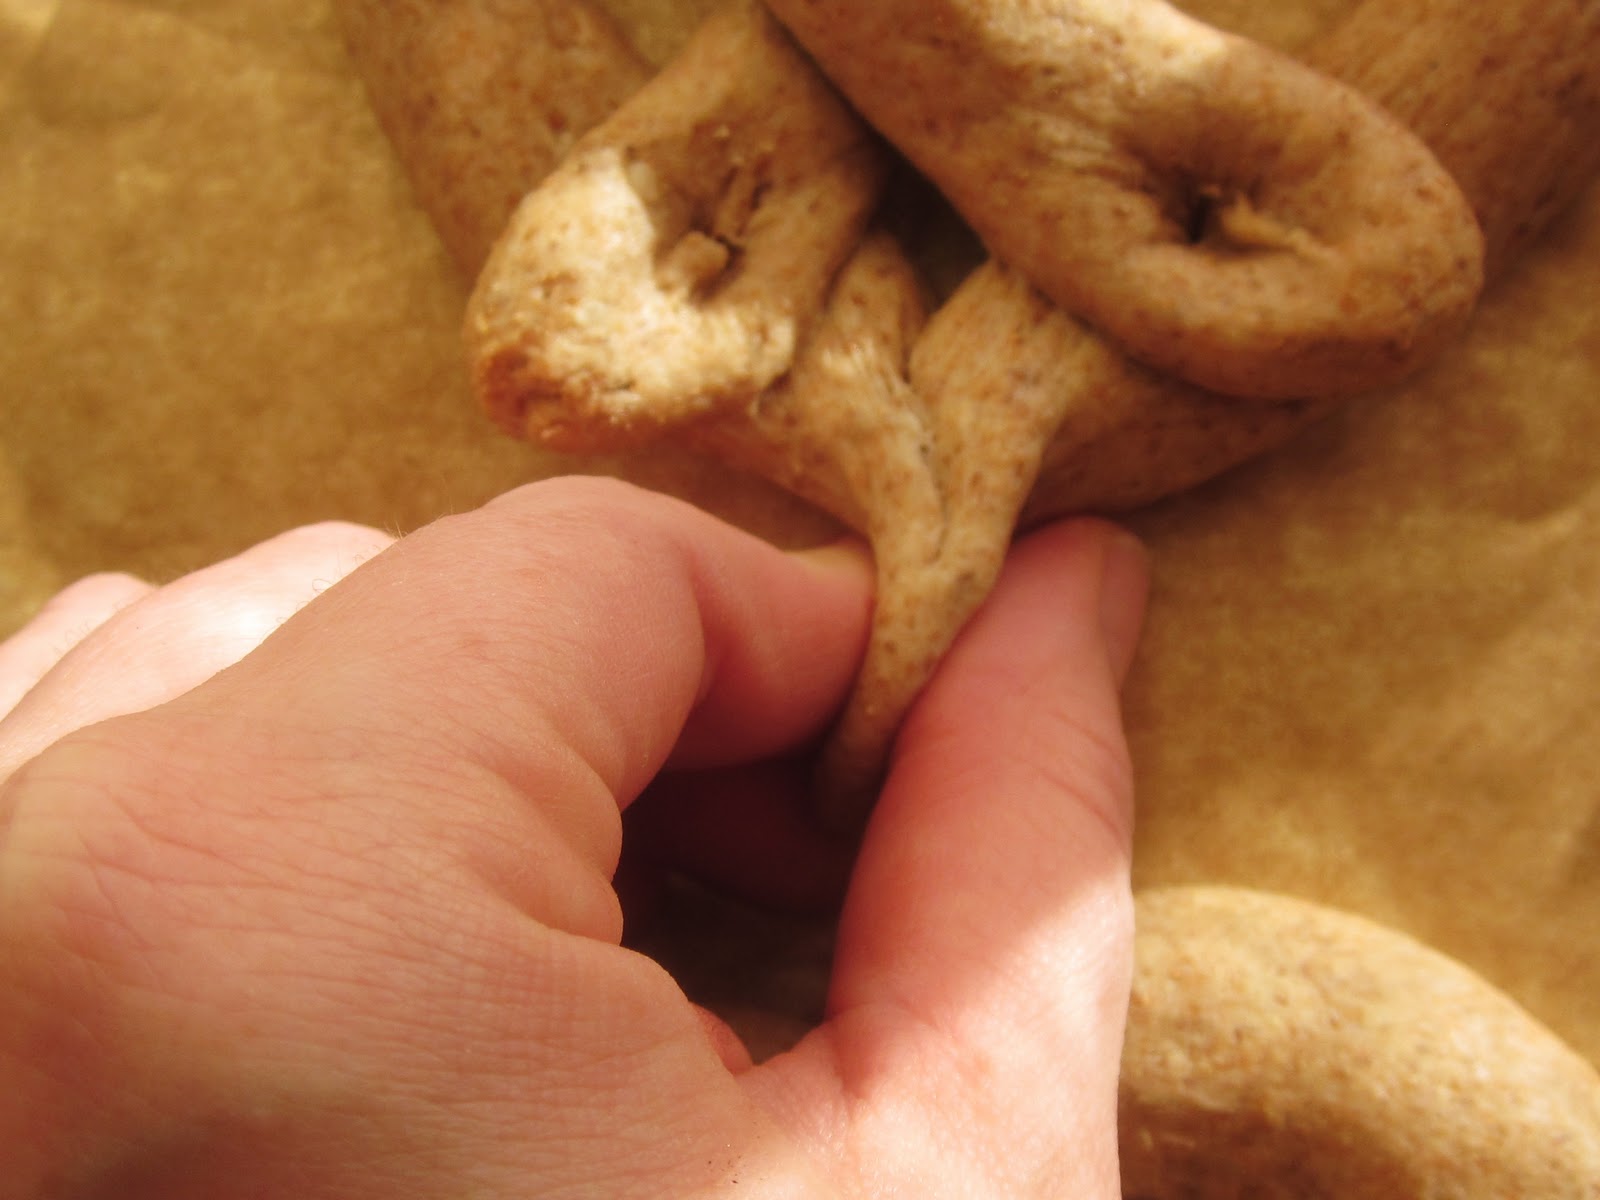
I have to say that Kim and Emily were complete "naturals" at this dough pinching stuff. Be so impressed.

I showed how to form pretzels here on my blog during the 

Vegan Soft Pretzel Tutorial

Once formed, place on a lightly oiled baking sheet. Allow to raise about 30 minutes.  Preheat oven to 350 degrees and bake  12-15 minutes.


 While still warm, sift a hearty layer of powdered sugar on them if desired. OH...we desired.
 Would you care to crack on open?


Note to self. When I make these again I will use the  chocolate bread recipe. I think they would be divine. Oh so divine. 

The next thing we made where ham and cheese sandwich pockets with mustard.
Take 1/4 batch of the oven rise pizza dough and roll it out in a rectangle 24 inches by 12 inches, very thin.
Top with 1 lb of diced ham, divided between six squares you cut out of the dough. Drizzle the ham with mustard. Top with a large slice of mozzarella or Monterrey Jack cheese. Pull the dough up around the filling and pinch closed very tightly at the seams.
I think they've got it!
Place seam side down on a lightly oiled sheet pan.  Raise 30 minutes.
Bake 350 degrees 30 minutes.


Pizza pockets use 1/4 oven rise pizza dough recipe, rolling out the same way you would for the ham pockets.   Use a Tablespoon of spaghetti sauce or pizza sauce right in the middle.
Cut the cheese. Look...Emily is really good at it. Why this made me laugh so hard I have no idea.
Pile pepperoni, cheese, onion or any other pizza toppings you want into the middle of the dough squares.

Pull up the dough around the filling, pinch closed and put seam side down on a lightly oiled cookie sheet. We also oiled the top of the pizza pockets.

Top generously with fresh shredded parmesan cheese and some cracked pepper if desired.

Bake 350 degrees 30-35 minutes.

There you go. Make some. We had a great time!