Showing posts with label Kids cooking. Show all posts

Saturday, September 24, 2016

Lemon and herb Roasted Turkey with Cheddar and Citrus Cranberry Sauce Grilled Cheese


Our next grilled cheese of glory for grown-up people who don't just want cheese and bread is this freakishly delicious concoction. It is basically a Thanksgiving feast between two slices of sweet potato bread from the Fall Sweet Potato Bread Tutorial. It really is a bread to keep on hand for the next several months.


Let's start with the relish. I think it is probably one of my all-time favorite recipes for Thanksgiving and we love it!
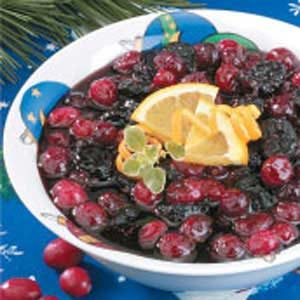
Teapot Cranberry Relish Photo from Taste of Home

The citrus cranberry relish is one that I adapted from a Taste of Home recipe found Here. I use orange juice concentrate, balsamic vinegar glaze and zest from orange and lemon to give it added flavor contrasts. I also love the addition of a hint of fennel seed. It gives the sauce a remarkable depth. If you make it for Thanksgiving, it is good in the fridge up to a month! Use it on Turkey sammiches yes, but it is also amazing in oatmeal (really?!), as an addition to muffins and cookies or as a relish for pot roasts and chicken.


Tess' Citrus Balsamic Cranberry Sauce
Ingredients:
  • 1 package (16 oz) fresh or  frozen cranberries
  • 2 cups brown sugar
  • 1/2 cup orange juice concentrate
  • 1/2 cup balsamic vinegar glaze  here
  • 2 cups dried cherries or apricots
  • 1 tsp grated orange zest
  • 1 tsp grated lemon zest
  • 1 tsp fennel seed, optional
Directions:   In a large saucepan, cook the cranberries, sugar, juice and balsamic glaze over medium heat until the berries pop, about 15-20 minutes. Add the remaining ingredients and simmer uncovered for 10 minutes. Cool slightly and transfer to quart jar and cover with a lid.  Good in the fridge up to 1 month.  

Let's talk Turkey. Seriously. This has to be right.
Ina Gartner's Herb Roasted Turkey photo from Food Network.com
I don't mess with perfection on the turkey and my go-to the last few years has been the tutorial posted by Ina Gartner in 2008. Always perfect. Always flavorful. Would we expect anything less from Ina? She's one of my all-time favorite chefs.  Get her Printable Recipe  and you can also watch the full tutorial here
For the Grown-up grilled cheese...
Place 1-2 slices of warm turkey breast (above) on a slice of sweet potato bread. Top with 2 slices of sharp cheddar cheese. Add 1-2 Tablespoons of the citrus cranberry sauce.  Grill in a skillet  with a few tablespoons of olive oil or butter over medium heat until cheese is melted and bread is golden brown.  Server warm.
There you go darlings! A wicked delicious sandwich for fall! Use both the recipes for the components for your Thanksgiving dinner too! 
Always My Very Best,
Your Friend Chef Tess

Tuesday, May 13, 2014

Fabulous Centerpieces on a dime! Popcorn Ball Topiary Segment!


Good Morning Arizona! Was amazing yesterday! If you missed it or are out of state, this is a fabulous way to get ready for weddings, bridal showers, baby showers, Summer and Spring parties. Kids love them for birthdays! Sky is the limit!

Always My Very Best,
Your Friend Chef Tess


Saturday, May 10, 2014

Popcorn Ball Topiary for Mom's Day


Tomorrow morning I get to spend some time at ABC 15 Phoenix showing a fast and easy last minute craft for kids to do for Mom's Day. If Dad waited until last minute and wants to still do something fun and easy, this is a great idea!  Enjoy darlings!

Honey-Fruity-Cutie-Gelatin Popcorn Balls

1 microwave bag popcorn, popped
1/2 cup granulated sugar
1 cup honey or corn syrup
1 box Jello (3 oz box, any flavor)

Equipment:
Large bowl (gallon sized or larger)
saucepan
Oil for coating hands/popping


Directions:
1. Gather all ingredients and supplies together.
2. Pop the popcorn. Pour into the large bowl.
3. Combine granulated sugar, honey (or corn syrup) and gelatin in a heavy saucepan. Stir slightly and bring to a full rolling boil over medium high heat.
4. Remove gelatin mixture from stove top and pour over popped corn. Blend well, until all of the popcorn is coated. Allow to cool a few minutes before shaping into popcorn balls. {Note: you can add up to 1 cup of nuts, candy corns, jelly beans, Boston Baked Bean candies, red hots...etc. at this point.}

5. Shape popcorn into balls using lightly oiled hands, or leave as fruity popcorn as is. You will need to press them together rather firmly.   To make a topiary, I wrap each popcorn ball with plastic wrap first, then pierce with a bamboo skewer and tie a ribbon at the base of the ball. You may insert them into other popcorn balls or brownie-cupcakes for a stand alone topiary or just enjoy a popcorn ball on a stick!


You may also like:

There you go darlings! Happy Mother's Day!

Always My Very Best,
Your Friend Chef Tess

Thursday, April 17, 2014

Artisan Bread Easy Enough for a 5th Grader!

 I'm pretty sure most parents agree that their 5th grader is probably smarter than they are most of the time. I had the amazing opportunity to visit my son's 5th grade class today and share with them the simple basics of yeast and bread baking used by the pilgrims and bakers throughout history. Yup. I also get to teach at schools occasionally and I think those experiences are the sweetest ever!  I'm also pretty sure everyone in my son's class will agree that their teacher is freakin' amazing!!

When class was over, I sent each kiddo home with a little cup of yeast that we had activated with water and flour. I've heard back from many of them letting me know that they baked some pretty cool bread!

  If you and your kiddos want to join them, here are the simple instructions:

 For more information visit the post on 4 Ingredient No Knead Bread Anyone Can Make!
There you go! Enjoy Spring Bread and Easter. We'll be playing hard around here!

Always My Very Best,
Your Friend Chef Tess


Friday, October 25, 2013

Roasted Witch Finger-ling Salad with Greeeeen Pesto Sauce


It's officially the week before Halloween and I had to share something soooo crazy-fun!  This is a fingerling potato salad...that looks like something totally morbid. Witch fingers. Mmm. I don't know which witch had to give up her flanges to give me this idea, but it has been fun seeing the various reactions from around my house.  Both boys, age 14 and 11 asked me if they could eat them right away.  Ace, my husband, wouldn't eat them at all. He said they looked too evil to eat...and really sick. Yup. That's the point darling. Though I do have to say that I had a really hard time not eating them!  Plus. They're greeeeeeeen!
 Just to set the record straight, they really are just potatoes...


So today when I got some fingerling potatoes from the market, I decided to do a Halloween theme.

You'll need:
One pound of fingerling potatoes, steamed or roasted until tender. Season with salt and pepper. Toss with 1-2 Tablespoons of your favorite oil.  

I'm partial to this Ahuacatlan Avocado Oil infused with chipotle. It just gives this awesome kick to the potatoes...and has a really great high smoke-point so it won't add free funky-radicals to my body. I'm radical enough, thank you very much. 
 Cooking the potatoesPersonally, I like to either pressure cook the potatoes 5-6 minutes on high pressure (natural release) or roast them in the oven at 350 degrees for 30 minutes.


While the potatoes are cooling, make the sauce.


 Chef Tess Wicked Witch Low-fat Pesto Dressing
1 cup parsley
4 cloves fresh garlic, peeled
2T dry basil or Chef Tess Romantic Italian Seasoning
1 cup fresh pumpkin puree (instead of oil)
1/4 cup basil infused olive oil
juice of one lemon
Salt and pepper to taste

Puree in a blender until smooth...and Greeeeeen....


 Seriously. The squash puree not only makes it low fat, but also makes it a nice bright green. Using the fresh parsley and dry herbs, lowers the cost dramatically without skimping on the flavor. Plus...it is greeeeeeeeen. 
 Drizzle the sauce over the potatoes. You can use as much or as little as you'd like.

Arrange decoratively on a tray and garnish with blanched almond halves for "fingernails" if desired.
Serve warm or cold. Though, cold is more authentic...for a witch finger. Right? Plus, they're greeeeeen! Happy Halloweeeeeeeeen!

Have fun this week!
Always My Very Best,
Chef Stephanie Petersen

Monday, December 31, 2012

Tips for Picky Eaters and Survival Situations. Are Your Kids Ready?


Monday is the day I share a little on food storage and emergency preparation.

 
One of the things I'm frequently asked is how I get my kids to eat so many different foods,  especially whole grain and  food storage foods.  I didn't think we were doing anything unusual in our methods of feeding our kids, until the morning my 6 year old came walking into my bedroom with a head of roasted garlic from the fridge and was popping the whole pieces in his mouth...like that was a totally normal thing for a 6 year old to do. Then I realized maybe we weren't as normal as some would hope. Of course, he wasn't putting the garlic cloves in his nostrils or armpits, so I figured we must be doing something right. 

  I'm a chef  so many assume it is because I just know how to cook and make food taste delicious that my kids aren't so picky. Truth be known, that may be only part of the magic.  We've had my kids eating pretty amazing and healthy varieties of foods from the time they could barely start eating. It wasn't just because I'm a "foodie" that my kids are good eaters. It is because we as parents lead by example. Does that mean they always eat everything I make? Nope. It does mean that I never give up. Did I have my share of carrot puree meltdowns? Yes. Yes I did. Then I tried to serve the puree to my kids and it was even worse.
"My kids won't eat beans...(or whatever...). How will they do when that is all there is to eat, like in a crisis or survival situation?"Research shows 15 exposures or more to a new food make is more likely to be accepted by young children, then just leaving it out of the diet completely. That is a big key. They may reject a certain food at first, but your job is to not give up. Find different ways to present it, and have fun. If your child doesn't like carrots but you know they will probably need to eat them sometime in their lifetime...don't panic. Make it a game. Don't make it a matter of emotional pressure. Find that magic consistency now, before you're in a crisis situation and when you do find that magic consistency, put that in your emergency food storage. 
 There are legitimate reasons for picky eating. 
There are 3 main reasons for children being selective eaters that are rooted in natural survival.
  •  Children almost always will prefer sweet foods over bitter, by nature.
  • Children  suffer from neophobia, the fear of trying new foods.
  • Gifted Children have a dislike of too many textures, flavors, or smells together.


Dislike of bitter foods is a natural mechanism put in place  to protect us from eating things that are potentially poisonous or dangerous. That natural aversion to bitter flavors stems from the the fact that most foods that, in nature, are poisonous,  like leaves or flowers have that bitter flavor.  Kale for instance is the worst ever...Okay, maybe I personally don't like the stuff. I'm personally really glad that aversion is there.  That bitter aversion saves lives because they'll spit out the offensive material. Sweeter foods like fruits  are rich in energy. Let's face it, kids need energy foods and it makes sense for that to be their natural attraction.

Neophobia is a defense. It is the natural fear of new foods. It usually appears around age two. That is the age that most societies stop breast feeding. At this point, kids don't depend on mother entirely for nutrition and they will, as a defense, avoid foods. They don't know if it is safe to eat. This however doesn't apply to marbles. They'll eat those and put them up their nose all day. Just saying.
My kid is just freaking brilliant. Do you have one of those kids who doesn't like anything mixed or touching on his plate? I know adults like that (Hi Evil Tara...tee hee). I was happy to find that they were just geniuses. 
 Gifted kids with sensual overexcitability can be particularly aware of certain textures and flavors. I was one of those kids myself. They may be overwhelmed by many tastes and textures together. Some of them can even distinguish different herbs and spices in a dish. My mother, thankfully nurtured this. Adding a few herbs at a time and helping me determine what that new flavor was early on became a game. This of course means, if you have a child like this, that they will be genius rock-star chefs and you should make sure they keep that up. On the other hand, don't overwhelm them. The creamy, crunchy, flavor intense dinner you had planned may not be just right for their little mouth just yet. It isn't you...but don't give up!
They may not intentionally be acting stubborn or picky. It is however, our job to broaden their food perspectives now, before they are faced with a stressful situation.  Here are some great tips to use now.
Make them more Sweet or Savory Vegetables
Adding a flavored sweet lemon juice, honey or vinegar to a vegetable can work miracles to change the flavor profile of the veggie. Often, adding that sweetener, if done naturally, will also increase the nutritional value of the food. Carmelized onions work magic to add depth and a lightly sweet flavor to dishes. Keeping that in mind, use finely chopped or minced pieces of the onion. Also, it is remarkable what a little grilling can do to a vegetable or fruit. Tossing a piece of pineapple on a grill pan with a little olive oil and then adding that to the vegetable mixture was magic around my house when the kids were small. It still is. After you find that magic flavor addition, add it to your food storage!


Serve Vegetables Raw, Dehydrated or Freeze Dried
It depends on the vegetable, but many are sweeter raw than cooked. It's a great way to get kids to eat green vegetables, like peaszucchini and green beans when they are served freeze dried. By the way, a huge amount of nutritional value is retained in the freeze drying as a natural preservation process and it also gives them a snack texture that is hard to beat.  Seriously...I actually will eat peas all day long freeze dried. I've seen kids completely reject zucchini until I served it dehydrated and thin sliced like a potato chip. The flavor was mild and lightly salted, they would eat them like crazy! They're still eating their veggies. Don't get caught up in a mind set that says there is only one way to serve it. 

Serve Foods in a Favorite Texture Form
So your kiddo doesn't like oatmeal, but they really like meatballs. Well...who says you can't add some oats and oat fiber to your meatballs? The texture issue is a key factor in breaking up the monotony and food fatigue in emergency foods. Most of these foods cooked are the same soft texture. If you have a child who likes crunch foods, be sure to store  and learn how to cook foods that are crunchy as well like  Homemade crackers.  
Link Foods to Your Child's Interests Now and Respect Their Tastes

This takes a little creativity, but it works well with younger kids. Give that food storage recipe a personal twist by naming it after their favorite dinosaur, hobby or activity. No. Do not go with the  favorite hobby or activity name being " nose-picking-oatmeal". I'm not saying name the split pea soup mix "T-Rex-turds" either.  Unless you have gross boys that like sick-o names like that.  I am saying to make it personal. Drop-dead-laugh on the ground funny is good as well. Once you've found some shelf-stable kid friendly meals like my Meals in a Jar that you've adapted to your family's tastes, give your child their favorite picks. It is okay, for instance, for them to help you make some specific shelf stable meals that they know are their favorites.  I have one boy who can't live without carrot cake breakfast pudding
If I had called it "6 grain cereal with carrots in it"...there's no way I could have ever persuaded him to try it once. 
Respect Your Child's Tastes 
Everyone has foods they like and dislike. If your children don't want to eat broccoli, then don't force it.  Encourage it. Love them anyway. Keep it light and fun.  Add it often to meals in small amounts as you certainly want to encourage your child to try a variety of foods. If your child has tried something many,  many times in several different dishes and applications and says he or she doesn't like it, then respect her decision to say "no" to eating it. I will never be a fan of raw celery sticks (I call them alien fingers). My mom didn't stop serving celery. She just served it differently. I love it chopped and cooked in stews.  Keep serving that food at meal time. Be diligent. You'll never regret teaching your child to appreciate meals that are whole grain with a long-term shelf life if those foods can save their life. It may be a simple emergency, like your family losing employment that forces you to eat more beans and stored food. Wouldn't it be nice, to start now with creative food storage recipes and meals so that in a time of family crisis that are already stressful, the meals are received with enthusiasm? 

There you go. Help your picky eaters.

Always My Very Best,
Your Friend Chef Tess


Sunday, December 2, 2012

The Kitchen Craftin' Gingerbread House Under Glass Tutorial


 Last week we made some gingerbread houses for centerpieces to use during some swanky upcoming Christmas events. Ya know. It is the pretty little house that any inch-high fairy would find passed the land of swirly whirly gum-drops and the proverbial "wintery Fairy-Land". Try not to scream, "Saaaanta! I know him!!"  Now, in order to keep swipers from swiping...we put our gingerbread fantasy-lands under glass!


How did we take this gorgeous beast and put it in the glass display?
 Ya know...without destroying all the delicate features of the house?


Well. The secret is making them by first measuring. Simple silly.  The second secret is making them lightweight and cheating a little. Yes. I cheated. These beauties are made with cardboard. They're a cross between a kitchen craft and a real gingerbread. This makes them light enough and strong enough to put in a container without falling apart.

We even used a hot glue gun to really give the strength we needed for the base.
My advanced pastry school instructors are probably not very happy with this. However, I'm a mom first right now...and I just didn't have a full day to devote to baking gingerbread, cutting, sugar melting, and waiting for royal icing to dry. Plus...it wouldn't have been light enough to slip into the cookie jar. Really. 
Just make sure the base of the structure fits inside the container, then remove from the glass, decorate and return to the "under glass" area.  This one was done in a trifle bowl.
This also works for mini snow-globe-type gingerbread houses. Invert a regular mouth mason jar lid and ring that have been sealed together with hot-glue. This base gives the house enough lift to be seen as a snow globe inside of the jar.  Put your gingerbread or cardboard house inside the inner circle of the ring. Place the regular mouth mason jar lid on a wide-mouth lid. 
Make sure it will fit inside the wide mouth quart jar. This is one of the Ball old-fashioned wide mouth pint jars. They are a little fatter and shorter than the regular wide-mouth jars. 

Remove. Decorate. Return to the jar.

Other cheater ideas.
Yup. I have them too.
1. Use recycled stuff. The top roof is a recycled hamburger clam-shell. The base is a cardboard box and the structure for the fireplace is some strategically folded paper-towel cardboard.  

2. Use unexpected decorations and embellishments.
The "wood siding" for the house is actually some perfectly measured and snapped pieces of tomato-basil dry linguine...hot glued in place. This was dry enough to keep the structure from going soggy. I could have used gum pieces or something. This was just what I had around the house. If you see some light green on the side of the wrap-around porch and the balcony...that was spinach linguine.

The pillars on the wrap-around porch and the fence-posts are all made from candy sticks. My son called them candy cigarettes. I'm not sure I'd let my kids play with them for anything but making gingerbread. I used royal frosting for the final decorations but in general, the hot glue gun stayed in-use most of the project. I think this house will be here in 5 years if I keep it dry. Not that I'm going to do that...but it is really cool!
My son said, "We need to make these every single week!" So, you can bet that we will be doing more. 
Please note. The pile of candy and bags of goodies...well...that was for the project. However, for under 20$ and a full 6 hours of just being creative with my son...it was a priceless investment.

We bonded over pretzel-logs, licorice siding, smarties shingles, and frosting ice-cycles. What could be more perfect?

There you go. Do some kitchen crafts with your kiddos!

Always My Very Best,
Your Friend Chef Tess