Showing posts with label pastries. Show all posts

Monday, November 6, 2017

Salted Caramel Buttermilk Doughnut Holes on a Fork

These were a huge hit at the baby shower last weekend. Seriously. What's not to love about salted caramel on anything. Even liver would taste good with salted caramel.  These homemade buttermilk doughnut holes are a far cry from the liver. They're fluffy cake bites with a hint of spice that you roll in powder and then drizzle with salted caramel just before serving. I roll them in powdered sugar, wait a few minutes, and roll them in sugar again. This gives them a nice thick coating.  Don't add the salted caramel more than an hour before serving or it will melt into the doughnuts. I served them in mini souffle cups that you can purchase at most grocery stores in the cake and party favor section.


Salted Caramel Buttermilk Doughnut Holes

Doughnut Batter:

2 cups Unbleached All-Purpose Flour
¼ tsp. Chef Tess Wise Woman of the East Blend, or nutmeg; optional, for flavor
¼ cup coconut sugar
1 Tbsp. plus 1 tsp. baking powder
1/2 teaspoon salt
1 large egg
1 cup buttermilk
¼ cup coconut oil, melted

Frying Oil:  about 5 cups

Powdered Sugar, about 3 cups
Salted Caramel Sauce, prepared, about 2 cups

Instructions:
      Pour the oil 1" deep into a 10" skillet that's about 2 1/2" deep or use an electric frying pan. You want the oil to be about 1" deep. Start to heat the oil to 350°F while you're preparing the doughnut batter.
Whisk together the dry ingredients. In a separate bowl, whisk together the buttermilk and egg.
Pour the milk/egg into the bowl with the dry ingredients, stirring briefly; then add the oil, stirring to make a thick batter/soft dough.
When the oil has come up to temperature, use a cookie scoop (or a spoon) to drop balls of batter into the hot oil. This recipe will make 2" doughnut holes using a tablespoon cookie scoop, and drop in balls of dough about as big as an undersized ping pong ball; or 1 1/2" holes, using a teaspoon cookie scoop, and dropping in balls of dough about as big as a chestnut.
Fry the doughnut holes for 2 minutes on the first side, or until they're a deep brown. Some of them may turn themselves over; that's OK, just use a pair of tongs to turn them back. After 2 minutes, turn the holes over, and fry for an additional 2 minutes (for the larger doughnut holes), or 1 1/2 minutes (for the smaller ones).
Transfer the doughnut holes to a baking sheet lined with paper towels to drain and cool.
Decorate:
·       Serve warm or at room temperature, roll in powdered sugar and place in mini souffle cups.Drizzle each doughnut hole with 1 Tbsp. salted caramel sauce and pierce with a mini serving fork. 


Monday, August 22, 2016

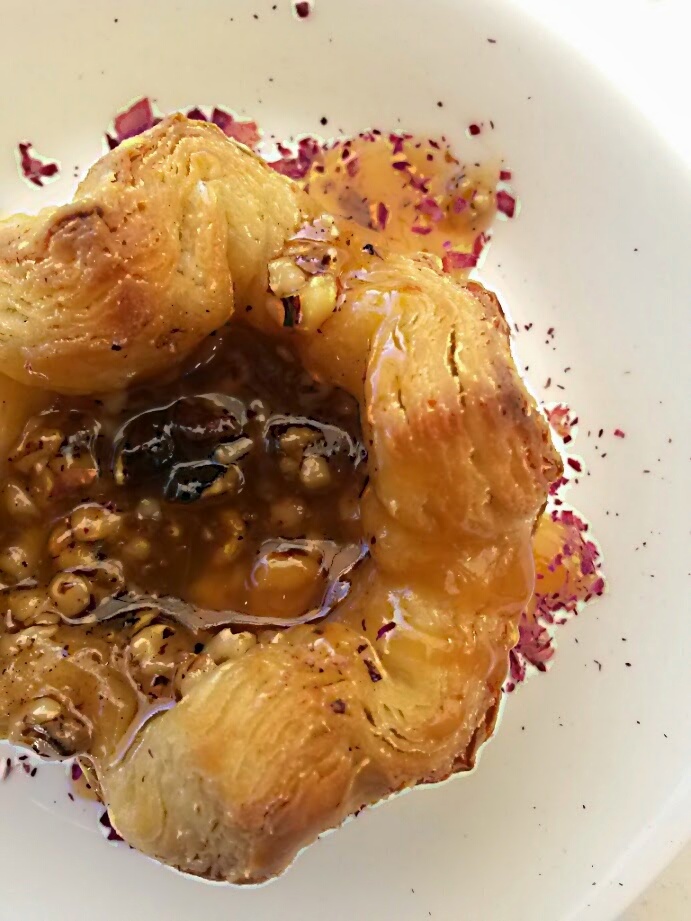
Baklava Puff Pastry Cups


Baklava! I can't even say the word "baklava" without wanting to belly dance. My mom, the Mega Mom is a belly dancer (or a least she used to be). She used to go to dance the competitions. I remember my grown brother going once to support her and watch the show. My brother is a professor. He's very reserved.  He takes after my dad.   He called me afterward and said, "I need therapy after that. Seriously. A grown man should never see his grey haired mother belly dance." 

 I, on the other hand, take after my mother in many ways. I think it rocked that she got up there and danced. Reeeeeaaallly rocked! The Mega Mom is strong. She's dramatic and thoughtful. She's a powerful woman warrior!  Whenever I used to go home to visit my mom in Utah, I'd try to get in at least one or two belly dancing classes with her. I loved how they celebrated all the shapes and sizes that women came in to class. There was no body shame connected with belly dancing at the Tribal class whatsoever.  In fact, we actually would spend a few minutes at the beginning of class rubbing our bellies talking about the power of women. I loved it. That of course brings us to the subject of these little bad-boy baklava cups...because your belly size will not have to be an issue of concern if you decide to make these a regular part of your life.  I reserve them for special occasions...but you can always make any given Tuesday a special occasion.  Whip off your shirt and do a few belly dancing moves and nobody will even complain about the dessert. I swear.  Dude. I digress.

Okay. Here's the deal. This Baklava cup is a faster simpler way to have all the flavors of the ever popular and traditional layered baklava, without the work of layering. I've adapted it from a recipe I found for Puff Pastry Baklava  on the Pepperidge Farm website a couple years back.  I use their puff pastry a lot. It is simple to use and the price is reasonable.  The twist is going to be how I make the filling using a golden syrup that tastes similar to a "Sugar Daddy" candy and mix that with sugar, my cinnamon spice blend and just a hint of lavender and rose petal. The honey sauce that I drizzle over the top of the baked pastry is remarkable with just the slightest amount of heat from cayenne and the contrast of creamy vanilla. Serve these cups warm with a scoop of ice cream on top and I promise that everyone will rub their bellies, start talking about how strong and awesome you are...and maybe even start kissing you. I can't promise the kissing part. 

Chef Tess Baklava Puff Pastry Cups
yield 12 cups

1 package frozen Pepperidge Farm Puff Pastry 

Filling:
4 oz. butter
1/2 cup Lyle's Golden Syrup or light molasses
3 cups chopped walnuts
1 cup sugar
1 1/2 Tbsp good Saigon cinnamon
1/2 tsp pumpkin pie spice 
1/4 tsp ground cardamom
1 tsp orange zest
1 tsp lemon zest
1/2 tsp dry culinary lavender

 Additional: 4 oz melted butter to drizzle over baked cups

honey sauce:
1/2 cup honey
2 T lemon juice
1 tsp vanilla extract
1/8 tsp cayenne pepper

1/2 tsp dry culinary lavender
1 tsp dry culinary rose petal


Pull the puff pastry from the package and allow to defrost at room temperature for about 20-30 minutes.  Heat the oven to 375°F.  Lightly grease 2 12 cup muffin tins.
Unfold 1 pastry sheet on a lightly floured surface.  Roll the pastry sheet into a 9x12-inch rectangle. With a sharp knife, score the pastry surface to make 12 (about 4-inch) squares.  
form into a cup in the muffin tins.

Heat the butter in a 3-quart saucepan over medium heat.  Add the walnuts.  Cook and stir until the walnuts are lightly browned.  Stir in the syrup, sugar and spice. Cook and stir until the sugar is dissolved.  Remove the saucepan from the heat.
 Spread 1/4 cup walnut mixture in each of 12 bottom pastry cups.  
Drizzle with the additional butter, about 1/2 Tablespoon per cup. 
Bake at 375 degrees for 17-20 minutes, until golden brown.

To make the honey sauce:
 combine the honey, lemon juice, cayenne, and vanilla.  Drizzle the sauce over the pastries and sprinkle with dry lavender and rose petal.


There you go my darlings! A ridiculously simple and rich dessert sure to please even your most conservative Professors...and ensure that everyone needs therapy.  Thanks Mega Mom! 


Always My Very Best,
Your Friend Chef Tess


Friday, August 19, 2016

Strawberry Lemonade Italian Almond Pound Cake


I'm sure my faithful followers remember this amazing cake that I shared a couple of years ago.
 It is called Nancy's Almond Pound Cake


The Strawberry Lemonade version occurred during the heat of the summer when the thought of a berry tang-a-licious classic drink started showing up at all the local AZ food establishments. I seriously love lemon and strawberry together, but don't be limited to the one berry option. I'm incandescently  in love with this cake topped with fresh blackberries, blueberries, and raspberries as well. In Wonka-land we have also been know to use Snozzzz-berries (but only on the wallpaper).


Believe me when I tell you that it is every bit as wicked as it appears to be in these pictures...and it's worth every single calorie!  


Chef Tess' Strawberry Lemonade Almond Pound Cake

1 1/2 cups Almond flour
3/4 cup all purpose flour (or gluten-free flour blend)
1 tsp salt
1/4 tsp baking powder
1/8 tsp baking soda

Preheat oven to 300 degrees. Combine all dry ingredients in a bowl and sift well.

In a blender combine:
4 eggs
1 1/4 cup sugar
1T fresh lemon zest
1 tsp almond emulsion

Blend about 2 minutes until emulsified and sugar is dissolved. 

Add to blender:
5T melted butter
1/3 cup melted coconut oil

Blend on high for 1 minute more, until fully emulsified. While this is blending make the topping.

Topping: 
2T sugar
1 T fine minced fresh lemon zest
Combine the sugar and lemon zest. Mix together until lemon oil is released.

Lemonade Syrup:
1/2 cup fresh lemon juice
1 cup sugar

Fresh Strawberries and Strawberry glaze as desired. I use about 1/2 lb of sliced fresh berries per cake and 1 cup of glaze. 


Add the wet mixture to the flour mixture and stir well. Pour into a greased 9 inch cake pan lined with parchment paper. Sprinkle with sugar mixture. Bake 55-60 minutes.  
While cake is baking, combine ingredients for the lemonade syrup in a saucepan and bring to a boil. Cook about 3 minutes. Turn off the heat and allow to cool slightly. When cake is finished baking, a toothpick inserted into the cake will come out clean. While cake is still hot, pour lemonade syrup over the cake. The syrup will absorb into the cake as it cools. Let the cake cool in the pan on a wire rack about 1 hour. Run a knife around the sides of the cake. Invert on a plate. Remove parchment paper. When cake is cool, arrange fresh strawberry slices over the top of the cake and drizzle with strawberry glaze. Slice and serve in wedges. This cake will remain moist and delicious for several days. 

There you go my darlings! Bake some amazing almond cake!

Always My Very Best,
Your Friend Chef Tess

Wednesday, November 16, 2011

5 Day Sweet Roll Dough

Yesterday I shared some of the recipes and ideas from the homemade roll class, but this recipe deserves it's own post. Why? Because it's new to the blog...and it's one that has great application in so many rolls. I developed it as a roll dough that can be good in your fridge up to 7 days. It will make 5 dozen rolls so you can either make a dozen a day for 5 days, or just make a few dozen at once. I love the deep flavor and fluffy almost cake like texture of the rolls. I think you'll agree, this is a family favorite in the making! Please note that I use a lot of dry ingredients, thus the use of 6 cups of liquid. If you substitute prepared milk, you'll need to reduce the water amount. You'll also have to decrease the water if you use 4 real eggs instead of 1/2 cup dry egg powder. Bread flour, with it's higher protein content, will absorb more liquid than all purpose flour. 
 One of my favorite ways to make the sweet rolls is to just make sweet dinner rolls and lightly salt them with sea salt.
Here's the recipe.


Chef Tess 5 Day Sweet Roll Dough
2/3 cup Instant milk (or 4 cups prepared homemade soymilk  )
1 cup vanilla instant pudding mix (or homemade instant pudding mix
½ cup  whole egg powder
¾ cup  butter powder
¾ cup sugar
¾ cup olive oil
2T active dry yeast
1T baking powder
1T salt
6 cups lukewarm water (110 degrees or less)
12-14 cups  Bread Flour
Directions: Combine the milk powder, vanilla pudding mix, egg powder, butter powder, sugar and oil in a 3 gallon food grade bucket. Add the water one cup at a time with a whisk until all water is added and smooth mixture is made. Add the yeast and baking powder along with 4 cups of flour. Mix with a wooden spoon until smooth batter forms. Add the salt and 5-6 more cups flour, kneading well after each addition of flour. Mix 5 minutes. Allow dough to rest 10 minutes. Add 2-3 more cups flour depending on how moist the dough is. Knead 3 minutes more (total kneading time 5-6 minutes on medium speed with a dough hook or 600 turns by hand). Form into a nice ball and put in an ungreased food grade bucket in your fridge overnight (at least 8 hours). Punch down. This Dough is good up to 5 days in the fridge. Yields 6 dozen medium rolls. To bake, remove dough from fridge. Form into 2 oz rolls. Place 1 inch apart on greased pan and allow to raise 1 -1 ½ hour at room temperature.


The next few posts will be roll tutorials using this sweet roll dough! Won't that be the best?! Just in time for Thanksgiving!


There you go.


Always My Very Best,
Your Friend Chef Tess

Tuesday, September 20, 2011

My Easy Apple Fruit and Nut Strudel


You know what I need at the advent of Fall? A freakishly amazing strudel to knock me down on my knees and make me beg for mercy. It's a sick obsession...and I tell you there needs to be some kind of community intervention. I need to be locked in a room without an oven for a few weeks when the apples are this beautiful and the pastry is just begging to be filled with all kinds of romance. Evil freak-of-nature. How can I live with myself creating this stuff and then...not eating it?! You know what? I gave this entire confection away! Yup...be impressed.

 Tutorial Tuesday is here and I have decidedly been a little slow on posting this one...because I sure don't want my secrets getting leaked out all over the internet. Heaven forbid! People will start making wild passionate apple strudel all over the country and then what?! Total societal meltdown. Why? Because I got a little freaky reckless and started posting horribly evil things like strudel on my blog. So...shoot me. This one is for Janae Turner and her lovely husband Adrian...who came up with Bakeresse as my nickname. I think I owe Adrian at least a little post on the strudel. Plus, he and his wife were nice enough to eat this so I didn't have to stare at it's evil goodness all day. Bless you both! Now, this one I'm actually making without adding extra sugar. It's the natural fruit and the puff pastry sweetened naturally with stevia. You're welcome. Don't worry...you won't miss the sugar.
 I mean, seriously look at that rippling ab. I can't be held responsible for the human reaction I have to that in pastry form right?
Okay, so here's what you need.

1 sheet frozen puff pastry dough ( as I haven't done the tutorial for puff pastry yet I'm seriously not doing it today. So...ya know...this is the easy version here).


3 Granny Smith apples, peeled and chopped
1/2 cup sundried cherries
1/2 cup dried blueberries
juice and zest of one orange
1T Chef Tess Wise Women of the East Spice and Floral Blend
20 drops stevia natural sweetner (or 1/2 cup sugar)
1 cup chopped pecans
1/4 cup melted butter
Directions: Preheat oven to 425 degrees.
Remove pastry sheet from wrapper. Seriously I know...this is the cheater method. You can make your own pastry if you want. I usually do...but how much can I do in one post? Seriously.  Put the dough on a lightly floured counter top.
 Place berries and juice in a quart sauce pan and cook over low heat until fruit absorbs juice.
 Add the apples and zest. What is it about apples that makes me want to do a dramatic swoon across the room and pronounce them aaaaaaahpples daaaaahling. What is it? I'm not sure. I just love Fall and good baking apples.
 Season generously with my blend. Yup. You need it. It's not just cinnamon...it's a way of life. It's got a lot of other spices and citrus...and a hint at the very end of lavender and rosepetal. It will change your pastry life. I'm not kidding. Chef Tess Wise Women of the East Spice and Floral Blend. Add the stevia here too.
 Add the nuts and cook 3-5 minutes until apples are tender, but not mushy.

 Open up the pastry and fill the center 1/3 with a generous portion of the apple filling being careful not to get the filling on the outside flaps.
 Cut the sides into strips 1/2 inch wide, up to the filling.
 Fold the strips over the filling, being sure to tuck the strips into the side.
Now, drizzle the top with melted butter.


Transfer the strudel onto a baking sheet and put in the center of the preheated 425 degree oven for 30-35 minutes.

It will look like this...


Now, I actually took a micro-zest to an extra lemon and then mixed the zest with a tablespoon of vanilla honey. With a pastry brush, while pastry is still hot, spread the honey over the entire confection. 
Quick...while you still have some will power left...call a good friend and walk it over. Go! 
P.S. yes...I'm still home. Come on over with your strudel...anytime.

Your Friend,
Chef Tess

Thursday, December 25, 2008

Carmel Orange Hazelnut Danish...


There you are...the love of my life! These little bad boys are a butter-roll in Danish. The butter I infused with orange and lavender and then used brown sugar in the roll in, as is done with the Kouign Aman (Kouign Aman a Celebration in Opposites)--but the classical version uses granulated sugar. The brown sugar gave an amazing caramel addition to the already evil pastry! The result was a salty sweet infused love bomb. I can't EVER make them again or I will need to confess to my bishop. Seriously... I used the same recipe with an addition of a bit of sourdough and a much longer fermentation (2 days to be exact) which resulted in a deep flavor. Well worth the wait if you ask me! Because of this, I was able roll up the Danish and leave them on my kitchen counter overnight to rise. This lovely Christmas morning, we had hot pastry that I hardly had to think about...Though now I can't STOP thinking about.

Sunday, December 7, 2008

Danish Pastries of Love and Happiness


Here's something pretty. Danish pastries are one of my favorite things to make. I love how they look. I love how they smell coming out of the oven and filling my house with this buttery cardamom wave of love. Really, I think whoever came up with these must be among the raving genius bakers in history. Take a peek. I made them myself.

These are another one of those roll in doughs. Butter rolled into the dough to make it flaky and luscious. Ahhh. I love butter. Real Danish is a roll in dough. You see "Danish" in bakeries that don't make it with a roll in and it makes me crazy. Really, what is the point? If I wanted a cinnamon roll glorified, I would ask for one. These are the real deal. I promise I will give you a recipe someday!

Kouign Aman a Celebration in Opposites

My mother GENEVE is named after a region in France. I personally have never had the chance to visit the country but have grown up with a woman who loved good food nearly as much as the French! My phone rang, as it often does. This time the woman on the phone sounded like my mom but with a huge amount of awe and excitement! She had just gone to a bakery in Salt Lake City, Utah that had the most amazing pastries she had tried in a long time. Her great excitement spilled over these most amazing and unusual pastries called Kouign Aman, from a region in France called Brittany. I went to the website for the bake shop called Les Madeleine (http://www.les-madeleines.com/) . They touted the Kouign Aman as being a celebration of opposites, salty and sweet, crispy and gooey. NOW they had my attention. I was the one who had just finished a rousing chocolate dipping of salted French camels. Salty and sweet. Adding crunch and gooey sounded too good to be true!

I was excited to find that the preparation was very similar to that of a croissant, without the time it takes to roll into crescents. As I had been at a bakeshop in the Phoenician resort we had made croissants from scratch by the truckload. This sounded like a perfect fit for an upcoming holiday boutique I was involved with. To my joy they came together without much pain at all and I am excited to show you my finished pieces. I will be talking about roll in doughs very much in the future, but just know for now that once again, my mother is right. I am in awe and amazement at these new little pastries!


This recipe -- a tradtional cake from the Brittany region of France -- is brought to us by renowned pastry chef Florian Bellanger, of New York City's Fauchon.


Makes 15
1 3/4 cups room temperature mineral water
1 1/2 teaspoons fleur de sel (sea salt)
1 pound (4 sticks) plus 2 tablespoons high-fat unsalted butter, chilled, plus more melted butter for tart rings
5 cups all-purpose flour
1 tablespoon firmly packed fresh yeast
3 cups sugar, plus more for rolling [This I found to be too much sugar...I used about 2/3 cup]Directions
In a small bowl, combine mineral water and salt. Let stand until salt has dissolved. Meanwhile, melt 2 tablespoons butter in a small saucepan over medium-low heat.
In the bowl of an electric mixer fitted with the dough hook, combine flour and the melted butter on low speed. Add water-and-salt mixture, and continue to mix until well combined, about 2 minutes. Add yeast, and mix for 1 minute more.
Cover the bowl with plastic wrap, and let rise in a warm place until doubled in size, about 1 hour. Punch the dough down, wrap in plastic, and place on a baking sheet. Chill for 2 hours in the refrigerator.
Meanwhile, on a Silpat (a French nonstick baking mat) or parchment paper, roll the remaining 1 pound butter into a 1/2-inch-thick rectangle. Wrap in parchment paper, and return to refrigerator until chilled, about 30 minutes. Remove the chilled dough from the refrigerator. On a lightly floured surface, roll out the dough to an 18-inch square. Center the chilled butter rectangle on the dough so that each side of the butter faces a corner of the dough. Fold the corners of the dough over the butter to enclose. Seal the edges by pinching them together. Roll the dough into a 24-by-8-inch rectangle. Fold the dough into thirds, aligning the edges carefully and brushing off any excess flour. (The object is to ensure that the butter is distributed evenly throughout so that the pastry will puff evenly when baked.) Wrap the dough in plastic, and chill for 20 minutes; this completes one turn.
Repeat process once, then repeat process twice, dusting the work surface and the dough with sugar, and using 1 1/2 cups for each turn[AGAIN, I did not use this much sugar...just about 1/3 cup each turn...]. You will now have completed four turns.
Using a pastry brush, brush 15 ring molds (3 1/2 by 3/4 inches) with melted butter. Transfer to prepared baking sheets, and set aside. Remove dough from refrigerator. On a lightly sugared surface, roll the dough into a 1/2-inch-thick rectangle. Cut into 15 squares (4 1/4 inches). Fold up the corners of one square toward the center; repeat process. Lightly press to adhere. Turn square over, and gently coat with sugar. Invert, and place in a prepared ring mold. Repeat with remaining squares.
Preheat oven to 425 degrees. Let rise in a warm place until puffed, 30 to 40 minutes. Bake until golden brown, 35 to 40 minutes. Immediately remove ring molds, and place on a wire rack until completely cooled.