
Hello my darlings! Monday is the day I share a few tips and tricks for cooking and baking with food storage. It's always a happy-happy-joy-joy-day when I can visit my friends Callie and Tenille on the Cookin' Cousins blog! This is what they are sharing with their readers today (I'm guest bloggin') and I wanted to share it here as well. These are revised recipes and I think they're even better than the ones I've done here in the past.
Today we are dawning our bright frilly aprons, putting giant fluffy flowers in our hair and bustin' out the rick-rac embellished calculators to show you how to save real money! Welcome to Gravy and Sauce Mix basics. I can't stop bouncing! I'm so excited to show you how to save some cash-oh-laa, add some flavor, and have convenient mixes that are practical enough to use every day. Now that I have my three-prong thesis statement out of the way. Are we ready to begin?

1/4 cup cornstarch or Ultra gel
1T plus 1tsp beef or chicken stock granules, MSG free** if you prefer (make sure it's labeled gluten-free)
1T onion powder or Freeze Dried onions
1 tsp chef Tess All Purpose seasoning
1 bay leaf
Mix Directions: Place all ingredients in a half pint seal able jar. Repeat as needed however many mixes you want to make. Please note, this mix makes 4 cups of gravy.

To prepare: Whisk mix with 4 cups milk or water (broth or stock if you omit the bullion). Simmer over medium heat stir occasionally 10-15 minutes.
Smaller Batch
yield 2 cups
2T cornstarch or Ultra gel
2 tsp beef or chicken stock granules (Haco Beef Base is my favorite)
1 tsp onion powder
1/4 tsp Chef Tess All Purpose seasoning
To prepare small batches: Whisk mix with 2 cups stock or milk in a medium sauce pan with a heavy bottom. Simmer over medium heat 5 minutes for corn starch sauces, 10-15 minutes if you use flour.
 Yankee Beef Pot Roast Gravy

 This is a recipe that I use as the base for any cream soup or sauce. It's got a short list of ingredients and it works for the basics of life. The basics of life will happen on Tuesday night...or in any emergency. That being said, for food storage the main thing to remember is that you can keep this mix in pint jars sealed and labeled for a quick dinner anytime of the year. They keep fresh up to 5 years (for best flavor) so please be sure to label and date clearly with an oxygen packet at the top of the jar for optimal shelf life.
Chef Tess Cream Basic Soup/sauce Mix for Food Storage
1/2 c All Purpose flour (or for gluten free use 1/4 c cornstarch or ultra-gel)
2/3 c instant non-fat dry milk
1/3 cup sour cream powder
2T butter powder
1 bay leaf
2 T Freeze Dried Onions
1 T freeze dried celery
1T Chef Tess All Purpose Seasoning
2 T chicken stock or bouillon granules (No msg if you prefer. I like the low sodium like Haco chicken base )
To prepare: combine soup mix with 6 c water and whisk until combined over medium heat. Simmer 15-20 minutes. Add any flavor variations you like...2 c chopped broccoli or cauliflower, potatoes, corn, carrots, chicken, clams, crumbled bacon. If you want a cheese soup, be sure it gets added only at the very end after soup is off the heat or it will be grainy. This mix can also be used as a white sauce!
Have fun with this one! Add dehydrated potatoes, freeze dried vegetables and meats.
Tomato Soup: If you want creamy tomato, you may add 1/4 cup cup of tomato powder, but be sure to also add 1tsp baking soda to keep it from curdling when it cooks.
Medium Batch cream soup/sauce mix
(yield 3 cups soup/sauce)
1/4 c All Purpose flour (or for gluten free use 3T cornstarch or ultra-gel)
1/3 c instant non-fat dry milk
3T sour cream powder
1T butter powder
1 T Freeze Dried Onions
1 1/2 tsp Freeze Dried Celery
1 1/2 tsp Chef Tess All Purpose Seasoning
1T chicken bouillon like Haco chicken base (Haco says they are msg free and low sodium)
To prepare: combine soup mix with 3 c water and whisk until combined over medium heat. Simmer 15-20 minutes
Small Batch Cream Soup/sauce Mix (Yield 1 cup soup/sauce)
1 1/2 TablespoonHoneyville All Purpose flour ( gluten free use 1T cornstarch or ultra-gel)
2T instant non-fat dry milk
1T cup sour cream powder
1 1/2 tsp butter powder
1 1/2 tsp Freeze Dried Onions
1 1/2 tsp Freeze Dried Celery
1/4 tsp Chef Tess All Purpose Seasoning
1 tsp Haco chicken base
 Now. This is a big one. Try not to pass out (or pass anything in general for that matter).
How many casserole recipes start with a can of cream-o-gunk soup? I know a lot of guys and dolls who can't even make dinner without it. Now, suppose your family food budget went from several dollars a week going toward those cans...to several pennies a week. Would that save some good cash?
Oh yeah! Mama needs a new pair of shoes! What am I saying? Mama needs a pony!
What if you could control every single ingredient in your recipe as well. There's nothing wrong with cutting out a lot of undesirable added chemicals. There. I said it. Be a control freak. Control is good. It's good in hair gel and it's good in cooking. Though, I'm not ever mixing the hair gel with the soup. That would just be wrong. {Insert dramatic eyeball raise on the face of Chef-Tess} Use one mix to replace one can of soup condensed soup.
Tess' Condensed Soup replacement Mix
1/4 c Corn Starch or 1/3 cup ultra-gel
2 tsp chicken bouillon/stock granules ( My favorite is Haco chicken base )
1 T Freeze Dried onions
1/4 instant non-fat dry milk
2T sour cream powder
1/2 tsp Chef Tess All purpose seasoning
To prepare:Combine mix with 1 1/4 cups water whisking over medium heat.


 Heat until thick, about 5 minutes. It will thicken more as it cool so don't add a lot of extra thickener or you'll end up with glue.
 Yes. It does weigh just about the same amount as the contents of one small can of cream-o-gunk soup. Give or take 1/2 an ounce. I'm not worried.
 If you use ultra gel, you can skip the cooking step and just combine the full mix with the 1 1/4 cups warm water using a wire whisk. It will thicken in about 5 minutes. Yes. You did just make instant condensed soup pudding. Mmm. Pudding pie.
*Chef note: Cornstarch will lose it's ability to thicken once frozen, opt for Ultra gel for freezer sauces.
Cream of mushroom: Crush 1/4 cup Freeze Dried Mushroom Slices down to 2 T crushed freeze dried mushrooms. Add to your mix.
Cream of Celery: Add 2 T Freeze Dried Celery to the mix.
Here's a handy-dan-delicious tip. Put the single batch in a snack size zippy bag. Expel as much air out as possible and put up to 4 baggies in a quart size wide mouth jar.This is not only a fantastic way to have the equivalent of one can of soup condensed (bwhaha condensed soup more condensed soup), but also an easy grab when you have a recipe that calls for condensed soup. Just pull out a baggie. I don't even write cooking directions on the baggies (who has time for that?). I simply write how much water to add on the top of the jar. I actually double the recipe and know that each baggie will make 2 cans of soup. This quart size jar stuffed with baggies makes the equivalent of 10 cans of soup. Each mix (using cornstarch) cost about 7 cents. Yes. 10 cans worth of soup for 70 cents. That's a whole lot less than 10$ for 10 cans (on sale).

 There you go my lovelies! Make some time-saving, cash-ohhh-laaa saving, sanity-saving homemade sauce and soup mixes.
Always My Very Best,
Your Friend Chef Tess
I am no longer the corporate chef for Honeyville but we still love them dearly. My family is greatly blessed and relies heavily on the extra money brought in by sales tracked back to this site. This is also the company that packages and sells my spice line as well as my food storage cookbooks. Thank you so very much for your support. Xoxo!

Today we are dawning our bright frilly aprons, putting giant fluffy flowers in our hair and bustin' out the rick-rac embellished calculators to show you how to save real money! Welcome to Gravy and Sauce Mix basics. I can't stop bouncing! I'm so excited to show you how to save some cash-oh-laa, add some flavor, and have convenient mixes that are practical enough to use every day. Now that I have my three-prong thesis statement out of the way. Are we ready to begin?
The first mix I want to share is a real money saving tool. A single packet of gravy mix at the grocery store averages about 70 cents. Sometimes more or less on sale. My main concern isn't always saving money. The other side of the mixes is that they usually taste so flat and have a list of ingredients ten miles long. The gravy mix I use is also a base for soups. It can be used for beef stew or sausage biscuit gravy. It's simple enough to just add water (or milk for creamy soup) and cook on the stove. It also, ironically, costs just a few pennies to make. My small batch yields 2 cups of mix. That's about double the amount of gravy than what the average store-bought variety will provide. Oh...and for double the amount, you're looking about 12 cents per mix. If you made that a 1 cup serving...it would be 6 cents. Pennies. Oh. Did I also mention that it is gluten free?!
Chef Tess Basic Gluten Free Gravy Mix1/4 cup cornstarch or Ultra gel
1T plus 1tsp beef or chicken stock granules, MSG free** if you prefer (make sure it's labeled gluten-free)
1T onion powder or Freeze Dried onions
1 tsp chef Tess All Purpose seasoning
1 bay leaf

To prepare: Whisk mix with 4 cups milk or water (broth or stock if you omit the bullion). Simmer over medium heat stir occasionally 10-15 minutes.
Smaller Batch
yield 2 cups
2T cornstarch or Ultra gel
2 tsp beef or chicken stock granules (Haco Beef Base is my favorite)
1 tsp onion powder
1/4 tsp Chef Tess All Purpose seasoning
To prepare small batches: Whisk mix with 2 cups stock or milk in a medium sauce pan with a heavy bottom. Simmer over medium heat 5 minutes for corn starch sauces, 10-15 minutes if you use flour.

2 cups Freeze Dried Diced Beef
1/4 cup ultra gel or cornstarch
1/4 cup Freeze Dried Mushrooms
1/3 cup Dehydrated onion
1 tsp dehydrated minced garlic
1 tsp Chef Tess All Purpose Seasoning
Pour the gravy mixture into a 2 quart pot. Add 4 cups of very hot water to the gravy mix. Whisk well. Place on a stove and bring to a simmer 15-20 minutes. Turn off the heat and leave covered 5 additional minutes. Serve over baked potatoes or mashed potatoes.
To make this a 52 method meal in a jar that includes the mashed potatoes, go Here.


Chef Tess Cream Basic Soup/sauce Mix for Food Storage
1/2 c All Purpose flour (or for gluten free use 1/4 c cornstarch or ultra-gel)
2/3 c instant non-fat dry milk
1/3 cup sour cream powder
2T butter powder
1 bay leaf
2 T Freeze Dried Onions
1 T freeze dried celery
1T Chef Tess All Purpose Seasoning
2 T chicken stock or bouillon granules (No msg if you prefer. I like the low sodium like Haco chicken base )
To prepare: combine soup mix with 6 c water and whisk until combined over medium heat. Simmer 15-20 minutes. Add any flavor variations you like...2 c chopped broccoli or cauliflower, potatoes, corn, carrots, chicken, clams, crumbled bacon. If you want a cheese soup, be sure it gets added only at the very end after soup is off the heat or it will be grainy. This mix can also be used as a white sauce!
Have fun with this one! Add dehydrated potatoes, freeze dried vegetables and meats.
Tomato Soup: If you want creamy tomato, you may add 1/4 cup cup of tomato powder, but be sure to also add 1tsp baking soda to keep it from curdling when it cooks.
Medium Batch cream soup/sauce mix
(yield 3 cups soup/sauce)
1/4 c All Purpose flour (or for gluten free use 3T cornstarch or ultra-gel)
1/3 c instant non-fat dry milk
3T sour cream powder
1T butter powder
1 T Freeze Dried Onions
1 1/2 tsp Freeze Dried Celery
1 1/2 tsp Chef Tess All Purpose Seasoning
1T chicken bouillon like Haco chicken base (Haco says they are msg free and low sodium)
To prepare: combine soup mix with 3 c water and whisk until combined over medium heat. Simmer 15-20 minutes
Small Batch Cream Soup/sauce Mix (Yield 1 cup soup/sauce)
1 1/2 TablespoonHoneyville All Purpose flour ( gluten free use 1T cornstarch or ultra-gel)
2T instant non-fat dry milk
1T cup sour cream powder
1 1/2 tsp butter powder
1 1/2 tsp Freeze Dried Onions
1 1/2 tsp Freeze Dried Celery
1/4 tsp Chef Tess All Purpose Seasoning
1 tsp Haco chicken base
To prepare: combine soup mix with 1 c water and whisk until combined over medium heat. Simmer 15-20 minute (or 5 minutes for cornstarch)
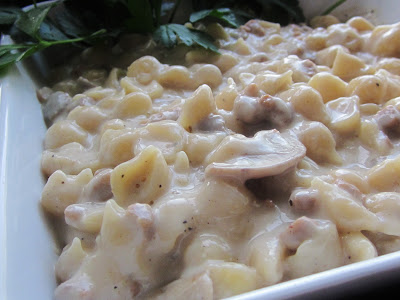
How many casserole recipes start with a can of cream-o-gunk soup? I know a lot of guys and dolls who can't even make dinner without it. Now, suppose your family food budget went from several dollars a week going toward those cans...to several pennies a week. Would that save some good cash?
Oh yeah! Mama needs a new pair of shoes! What am I saying? Mama needs a pony!
What if you could control every single ingredient in your recipe as well. There's nothing wrong with cutting out a lot of undesirable added chemicals. There. I said it. Be a control freak. Control is good. It's good in hair gel and it's good in cooking. Though, I'm not ever mixing the hair gel with the soup. That would just be wrong. {Insert dramatic eyeball raise on the face of Chef-Tess} Use one mix to replace one can of soup condensed soup.
Tess' Condensed Soup replacement Mix
1/4 c Corn Starch or 1/3 cup ultra-gel
2 tsp chicken bouillon/stock granules ( My favorite is Haco chicken base )
1 T Freeze Dried onions
1/4 instant non-fat dry milk
2T sour cream powder
1/2 tsp Chef Tess All purpose seasoning
To prepare:Combine mix with 1 1/4 cups water whisking over medium heat.


*Chef note: Cornstarch will lose it's ability to thicken once frozen, opt for Ultra gel for freezer sauces.
Cream of mushroom: Crush 1/4 cup Freeze Dried Mushroom Slices down to 2 T crushed freeze dried mushrooms. Add to your mix.
Cream of Celery: Add 2 T Freeze Dried Celery to the mix.
Here's a handy-dan-delicious tip. Put the single batch in a snack size zippy bag. Expel as much air out as possible and put up to 4 baggies in a quart size wide mouth jar.This is not only a fantastic way to have the equivalent of one can of soup condensed (bwhaha condensed soup more condensed soup), but also an easy grab when you have a recipe that calls for condensed soup. Just pull out a baggie. I don't even write cooking directions on the baggies (who has time for that?). I simply write how much water to add on the top of the jar. I actually double the recipe and know that each baggie will make 2 cans of soup. This quart size jar stuffed with baggies makes the equivalent of 10 cans of soup. Each mix (using cornstarch) cost about 7 cents. Yes. 10 cans worth of soup for 70 cents. That's a whole lot less than 10$ for 10 cans (on sale).


Do you want the printable version of today's recipes. Yes. Of course you do. Click: here.
**End Note: MSG free will depend on the company who makes the base or bouillons. Some say MSG free but contain autolyzed yeast extract. The ones I use are labeled MSG free, but contain the yeast extract, meaning it's not the same compound as MSG per say. If you want to know more about this go here.
Again, and as always... You do what you feel is right for you and your family. If I can eat seaweed with naturally occuring yeast and the products I use don't exceed that amount, as I understand it, they should be fine. I prefer the flavor and the salt content of the brand I use. I try to offer healthier alternatives here. If you want to just make the mixed without the flavor extracts, you can do so and then use homemade or packaged stocks in place of the bouillon and in place of the liquid in the recipe. These are things that have worked for me and my family. Use organic versions if you want. These recipes can act as a guide. I've made the soup and sauce bases using non-gmo soymilk powder as well and it has ben great!I have not tested them using almond milk or rice milk.
Always My Very Best,
Your Friend Chef Tess


