Showing posts with label Rambling Reviews. Show all posts

Saturday, September 16, 2017

Rambling Review: Isopasta High protein Low-Carb Pasta


Remember the day I promised you guys that I'd only review on my blog the stuff I liked, because I'm classy that way? Well. Here's a good one.

I recently found a low-carb pasta that is based on protein...and it's really good.

 I didn't get paid to do this post. 
They didn't send me any free product. 
This is just my own  experiment and observation because I thought it sounded too good to be true! 


 It's called IsoPasta
photo courtesy of Isopasta 

Things to note:
  • At first, the price threw me. I'm admittedly a cheapskate and I'm used to the normal pasta prices at the grocery store, but then I did the math. For low carb, what I'd pay for a protein supplement or protein bar anyway, I could actually eat a rather filling and tasty meal. 
  • It makes a lot of pasta!  One bag of their pasta along with vegetables and lean beef, made about a half gallon of finished fusilli. They called this 5 servings, but the pasta is so filling, it was really more like 8. Plus the calorie count was 170, including only 7 net carbs and 30 grams of protein. 
  • Cooking time is real.   The package actually says to cook it for 30 minutes. That threw me off too. I'm a chef. I like a good texture to my pasta, but on this one they aren't kidding. 30 minutes and it is the texture of regular pasta. 
  • It's really filling.  I can eat this at noon and not have a hunger pain until six hours later. Not many protein bars can offer that.
  • It's so much like pasta, it's scary.  Like really scary. For those missing pasta in their life, it's a real blessing!


There you go. Just a quick review of something yummy!  Have an awesome Tuesday my darlings!


Monday, February 20, 2017

Streets Fine Chicken in Dallas TX, Rambling Review


 Y'all know that if I don't like a restaurant, I don't give it a review on my blog.  As a general rule, I just think it is classy to only share what is awesome and not rip another establishment down. That being said, I was in Dallas last week with Evil TARA ...the original giant brain in my Evil Think Tanks ...see the ETT for details on how those kitchen shenanigans ensued.  At any rate, she's the one who originally said, "Steph, you should start a blog." To which I replied, "What's a blog?"  I had so much to learn and she opened the floodgate.  We've had a lot of fun along the way.  Now, back to Dallas.

During a two day visit with my remarkable friend, we were looking for a place to have a quick dinner.  We found this one.  Streets Fine Chicken

I should have known that I'd love it just based on the first few items on the menu...Chickarones, fried chicken skins with chili lime salt, and the chicken lollipops, smoked 'n' fried chicken drumsticks rolled in a Grand Marnier horseradish molasses.
 We ordered the lollies. How could we not?
They were fall-off-the-bone tender smoked  and then deep fried giving it a very unique crisp-tender contrast.  That perfect little drumette was then covered in this sticky-savory molasses that literally made me giddy.  The presentation was spot-on and the flavors were perfect. 

Next we got the Chickarones. In Arizona and across the country people have fried pig skins all the time.  I thought this was a brilliant use of chicken skin, plus when I bake chicken, I really love the crispy skin!  These were so crispy and warm with a mild chili and lime salt.   

 I think I can't admit how many of them I ate.  I was on vacation. Don't judge me. Seriously though, they were crispy heaven! They were everything one would expect in a fried pork skin, but with chicken...and way better than pork. Waaaay better. 
After that, we were on to the main stage.  They had two things that were their specialty.  Fried chicken and something called "Sin Killer Chicken".  Tara had had Peri Peri chicken in France and insisted that I'd love it.  I had to trust that, plus the description sounded absolutely divine!


We ordered it with the creamy baked brie macaroni and cheese.  I wish I had words to describe the flavor explosion. Tangy, sweet, spicy with hints of citrus and herbs then grilled to a tender perfection.  I was in love.  Life changing chicken.  I never say that, but this was awesome.
Sin Killer is flame grilled chicken marinated in olive oil, agave nectar, orange peel, lime juice, garlic, cilantro, onion, Peri Peri peppers, herbs and spices; There was also a light and super fluffy honey biscuit; creamy brie mac n' cheese made with gouda and creamy brie - baked then toasted to perfection. 
By the time we got to their signature fried chicken and roasted brussel sprouts, I could barely take a bite.  The few tastes I did have were really remarkable. It wasn't fried chicken that you could ever put in a bucket.  It was really delightful. 
Needless to say, I really adore this chicken place.  The service was every bit as awesome as the food served with a smile and a Texas accent.  Whenever I'm in Dallas, this will definitely be on my list of places to go!

There you go darlings! Go visit these guys!

Always My Very Best,
Your Friend Chef Tess


Tuesday, April 1, 2014

Rambling Review: Fired Pie...Redefining Custom Pizza Fast!


I have to share this Post by Fired Pie.
 One of my favorite visitors this week on the Radio show Cooking With Jan D'Atri  came from a new pizza chain here in the valley called Fired Pie.  They brought 5 pizzas to the radio station and we were in hog heaven!  I loved their concept!  I have teenage boys. Anyone who makes pizza simple for me and still makes it ridiculously awesome is worth sharing.  Their whole concept is basically a "build your own" pizza that is then fired off in a 500 degree oven in 3 minutes flat. The crust is a thin, remarkably artisan crisp-chewy dough. The toppings are all first class. The price is great for an 11 inch pizza as well...


My favorite sample was the pesto chicken.

I'd suggest you  follow Fired Pie on Facebook
Seriously...they are redefining custom pizzas and salad.
Mention you heard about them from us on the Radio show on Tax Day, 4/15 and get a single item pizza of your choice for $4.15...Totally worth the trip.

There you go. A new favorite pizza place! Go check them out.

Always My Very Best,
Your Friend Chef Tess


Thursday, January 24, 2013

Where Do You Get Chef Coats? Shout Out!

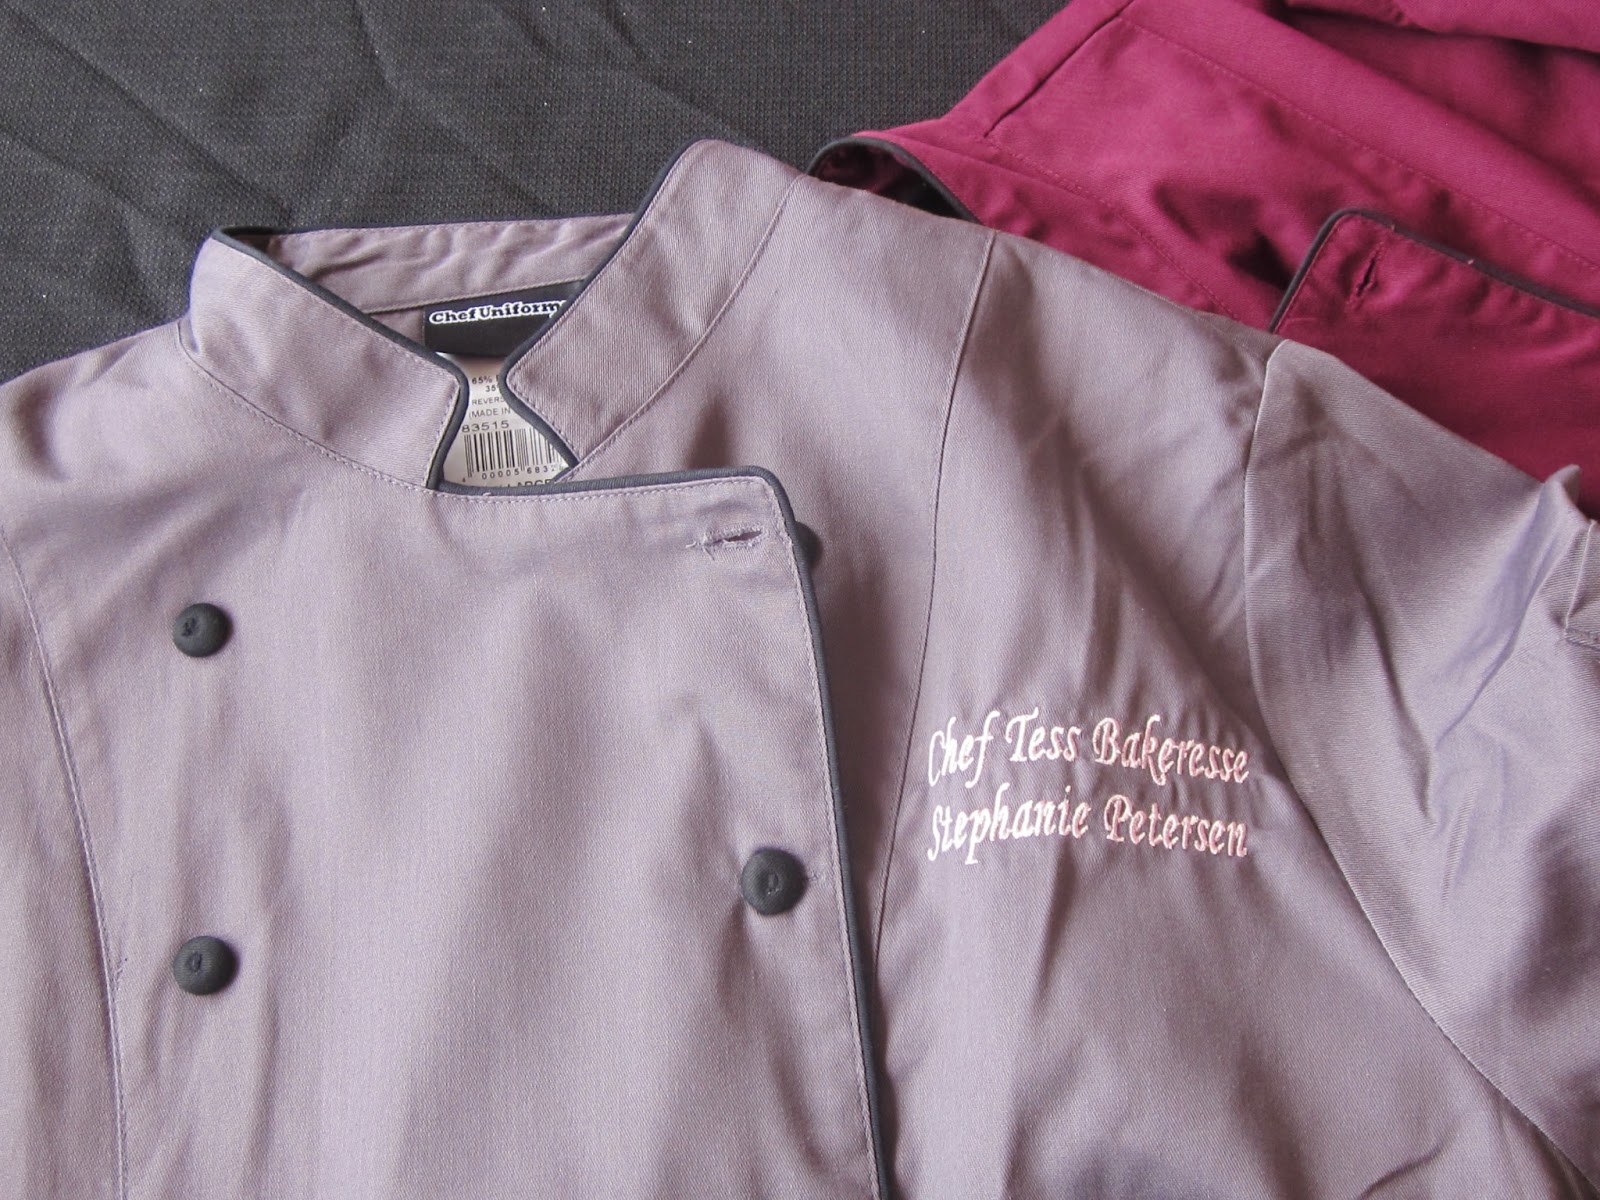
 A few months ago I walked into a uniform store here in Phoenix. The name of the store will remain undisclosed. I had found them on the internet and they never answered their phones so I had to drive way across town. I'm a busy gal and usually pressed for time, but I really needed a new white chef coat and so far, this was the closest location with "uniform" in the title.   When I got there, I walked into a warehouse sized store full of pants and suits and anything you could imagine for the working-class. The entire uniform store had everything except chef coats. Everything. If I was a road worker I would have been set for life when it came to uniforms.  Needless to say, I had to go to my event without a new chef coat.  A few weeks ago the folks at www.chefuniforms.com contacted me and offered to send me a free chef coat to try out and review. I was excited to see what they had. Mind you, I only use them when I go to events or cook at the company kitchen, but that is often enough and the old white one I had was getting pretty worn out.  

They sent out a coat and I got it within a few days. I loved the fit and the look of it so much that I went back to their website right away and ordered 4 more! They had the Basic White Chef Coats starting as low as 10$ and from there one could get fancy and colorful and add all the wording and stuff (for a certain cost). 

 My new personally embroidered coats arrived just a few days after I had ordered them and the check-out on their site was very fast and easy. I'm just super impressed.
So, if you're in the market for a new chef coat, this is great location. The cost is right, I didn't have to take time out of my busy work day to drive across town and not find what I wanted...and the package came with a return sticker with paid postage inside, just in case there was something wrong with the size or whatever! 

There you go darlings! Get a chef coat.
 www.chefuniforms.com rocks!


Always My Very Best,
Your Friend Chef Tess

Tuesday, August 14, 2012

Making whole-grain flour at home in 3 Easy steps! Turning Wheat into Bread!


 After 13 years of using an older hand-me-down grain mill, I finally have saved enough to get the electric grain mill I've had my eyes on for 2 years. Yup. We do practice delayed gratification at my house. I realize I could have bought it sooner...but I really wanted to be sure it was in the family budget after other debts were paid off. So. Enter the new grain mill. Eeeek! I'm so excited!  This is the NutriMill. I'm totally in love. Today we used 50lbs of whole KAMUT® ancient Egyptian wheat. It is organic, non-GMO and 70% of the people who have issues with modern wheat can tolerate this form of grain. With this mill, we made 50lbs of flour in about 20 minutes. That might be a record for making flour around here. In fact, my kids usually moan when I say, "It is flour making day!" However, this new mill was so easy to use that they ended up being asked repeatedly to stop making flour! I LOVE that! Love it!
 Here are the basic steps to making flour:
Step One: Assemble the grain mill.
 The first thing I noticed about this new NutriMill.  was how easy it was to assemble. I was worried that my giant-little brain wouldn't be able to get it to work.

 The instructions were pretty clear.

 Step 2: Follow what the NutriMill owner's manual says about the first time you use their mill. This means you need to mill 2 cups of wheat and then discard it. This will eliminate any contaminants the mill may obtain in the manufacturing process. Make sure the grain you use is clean! 
Mill that first 2 cups of wheat according to the mill instructions. This one says to unplug the mill, add the grain to the top. Then plug in the mill and turn it on. There is a knob on the front that is easy to adjust for how fine or large the grains are that are going into the stones to be ground.
 Throw away that first two cups of wheat (about 4 cups of flour). By the way, this step only needs to be done the very first time you ever ever use the mill. From here on out, I'm good to mill and use all the grain I want without throwing any away.
 Step 3: Let the kids take over and make the bread. You think I'm kidding right? Not really but okay. I was there in the kitchen when they started milling the grain. They know how to use our hand-crank grain mill as well, but today we did electric. I wanted there to be full ownership in this bread. I am the Little Red Hen Mother. If they want bread, they get to help make it. Plus, this also gives me the extreme emotional and spiritual satisfaction of knowing that in any given situation, my boys will know how to make food from grain. Bread, porridge, crackers or anything that can be made from flour, they can make. I'm sick-in-the-head that way, but I get a weird sense of peace in knowing that they will leave my home someday with a full knowledge of how to work, cook, and contribute to society as a whole. So...starting with wheat and basic food is a good place. They could end up in a country someday that doesn't have flour. You think I'm kidding right? No Way. I'm thinking about being prepared for anything in life...anything! Will they be soldiers or in a refugee camp in the future? I don't know. There are not any guarantees in life.  If they only had wheat or any other grain, they'd be good to go! Heck yes! Rock-star cool! Yes, they are boys. So?!? If I had girls they'd learn the same thing. Boys grow up into men who need to eat right?! What if there isn't a girl around who knows how to make flour?! See...sick mother isn't so sick right?  So let us repeat the steps again:
1. Unplug mill and add grain to the top (hopper).
 2.Turn mill on & adjust the grind to the your desired texture of flour. Random side note. My son asked, "Hey does the wheat scream when it gets down to the part where it is all ground up?!" I laughed out loud as I remembered watching my grandmother's grain mill and the last straggling grains hold on to the edge of the mill's hopper before being sucked into the black hole at the bottom to be ground into the sweet and delicious flour that would be made into bread. Yes my son. They scream. Just like kids scream when they go down a water slide. It's fun! Or it is grain-o-side. Either way...it is for the greater good. Right? Try not to encourage slipping on grain-native-ceremonial-garb and doing some weird dances and chants while the grain is being sacrificed to the grain-mill-demi-god. I'm crazy but I'm not insane. Wait. Now that I think of it...the dancing would be just strange enough to do wouldn't it? If I can fashion the turmeric and paprika into a thick paint-like paste to rub on our noses...{I digress}.
 Hold on little grain and your life may be spared! Bwhahaha! Not today looser. Evil grin (as I flick the grain with my finger into the pit of despair)!
One thing I do with my grain is add 4 cardamom seeds to each batch of flour.
 I grind them with the wheat. The mill is not designed to grind spices alone (so keep that in mind and if you do add anything to your grain, keep it as pure as possible).  The cardamom will help the flour to retard bugs and other pests. I don't keep the flour around very long but it is a wonderful habit to have. Doesn't that seed mixed in with the grain look so much like a...nevermind.
 Little Man took his turn with the grain grinding as well. He's getting so tall! I don't know how much longer I can call him my Little Man.
 Each 25 lb bag of Kamut made 5, 5lb bags of flour. Simple math right?
 In the end, we made dough for 25 loaves of bread. We retained 25 lbs of flour for the bread class I'd be teaching soon.
It is beautiful stuff.
Step #3. Let kids make the bread. Or make it yourself. Whatever.
My son Face was anxious to make the bread now that he had made the flour.
4 cups hard wheat flour

 2 cups water. 1/4 tsp instant yeast.
 1 1/2 tsp salt.
 Mix until just combined. I'm not going to lie. This is his favorite part.
 The dough is so smooshy at first.
Once all the dough is smooshy, cover over with a lid and let sit 10-14 hours (usually for us it is about 12 hours before we get back to it). Dough will be ready to make into bread. The printable tutorial is below for how to make it into bread.
If you want the printable go to:

There you go! Turn Wheat into Bread!
Save money and empower yourself! 

Legal blah blah blah: By the way...I paid for my mill out of my own pocket so this a totally unbiased review of the mill. The opinions expressed here on the blog are totally my own. Isn't that good to know? I don't make any money if you decide to buy a mill based on this review. 

Always My Very Best,
Your Friend Chef Tess