These were a huge hit at the baby shower last weekend. Seriously. What's not to love about salted caramel on anything. Even liver would taste good with salted caramel. These homemade buttermilk doughnut holes are a far cry from the liver. They're fluffy cake bites with a hint of spice that you roll in powder and then drizzle with salted caramel just before serving. I roll them in powdered sugar, wait a few minutes, and roll them in sugar again. This gives them a nice thick coating. Don't add the salted caramel more than an hour before serving or it will melt into the doughnuts. I served them in mini souffle cups that you can purchase at most grocery stores in the cake and party favor section.
Salted Caramel Buttermilk Doughnut Holes
Doughnut Batter:
2 cups Unbleached All-Purpose Flour
¼ tsp. Chef Tess Wise Woman of the East Blend, or nutmeg; optional, for flavor
¼ cup coconut sugar
1 Tbsp. plus 1 tsp. baking powder
1/2 teaspoon salt
1 large egg
1 cup buttermilk
¼ cup coconut oil, melted
Frying Oil: about 5 cups
Powdered Sugar, about 3 cups
Salted Caramel Sauce, prepared, about 2 cups
Instructions:
Pour the oil 1" deep into a 10" skillet that's about 2 1/2" deep or use an electric frying pan. You want the oil to be about 1" deep. Start to heat the oil to 350°F while you're preparing the doughnut batter. Whisk together the dry ingredients. In a separate bowl, whisk together the buttermilk and egg. Pour the milk/egg into the bowl with the dry ingredients, stirring briefly; then add the oil, stirring to make a thick batter/soft dough. When the oil has come up to temperature, use a cookie scoop (or a spoon) to drop balls of batter into the hot oil. This recipe will make 2" doughnut holes using a tablespoon cookie scoop, and drop in balls of dough about as big as an undersized ping pong ball; or 1 1/2" holes, using a teaspoon cookie scoop, and dropping in balls of dough about as big as a chestnut. Fry the doughnut holes for 2 minutes on the first side, or until they're a deep brown. Some of them may turn themselves over; that's OK, just use a pair of tongs to turn them back. After 2 minutes, turn the holes over, and fry for an additional 2 minutes (for the larger doughnut holes), or 1 1/2 minutes (for the smaller ones). Transfer the doughnut holes to a baking sheet lined with paper towels to drain and cool.
Decorate:
·Serve warm or at room temperature, roll in powdered sugar and place in mini souffle cups.Drizzle each doughnut hole with 1 Tbsp. salted caramel sauce and pierce with a mini serving fork.
These were one of the cookies at my latest catering event and I had to share the recipe with all of you gorgeous people on the blog. For one thing, you can never have too many cookie recipes during the holidays. For another thing, do we need another reason to have sugar cookies?! Really?! I just thought that these little guys just added a lot of character to the dessert table and they were so simple to make! Citrus and Lavender is probably one of my all-time favorites when it comes to flavor profiles in baking, as long as the lavender isn't so strong that it takes over the finished pastry. The secret to these cookies is using just one drop of essential oil in the baked cookies and then adding citrus notes. If you use more than a drop, the lavender is too powerful and it takes over the cookies. When I made these for my BFF Gena's Baby Shower, she tasted them and said, "OH these are fabulous! There's just a little something that makes them soooo good but I can't place the flavor. What is it?!" ...and that is how it should be with lavender. Subtle. Sophisticated. Sexy. Are you ready for the secret recipe?
Directions: Preheat oven to 375° F. Wash and sanitize all work surfaces, utensils, and hands before handling raw flour and dough. In a mixer with a paddle attachment, cream butter and sugar until fluffy. Add the eggs one at a time. Add emulsion, lemon, lavender, and milk. Stir well. Combine the flour mixture with the creamed butter mixture, just until combined. Scoop by rounded Tablespoon onto ungreased cookie sheet or sheet lined with parchment paper. Wash and sanitize all work surfaces, utensils and hands after handling raw flour and dough. Bake until lightly golden, about 10-13 minutes. Allow cooling on the baking sheet about 10 minutes before transferring to another location. Store in an airtight container. Yield approx. 5 dozen cookies.
Orange Buttercream Frosting
3 cups powdered sugar
½ cup butter, softened 1 tsp. almond extract 1 tsp. orange emulsion or 5 drops culinary grade orange essential oil 3-4 Tbsp. hot water
Directions: In a large bowl, beat remaining Frosting ingredients with electric mixer on low speed until creamy.Pipe frosting onto cookies. Top with a sprinkle of a few edible gold pearls on each cookie. After they were finished decorating, I added a little flourish of edible gold spray.
There you go! Make some amazing sugar cookies! Always My Very Best, Your Friend Chef Tess
This is post number 3 from the catering that I did for my sweet best friend Gena's baby shower. Gena loves soft sugar cookies with real buttercream and I had to bring these little guys along. The frosting was topped with freeze-dried chunks of apricot and then I sprinkle a few edible gold pearls on each one along with a few sliced almonds. The freeze-dried apricots gave them a fabulous tart-sweet contrast. After they were finished decorating, I added a little flourish of edible gold spray. They turned out stunning and delicious! These would be perfect for a wedding, bridal shower, or any holiday catering event this winter.
Directions: Preheat oven to 375° F. Wash and sanitize all work surfaces, utensils, and hands before handling raw flour and dough. In a mixer with a paddle attachment, cream butter and sugar until fluffy. Add the eggs one at a time. Add vanilla and milk. Stir well. Combine the flour mixture with the creamed butter mixture, just until combined. Scoop by rounded Tablespoon onto ungreased cookie sheet or sheet lined with parchment paper. Wash and sanitize all work surfaces, utensils and hands after handling raw flour and dough. Bake until lightly golden, about 10-13 minutes. Allow cooling on the baking sheet about 10 minutes before transferring to another location. Store in an airtight container. Yield approx. 5 dozen cookies.
Amaretto Buttercream Frosting
3 cups powdered sugar ½ cup butter, softened 1 tsp. almond extract 3-4 Tbsp. hot water
Directions: In a large bowl, beat remaining Frosting ingredients with electric mixer on low speed until creamy.Pipe frosting onto cookies. Top with freeze-dried chunks of apricot and then I sprinkle a few edible gold pearls on each one along with a few sliced almonds. After they were finished decorating, I added a little flourish of edible gold spray.
Once upon a time my favorite friend Heather invited me over for a barbecue. She whipped out a giant vat of potato salad that she had made and it blew my freakishly adorable mind-space. Number one, because she made just enough for me, and maybe a tablespoon or two for the rest of the guests. You know, I love good potato salad. I do. Don't judge me. Secretly you do too. I bet I'm not the only one who has it as a midnight snack instead of cheesecake. Well. Maybe only if there isn't cheesecake in the house. Number two, It was perfect. It had just the right balance of zing and zang. The best part... It had bacon in it. Yeah. Bacon. Then she confessed to me her ultimate secret for the best potato salad ever. The secret ingredient she used, besides the bacon fat in the dressing, was also the use of pickle brine in the dressing. That's when things got crazy! I started to squeal gleefully! I pulled out ceremonial head-garb and started singing...The Heather and Tess Ya-ya Sisterhood dancing ensued as I confessed that I too had been using pickle juice in my potato salad dressing for years! After we removed our ceremonial head-garb and stopped dancing, we continued comparing recipe similarities, and it always came back to the pickle juice being the secret ingredient. Ya know...and the bacon. Confession...I have used pickle brine in my potato salad since I was in my twenties, So, since last week...give or take a few decades. This is just a brilliant use of an otherwise "useless" liquid that generally gets thrown away in the trash anyway! I couldn't wrap my head around the bacon fat for my clients, but for the family barbecue, it was absolutely spot-on! Several years later as I was developing a potato salad recipe for catering and personal chef events, this loaded potato salad just kept appearing in my universe. It was a sign. It needed to be part of what I just served regularly. It is a potato salad without eggs (though you could add those if you wanted to do so) and it is a potato salad that has to always use dill pickle juice instead of vinegar in the sauce. Don't ask me why...except that the saltiness of the pickle brine with the potatoes give it a punch of flavor! To give balance to the tangy zip of the pickle juice, I use sweet pickle relish as well. It seems weird, but it works! Yes! This is a banquet size recipe that will make 60 servings. Obviously it can be cut back if you need to do so...but it will ensure that there is something for your guests to eat after you've had your "taste". Tess' Loaded Potato Salad yield 60 ½ cup servings Ingredients: 5 pounds red potatoes, diced into 1/2 inch cubes, skin on, washed 2 1/2 cups mayonnaise ¾ cup dill pickle juice OR white vinegar 1 tsp black pepper, freshly cracked 1 tsp salt 1 tsp thyme, ground 1/2 tsp Cumin, ground 1/2 tsp curry powder 1T minced garlic 1/4 lb bacon crumbles 1 cup green onions, sliced thin 1 cup diced celery 1/4 cup sweet pickle relish Procedure: In a large pot of salted water, add potatoes and cook until just fork tender. Remove from boiling water and cool. Combine remaining ingredients in a large 2 gallon bowl. Mix with potatoes, adjusting seasoning as needed, chill well. Serve with your favorite stuff...or just eat it at midnight in your jammies and slippers in front of the open fridge door. I'm not going to judge you. Just make sure to wear the ceremonial head-garb. Xoxo!
Last week we made some gingerbread houses for centerpieces to use during some swanky upcoming Christmas events. Ya know. It is the pretty little house that any inch-high fairy would find passed the land of swirly whirly gum-drops and the proverbial "wintery Fairy-Land". Try not to scream, "Saaaanta! I know him!!" Now, in order to keep swipers from swiping...we put our gingerbread fantasy-lands under glass!
How did we take this gorgeous beast and put it in the glass display?
Ya know...without destroying all the delicate features of the house?
Well. The secret is making them by first measuring. Simple silly. The second secret is making them lightweight and cheating a little. Yes. I cheated. These beauties are made with cardboard. They're a cross between a kitchen craft and a real gingerbread. This makes them light enough and strong enough to put in a container without falling apart.
We even used a hot glue gun to really give the strength we needed for the base.
My advanced pastry school instructors are probably not very happy with this. However, I'm a mom first right now...and I just didn't have a full day to devote to baking gingerbread, cutting, sugar melting, and waiting for royal icing to dry. Plus...it wouldn't have been light enough to slip into the cookie jar. Really.
Just make sure the base of the structure fits inside the container, then remove from the glass, decorate and return to the "under glass" area. This one was done in a trifle bowl.
This also works for mini snow-globe-type gingerbread houses. Invert a regular mouth mason jar lid and ring that have been sealed together with hot-glue. This base gives the house enough lift to be seen as a snow globe inside of the jar. Put your gingerbread or cardboard house inside the inner circle of the ring. Place the regular mouth mason jar lid on a wide-mouth lid.
Make sure it will fit inside the wide mouth quart jar. This is one of the Ball old-fashioned wide mouth pint jars. They are a little fatter and shorter than the regular wide-mouth jars.
Remove. Decorate. Return to the jar.
Other cheater ideas. Yup. I have them too. 1. Use recycled stuff. The top roof is a recycled hamburger clam-shell. The base is a cardboard box and the structure for the fireplace is some strategically folded paper-towel cardboard.
2. Use unexpected decorations and embellishments. The "wood siding" for the house is actually some perfectly measured and snapped pieces of tomato-basil dry linguine...hot glued in place. This was dry enough to keep the structure from going soggy. I could have used gum pieces or something. This was just what I had around the house. If you see some light green on the side of the wrap-around porch and the balcony...that was spinach linguine.
The pillars on the wrap-around porch and the fence-posts are all made from candy sticks. My son called them candy cigarettes. I'm not sure I'd let my kids play with them for anything but making gingerbread. I used royal frosting for the final decorations but in general, the hot glue gun stayed in-use most of the project. I think this house will be here in 5 years if I keep it dry. Not that I'm going to do that...but it is really cool!
My son said, "We need to make these every single week!" So, you can bet that we will be doing more.
Please note. The pile of candy and bags of goodies...well...that was for the project. However, for under 20$ and a full 6 hours of just being creative with my son...it was a priceless investment.
We bonded over pretzel-logs, licorice siding, smarties shingles, and frosting ice-cycles. What could be more perfect? There you go. Do some kitchen crafts with your kiddos!
Today's cooking class was like three classes in one. We talked "freeze cinnamon rolls", "fruit cutting and preparation for large groups", and "cooking for large groups using food storage ingredients".
Class one. How To Make Freezer Cinnamon Rolls", was outstanding. Some gals got to play with frosting...err...frost the cinnamon rolls in a really fast and easy way. What is it about playing with frosting that makes life so beautiful? I don't know. That's probably one of my favorite things to do.
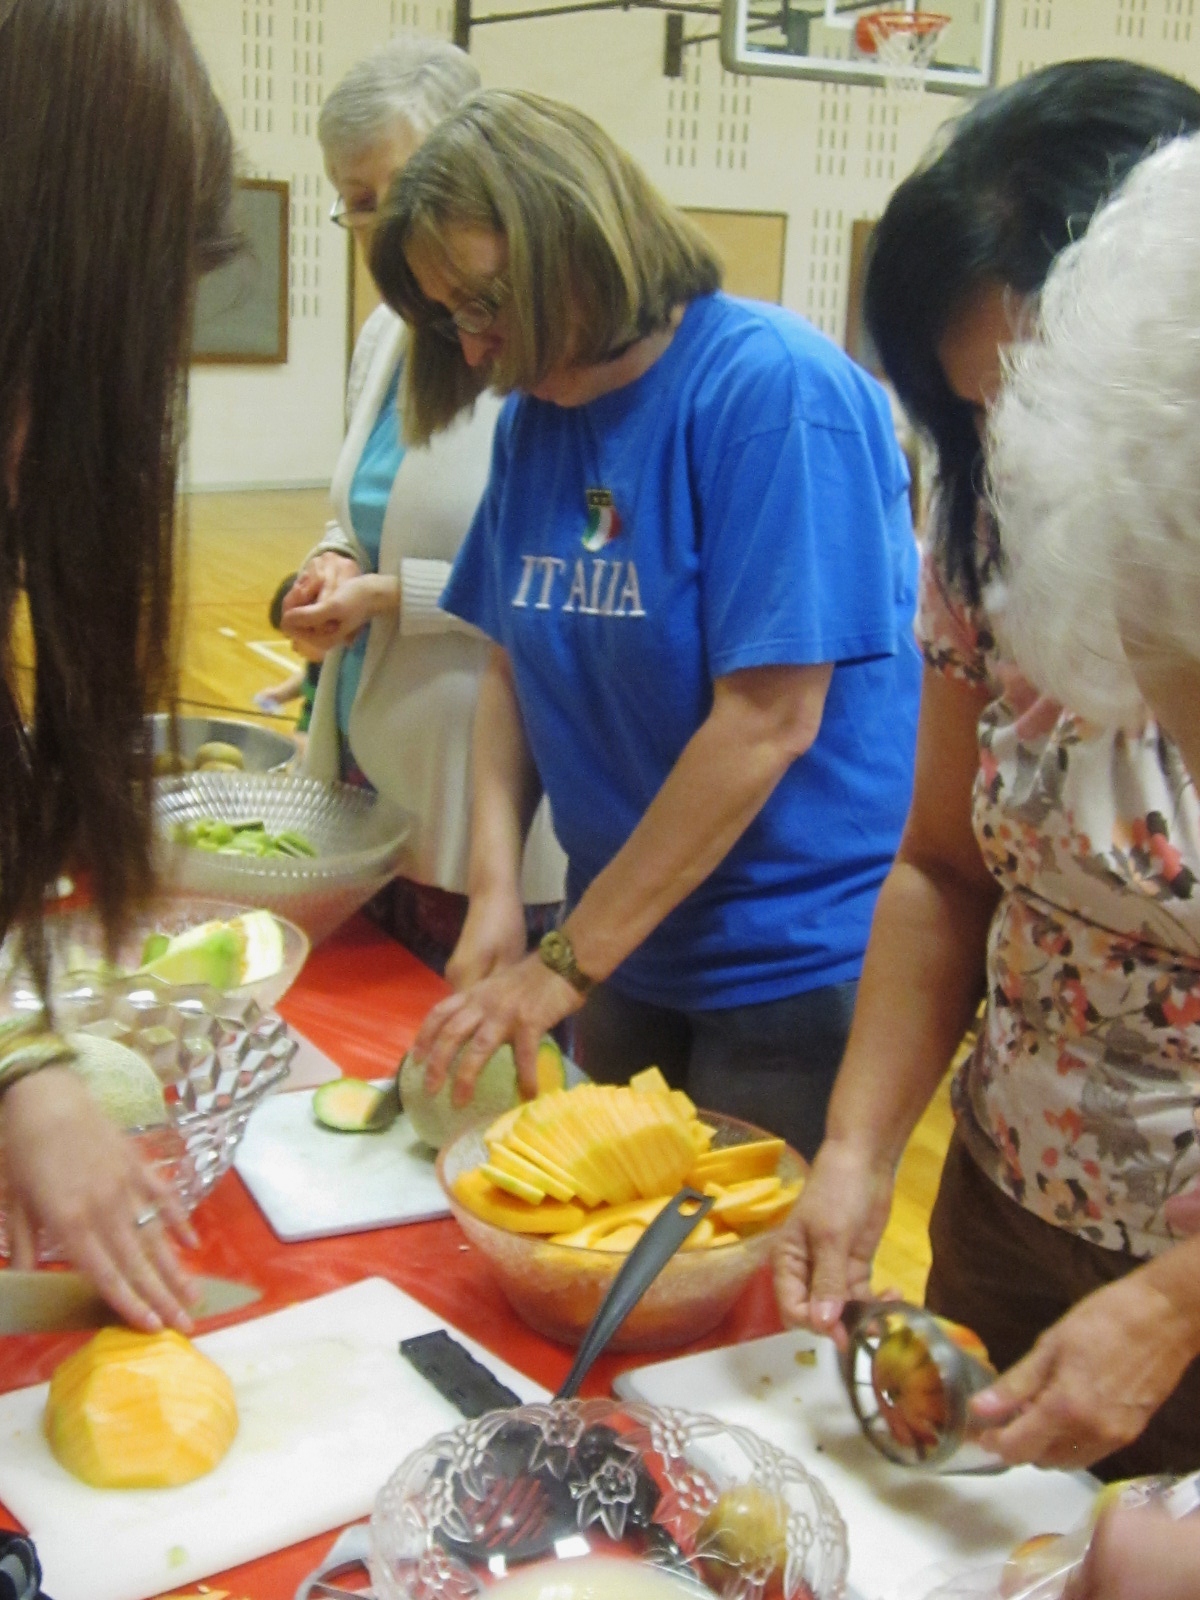
Class two. "How To Cut Fruit Fast and Effectively for Large Groups", was beautiful. Even the little ones got involved. Peeling melon correctly as well as kiwi. We had many hands, light work, and a lot of laughs.
Seeing the food laid out after all the work, is always so gratifying.
Class three. "How To Cook a Quiche Using All Food Storage Ingredients" was the final blast. This delectable savory egg, cheese, asparagus and mushroom quiche with sausage was only one of 28 quiche that we had for the event. In the end we ended up with a few extra quiche, but I'd rather have too many than not enough. It was a delicious and educational gathering of sweet ladies. I'm so grateful I was asked to teach.
If you were there (or not there) and missed the printable recipes, shopping list, and tutorials for planning food for a large group like this, go here.
We stayed right on track with our food budget and had a fantastic turn-out. I'm so thankful to everyone who helped bake, prepare and participate. It makes me so happy to see something like this come together so smoothly and end so well. God bless you all! I don't know about the rest of you...but I had a remarkable time.
One of the things I really love to do is teach people how to be prepared for anything. I do mean anything. Recently a dear lady named Claudia Reed invited me to teach a large group of ladies from our church how to cook with their food storage and also prepare food for large groups. That event is coming up on Saturday! In my former life I did work as an assistant banquet chef. Large groups just happened. Planning a menu for food storage has been a cool project. The result was a menu for this gathering of gals that would include the quiche and cinnamon rolls along with a fresh fruit display and some instruction on how to make quiche, cinnamon rolls and cut large amounts of fruit efficiently. This is the first of a series of posts around this event...because today was the day we got together for about an hour and put together the quiche mixes and cinnamon roll mixes.
We made the mixes that would be given to different ladies in the congregation who had volunteered to cook or bake and then bring them to the church the day of the event. What we wanted was a way to distribute the food in such a way that we would have something delicious and educational.
The quiche is made out of 100% shelf stable dry ingredients, but tastes amazing. It has real cheese, asparagus, mushrooms, eggs, and sausage and chicken flavored textured vegetable protein. Frankly, TVP has come a long way since the 70's and I have to say I love the results we achieved with this quiche. It's tasty!
•Directions: Place all quiche ingredients in a gallon size ziploc bag (ONLY if you use TVP.*Real freeze dried meat must be in a glass jar or mylar bag with an oxygen absorber) This ziploc bag will be shelf stable 3-6 months if kept in a cool dry place. If in a half gallon glass jar with oxygen absorber it will be good 5-7 years. So, you can plan on quiche without a crust. The instructions were given out with the bag of ingredients and 2 pie crusts to 14 ladies for our event. They will each make 2 quiche. That will give us 224 slices of quiche.
To prepare quiche. Combine ingredients with 4 cups water Allow to hydrate 10 minutes.
Place ready pie crusts in the aluminum pans on a cookie sheet (this adds support to the pans and makes them easier to move). Pour quiche mixture into prepared pie crusts. Do not fill to top, as they will run over. .
Bake until set, 325 degrees 50minutes. Do not over bake. May be stored in refrigerator after baking and heated for service.
We also made 10 mixes for cinnamon rolls. These included a packet of my sugar and spice-butter smear to go inside the rolls. These should give us about 240 medium sized cinnamon rolls. Gallon size bags for the roll mix and sandwich size bags for the sugar/spice smear to go inside the rolls.
2 jars Chef Tess Wise Woman of the East Spice Blend (yes, those are still not available online).
These mixes were delivered to 10 ladies who are now going to bake the 2 dozen rolls for Saturday. We also provided them with the freezer safe Glad Ovenware . Those pans are so handy!! Grin. How's it going ladies?! In case you're worried or have questions, I'm posting directions here on the blog.
Directions:
Combine everything
in one large bowl or mixer. I like that. Knead 5 minutes by hand or 3
minutes in a mixer on medium setting. You may need a little extra flour for kneading by hand.
This is a less developed dough
as far as gluten is concerned. Form into a ball and place in a bowl
covered with plastic or a lid for 1 hour, or until doubled in size.
Take out of the bowl and place on a floured table or counter top. On
a lightly floured counter top, roll into a rectangle, 2 feet long by
one foot wide. It will be about 1/2 inch thick. Make sure you lift
the dough a couple times and dust underneath with more flour so it
doesn't stick to the table.
You will need 1/2
c Honeyville butter powder , ½ cup sugar , and 2 T Chef Tess Wise
Woman of the East Spice Blend (This mix was provided for you) combined with 3T warm water until
smooth.Spread
the butter mixture over the dough in a light coating. You will probably not need all the mixture. Leave about 1
inch on the ends and sides that doesn't have butter and/or sugar
mixture. It will help the rolls seal better.
Now roll them up
tightly. Pinch seam tightly.
Slice the roll into 24 1 inch sliced
pieces.
Place 1 inches apart.1 dozen in an oven safe freezer 9 by13
pan (with lid) that has been OILED so the rolls don't stick.
Now...lightly mist the tops of the rolls with oil and cover with a
loose fitting piece of plastic wrap (or lid).You are going to have to
raise the rolls completely, about 45 minutes to an hour.
Then
instead of baking, place in freezer and freeze solid.
Now you can keep these up to one month! When
frozen and ready to bake you take these out of the freezer and place
oven safe pan on a sheet pan (it must be supported in the oven) bake
at 375 degrees 20-25 minutes. We will frost them at the church building so don't worry about that step. Let them cool about an hour and then cover them with the lid to the pan.
In the future if you want to make
the mix (provided):
½
cup powdered butter, ½ cup sugar and 2T Chef Tess spice blend
Add
3T water to this mix and spread inside the cinnamon rolls
Follow
baking directions (above)
For
large rolls that are 2 inches thick, this will only make one
dozen rolls. Bake those 25-30 minutes.
So, that's what I've been up to this week so far. I'll have to let you know how things go with our big event.
If you're one of my baking or cooking ladies for the event, you know how to get a hold of me should you have further questions (my phone number was on the mix that came to your house). I'm so excited about Saturday!