
 A recent email from a new friend named Olivia, has prompted an in depth look at a newer direction of bread for my blog. She wanted to learn how to make good pumpernickel bread. I am not certain what most people think of when they think of pumpernickel. For most "middle of the road" Americans, it is a dark brown almost black bread with a light texture. True real Volkornbrot...the German stuff...is heavy and has to be cut very thin. It takes almost 6 days from formation of the starter to the climactic consumptions of the first slice. If however I hear back from my readers that the authentic stuff is what they want, I will move forward with blogging that. In the meantime...I am putting up this recipe for an old fashioned Peasant's Rye. It is a combination of a few recipes that I have come up with and I hope you will enjoy it as much as we do. It is 100% whole grain. If you use white flour, please omit the second (3/4 cup) amount of water. This cooked in the solar oven won't be as dark brown as if it was baked in the oven. It will still brown, but not like other regular ovens will. Don't be discouraged by the number of ingredients. It's well worth the effort.
Tess' Old Fashioned Peasant's Rye
You will need:
2 tsp active dry yeast
1/4 cup warm water (max 110 degrees)
5 cups whole wheat flour, preferably fresh ground and preferably fine ground
1 cup 100% whole grain rye flour
1T caraway seeds
2 1/2 tsp salt
1/4 cup cocoa (unsweetened powdered)
3/4 cup water (omit if using white flour)
1 1/4 cup buttermilk
2 T honey (buckwheat) or Molasses
2 T oil
2T apple cider vinegar
1-2 large shallots, pressed
Directions:
In a small dish, combine the yeast and 1/4 cup slightly warm water. Let it rest until it wakes up and bubbles. It should be a happy little riser. If it doesn't bubble, you can assume you're yeast is still dead asleep...and may never come back. Try again with a fresh batch of yeast and water. Don't let the water get too hot. It may also help to add a tsp of sugar or honey for the yeast to have a quick breakfast.
 I'm making my bread in my Kitchen Aid. As of Christmas, I've called it my
New Mixer ...though it's not technically totally new anymore. In the mixing bowl, combine the wet ingredients. Buttermilk, water,
 Out of order and not wet, but add them here anyway...caraway seeds. Random diversionary conversation break--caraway is what gives rye it's very distinct flavor. Caraway is also a natural digestive aid...so it makes it go down easier. Coated in chocolate would make it go even better...
 Which we do... "The chocolate syrup makes it go down easier." Quick, name that movie!
Princess Bride fans out there are spitting cocoa out their nose right now. Or now. Tee hee.
 Add the 1/4 cup cocoa...mmmm. Chocolate in bread. Now there is something I can get behind! It helps get that dark color. Power to the cocoa! Hey, that sounds like something I would say out loud when my kids used their brains. I think in that case cocoa would be spelled coco (like coconut). I digress. Okay add the cocoa.
 Add the oil, vinegar, and yeast/water combination to the bowl.
 Add the honey. Dance around singing "awwww sugar...do, do, do, do, do, do...honey, honey....". You can skip that step if you want. That dance step. Pardon my pun.
 Add the 5 cups whole wheat flour and the salt. Hold back on adding the rye flour. It has very little gluten protein and I like to hold it back so I can really develop the gluten. Gluten, gluten, gluten. It's magical stuff. Basically it is the natural protein in wheat (and a few other grains) that attaches to itself to form long elastic strands and a sponge-like mesh that traps gas and allows the bread to raise well. Take the time to develop it, and you have a powerful ally in the dough. It's like having a friend in the business, but you eat the friend.
One more thing...I don't let the salt go in first. It kills enough of the yeast that it totally affects the bread. I notice a difference. Really.
 On medium low (speed 2 for Kitchen Aid) knead for 5 minutes.
Turn off mixer. I hate to sound "simple stupid", but there will be one person who tries to mix in the rye flour with the mixer on who gets a huge rush of a mighty rye wind--- right in the eyes. Aside from the poetic phrase of "rye in the eye"...it isn't fun. Scrape down the sides of the mixing bowl while you're at it. Add the rye flour.
 At this time I also add the pressed shallot. Omit if you want, but I love the subtle flavor.
 Shallot is good. It's a flavor crossed between garlic and onion.
 Continue to knead the dough on medium low speed 5 more minutes.
 Turn off the machine and set your timer for 10 minutes. This step is 100% necessary for good whole grain bread. It give the protein and bran time to absorb as much moisture as possible before adding more flour. Adding more flour before the 10 minute rest will result in dry bread. Don't do it. ( If you used white flour, still do this step. You will need to add a bit more flour if you didn't already omit the 3/4 cup of water, or my may need to add a touch more liquid.)
After the rest, mix 2-3 more minutes adding just enough flour for the dough to really climb up the dough hook and look like this:
(clicking on the picture will make it appear full screen)
 Lightly mist your counter top with water. Yes. I use water instead of flour to cover my counter top. It gives me really moist whole grain bread.
 See that counter top?! Haaa. Not sticking, and no added flour to dry out my bread.
 Form into a nice pretty ball. This will help the gluten mesh to hold in the gasses. This is where I act like a mature motherly God fearing adult and not my 9 year old son...sigh.
The gasses will, in some mysterious and magical way transform the young gluten into something stronger, more elastic, and better able to give good volume to bread. Long way of saying, not to skimp on the fermentation process. Long allegory about "life" to be added later...
 Put the dough in the mixing bowl (I rinse the bowl out a little so I can really gauge the growth of the bread during fermentation).
Cover with a lid or plastic. I just so happen to have a lid from my Pampered Chef cookware that fits perfectly. 1 and a half to 2 hours later give or take...the dough should look like this. Climbed clear up the sides of the bowl about 3 inches from the top. Don't let it raise too long. It should giggle when you poke it with your finger. It may help to run your finger under water first.
 Poke it like this...
 Oooo, ahhhh, ohhh. See, like the mouth of the Pillsbury's dough boy...but fat like he was having an allergic reaction to being stung by a bee.

 Put the dough in the mixing bowl (I rinse the bowl out a little so I can really gauge the growth of the bread during fermentation).
Cover with a lid or plastic. I just so happen to have a lid from my Pampered Chef cookware that fits perfectly.
 1 and a half to 2 hours later give or take...the dough should look like this. Climbed clear up the sides of the bowl about 3 inches from the top. Don't let it raise too long. It should giggle when you poke it with your finger. It may help to run your finger under water first.
 Poke it like this...
  Oooo, ahhhh, ohhh. See, like the mouth of the Pillsbury's dough boy...but fat like he was having an allergic reaction to being stung by a bee.
Now, pull back those fat rolls. I mean dough rolls. Expel the air, but also' look at the elastic gluten strand development. It's really well worth clicking on this picture.
 Pull it away from the sides all the way around. More gluten. See?
 This may be my favorite picture of gluten in the history of gluten history.
Form this dough into a ball again, and return the lid for a second raise (45 minutes to an hour). Repeat the very technically named "dough poke procedure"
 Remove from the bowl and form into two sandwich loaves. Detailed instructions can be found in the loaf molding section. If baking in the regular oven, lightly mist with water and allow to raise 45 minutes to an hour. Mist with water again and sprinkle with caraway seeds. Preheat oven the last few minutes of raising. Bake at 400 degrees 15 minutes and then lower oven temperature to 350 and bake 20-25 minutes more, internal temperature of 175 degrees.
For Solar baking: Immediately after forming into loaves and putting in oiled 8 inch by 4 inch dark colored loaf pans, put in your solar oven.
 Lightly misted with water and then topped with caraway seeds...wow.
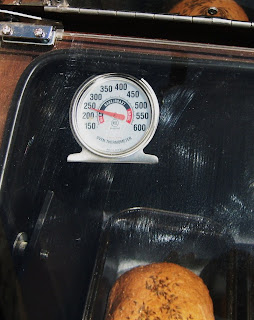
 After about 20 minutes, the temperature was already 250 degrees. With the door closed but not clasped, the bread was raising nicely. One hour and 15 minutes later it was baked through.
 Best part of solar baking...no added cooling cost from heating up my house. Arizona! Yikes we are already having to use our AC for an hour or two in the afternoon. That is so sad!
 Remove from oven and put on a cooling rack out of the pan. Allow to cool about 20 minutes before slicing. Store in a covered container. Bread should stay nice and moist 4-5 days.
 There you go.
 Pull it away from the sides all the way around. More gluten. See?
 This may be my favorite picture of gluten in the history of gluten history.
Form this dough into a ball again, and return the lid for a second raise (45 minutes to an hour). Repeat the very technically named "dough poke procedure"

 Remove from the bowl and form into two sandwich loaves. Detailed instructions can be found in the loaf molding section. If baking in the regular oven, lightly mist with water and allow to raise 45 minutes to an hour. Mist with water again and sprinkle with caraway seeds. Preheat oven the last few minutes of raising. Bake at 400 degrees 15 minutes and then lower oven temperature to 350 and bake 20-25 minutes more, internal temperature of 175 degrees.
For Solar baking: Immediately after forming into loaves and putting in oiled 8 inch by 4 inch dark colored loaf pans, put in your solar oven.
 Lightly misted with water and then topped with caraway seeds...wow.
 After about 20 minutes, the temperature was already 250 degrees. With the door closed but not clasped, the bread was raising nicely. One hour and 15 minutes later it was baked through.
 Best part of solar baking...no added cooling cost from heating up my house. Arizona! Yikes we are already having to use our AC for an hour or two in the afternoon. That is so sad!
 Remove from oven and put on a cooling rack out of the pan. Allow to cool about 20 minutes before slicing. Store in a covered container. Bread should stay nice and moist 4-5 days.
 There you go.
No comments:
Post a Comment