 I had a reader from Virginia Beach ask me about pita bread. Thank you Christine! Ironically I was already thinking of doing a tutorial. I loved hearing from her though and she had some great questions on pita bread. One of the questions was in regard to cooking pita pocket bread in a solar oven. So far, I haven't been able to pull it off. It just doesn't get to the 500 degrees necessary for pita bread in my solar oven. This may be one of the few things I still have yet to do solar. But now I have a challenge and I won't be letting go of it until I have been able to figure it out. Most of the time I use a frying pan instead of my oven anyway. It just gets too freaky hot in Arizona! Why would I heat up my house? The point of making pita pockets is to have a light and cool dinner or lunch...um...not be sweating like a hog when I'm eating it. Yikes. There's a visual. Hogs in my kitchen.
1T dry yeast
1 cup warm water
1 tsp salt
1T olive oil (I used a garlic infused oil)
1 cup whole wheat flour
2 cups bread flour
Directions:
Combine the salt and flour in a mixing bowl.
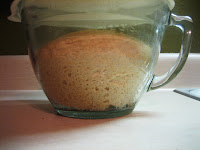
 Combine the yeast and water. Allow to bubble. In fact, you will know the yeast is good if it floats at the top and looks like this: (click on the picture for a closer look)
Add the yeast/water to the flour/salt and then add the oil.
 Mix up really well, then move to a lightly floured counter top or board and knead.
 When I knead, I do a series of folds.
 Pita bread doesn't need to be kneaded very long. About 20 turns, or 2 minutes. Not very long at all. I then make it into a dough ball. Yea...my obsessive need to have dough wads around my house is getting a little sick. Really sick. How can I help myself? Is there a 12 step program?
 Place in a covered bowl and allow to raise about 1 1/2 hours.
 See how fast that was?
 I lightly flour the counter top again...like little dew drops...but dry and made of wheat.
Divide the dough into two logs, then cut the logs.
 10 pieces. Yes...we will have 10 pita pockets when we are done. Magical isn't it? Great way to teach my kids simple math too.
 Roll each piece into a ball. This is a weird thing I do, but if I start with a circle, then when I roll out the dough it is usually circular.
 Ooooo. circle...
 Roll into an oval then a circle. Basic shapes, basic math. Wow. We are covering it all today.
Basic pan. Okay this is my frying pan. I got it about 8 years ago from my local Amway/Quixtar distributor. It was once called "Queen cookware", but this is the newer model called "Icook". It has this cool feature where once the lid is on, it acts as an oven. Very cool stuff. If you have the means, I highly recommend picking one up. I don't sell them either but here's the link:http://www.quixtar.com/products/product.aspx?itemno=101084&ctg=2151. Pampered Chef cookware does pretty well for pita bread as well.
Or...you can bake it in the oven on a hot stoneware pan. Heat the stone in the oven. Then put the pockets on the stone. Watch your eyebrows. 500 degrees for 10-12 minutes. I prefer the fry pan. I said that already huh?
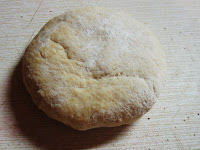
 Now here's the secret. Put the stove on medium heat. When the pan is hot, put a piece of pita bread in the pan. This is where I get technical. Count to ten, turn over the bread, and then cover with the lid. Don't open the pan for about 2 minutes. Then it will puff up like this:
Fill with the pita filling of your choice. I personally love them with just lettuce and tomatoes and a sassy dressing. Usually Homemade Ranch Dressing with some Herbs de Provence from Penzey's. Mmm. Great stuff. One of my all time favorite fillings is a chicken peach salad with roasted bell pepper relish sauce. That stuff knocks my sock off.
Or...you can bake it in the oven on a hot stoneware pan. Heat the stone in the oven. Then put the pockets on the stone. Watch your eyebrows. 500 degrees for 10-12 minutes. I prefer the fry pan. I said that already huh?
 Now here's the secret. Put the stove on medium heat. When the pan is hot, put a piece of pita bread in the pan. This is where I get technical. Count to ten, turn over the bread, and then cover with the lid. Don't open the pan for about 2 minutes. Then it will puff up like this:
Fill with the pita filling of your choice. I personally love them with just lettuce and tomatoes and a sassy dressing. Usually Homemade Ranch Dressing with some Herbs de Provence from Penzey's. Mmm. Great stuff. One of my all time favorite fillings is a chicken peach salad with roasted bell pepper relish sauce. That stuff knocks my sock off.


3 comments:
Wow, I have to try these! My family loves pita bread for sandwiches. Thanks for the tutorial :)
Steph,
Just had the most delicious dinner! And it is all thanks to you and your recipe for Pita pockets. I set the breadmaker using the delay timer with all of the ingredients (wet on bottom, dry on top w/yeast on upper most top) and the dough was ready when I came home from work. Now I realize that the post you gave said to only knead it for like 2 minutes, which may be why my dough did not puff up in the pan...the gluten was just way too developed. But Andre slapped some pizza sauce and cheese on the ones he ate (3 total), nuked it for 30 seconds to melt the cheese, and declared it DELICIOUS. He asked me 'How could anyone not like this?!" I had one of those pizzas, and 2 ham, lettuce, onion, pickle and mayo gyro style sandwiches. And I have to agree with Andre. It was DELICIOUS! So soft and FRESH! That's the key, right? Right off the pan, still warm.... mmmm. Next time I am going to follow your directions all the way and see if we can get the puffness pita style...but then again, I might just do it this way again. It was that tasty....
Just wanted yuo to know that I think you are brilliant! Thanks for sharing all your great ideas with me!
Auntie em
Thanks for sharing. I NEEDED a pita pocket recipe.
Post a Comment