

This is not the first time I've made homemade yogurt on my blog. It is, however, the first time I've combined the yogurt making and the parfait making into one post. If it looks a lot like the original yogurt post...it is. Haa.
Tomorrow morning I'm visiting Fox 10 Arizona Morning show at 9:45 for some basics on homemade yogurt and I thought I'd share the printable pdf along with the details of the show...all in one spot. I'm nice that way. Feel free to buy me a polk-a-dot apron or something with all the money you save on yogurt. Better yet...get one for yourself! Xoxo. Seriously. I need an apron intervention...or convention. I can't decide which would be better for me at this point. I'm leaning toward the convention though. There's too many frilly aprons in the world for them to not be all in one spot at one time for me to just shop until I pop...right?
Homemade Yogurt and Yogurt Cheese Tutorial
How many years can a mother say, "Eat this. I promise you'll like it"? Little man took a picture of me saying it over a tray of broiled sub sandwiches slathered heavily with herbed yogurt cheese. My favorite is still fresh blackberries with Homemade fruit and nut granola and mesquite honey. I've spoiled myself. Ruined forever. I will never look at yogurt the same. After I'm through gasping and dramatically wiping my sophisticated brow we can get on to business.
Okay. I'm ready now.
I've talked a little about the ever amazing work of Dr David B. Fankhauser, Ph.D. Professor of Biology and Chemistry. His blog has been a great source of information on homemade dairy. I dare say, one of the best I've seen as far as easing any concerns anyone may have about the safety and use of yogurt made at home. His Introduction to Yogurt is superb. I highly suggest reading it, as well as his detailed (highly detailed...to the point of perfection!) directions on how to go through the proper Procedure (Illustrated). I'll talk here briefly on it. I do however make no claim about being an expert on this subject. I've been practicing all his techniques and am now totally bird-dogging. I bow in respect. (I also now do the ceremonial head cock and "thumbs up" gesture with a cheesy Chef Tess grin.) Well done. Anyone else picture Drew Barrymore in "Never Been Kissed" just then? Totally what I look like when I do the thumbs-up. Right before I trip on my shoes and fall to the ground in a pool of cute-ness.
Speaking of pools of cuteness. Let's begin.
Speaking of pools of cuteness. Let's begin.
You will need Supplies and Equipment.
1 gallon fresh milk (either store bought, or your own home grown milk)
starter: 1 cup Dannon Plain yogurt, very fresh The good Dr. prefers Dannon Plain, made purely with milk and culture. (Get the freshest: check the expiration date.)Dannon Plain WORKS for me. See label
starter: 1 cup Dannon Plain yogurt, very fresh The good Dr. prefers Dannon Plain, made purely with milk and culture. (Get the freshest: check the expiration date.)Dannon Plain WORKS for me. See label
Equipment:
Heavy bottomed stainless steal pot that can cook 1+ gallon
four quart jars with lids, sterilized in boiling water
one 8 oz jar with lid, sterilized in boiling water.
candy or meat thermometer, reading range = -10 to 110oC (0 to 225 oF)
2 cup liquid measuring cup
1 medium sized "cooler" (such as a "Playmate" or Styrofoam with close fitting lid) (A gas oven with pilot may work if monitored closely).
These are the Directions according to Dr. David B. Fankhauser.
Sanitation is key here folks. Please don't skip any of these details.
1: Sterilize jars and lids which will be used to make the yogurt. Place in a 5 gallon pot with an inch of water in the bottom.
2: Cover and bring to boil. Boil for ten minutes. Turn off heat, do not remove lid.
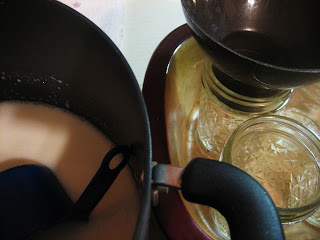
3: Use a pot with a thick bottom to scald the milk. Note the thick pad on the bottom of this pot.
Alternatively, a double boiler may be used. It is not necessary to boil the milk. This gives the milk a "cooked" flavor, and increases the probability that it will burn on the bottom or boil over.
4: Scald until the temperature of the milk is 85-90 C (185-195 F). It is not necessary to boil, and do not let boil over...what a mess! (Many claim success leaving out this step. But... results may work, but intermittently...)
5: Cool milk to 122-130 degrees. Rocket science as it sounds, it's important to watch the temperature so you don't kill the good stuff in the culture that would be bad. It won't make yogurt without that stuff.Place one cup of the scalded and cooled milk in a two cup measure. Add enough fresh, uncontaminated yogurt to bring the level up to two cups. Uncontaminated meaning yogurt from a new clean container that has never been dipped into. (Especially by your kiddos. I know what grows under those fingernails. Bleck!) Stir to blend the yogurt starter into the scalded and cooled milk until homogeneous
6..INOCULATE: Add the yogurt-milk slurry slowly to the 50 C scalded and cooled milk with stirring. (No hotter--you will kill the bacteria in the starter.) Stir very well to thoroughly distribute the yogurt starter. Once thoroughly mixed, distribute the inoculated milk to the sterilized jars, filling to the neck. Cover immediately with sterile tops. Tighten well.
 7.INCUBATE:Warm a gallon of fresh clean water to 55 C, pour into a clean cooler. Place in a warm location. I use my oven, turned off or in the summer, my Arizona front porch is perfect. Sad isn't it? At any rate, carefully set the jars of inoculated milk in the water so the bottom of the lids are above the water.
 let sit undisturbed for three hours. If the starter was active and the temperature correct, the yogurt will have gelled. I let mine sit for about 8 hours and it is perfect. Either for a nice delicate snack or to take at this point and make into yogurt cheese. See: how to make labneh for more detailed instruction.
Homemade Yogurt Cheese Tutorial
 Once thoroughly mixed, distribute the inoculated milk to the sterilized jars, filling to the neck. Cover immediately with sterile tops. Tighten well.
 7.INCUBATE:Warm a gallon of fresh clean water to 55 C, pour into a clean cooler. Place in a warm location. I use my oven, turned off or in the summer, my Arizona front porch is perfect. Sad isn't it? At any rate, carefully set the jars of inoculated milk in the water so the bottom of the lids are above the water.
 let sit undisturbed for three hours. If the starter was active and the temperature correct, the yogurt will have gelled. I let mine sit for about 8 hours and it is perfect. Either for a nice delicate snack or to take at this point and make into yogurt cheese. See: how to make labneh for more detailed instruction.
Homemade Yogurt Cheese Tutorial
Place salted yogurt in a sterile colander lined with a sterile handkerchief.
 Bunch with a clip or tie. Suspend over the bowl. It usually takes about 24 hours.
 This is what it looks like.
 I mix it with herbs and garlic. 1 tsp Italian herbs and 1 tsp fresh pressed garlic to 1 cup of cheese. Look how awesome it is!
 Sometimes I fold a little into cooked hot pasta and it makes a quick wonderful dinner. Fat free and so creamy!
 By and far, my favorite use for it on Solar oven roasted potatoes with herbs and carrots. Swooning yet?
 Now on to the Parfaits!
 Recently I've been addicted to these little love nugget-layer-delights. They are basically my Homemade yogurt, Home-Spun Breakfast Cereal or my favorite...
The thing I love most is that we don't use any added sugar in this "jam" filling...so these parfaits are relatively healthy.


 Bunch with a clip or tie. Suspend over the bowl. It usually takes about 24 hours.
 This is what it looks like.
 I mix it with herbs and garlic. 1 tsp Italian herbs and 1 tsp fresh pressed garlic to 1 cup of cheese. Look how awesome it is!
 Sometimes I fold a little into cooked hot pasta and it makes a quick wonderful dinner. Fat free and so creamy!
 By and far, my favorite use for it on Solar oven roasted potatoes with herbs and carrots. Swooning yet?
 Now on to the Parfaits!

Homemade fruit and nut granola and of course, some of the evil-delight...
a fruit layer Using Freeze Dried Fruit for Freezer Jam.The thing I love most is that we don't use any added sugar in this "jam" filling...so these parfaits are relatively healthy.

I've discovered that the use of the half pint (1 cup) mason jars for the parfaits work perfectly. It helps me to have something covered like that in the fridge. My 87 year old father in law (AKA Mr. Putt Putt) likes having them around too. My kids beg for them.


So, that being said, I think everyone can now safely make some delightful snack or breakfast grab-n-go items.

There you go. Make some yogurt and some yogurt parfaits!

Always My Very Best,
Your Friend Chef Tess
10 comments:
Thanks for the tutorial. I am definitely doing this very soon!
YUM! I'm going to try this today. My mom used to make us home made yogurt as kids...she was such a hippie, haha.It will definitely save money, since some of those yogurt cups are a dollar a piece!!
Thanks for the tutorial!
Great tutorial! Does reconstituted non-fat dry milk work to make the yogurt? That would be toooo good!
THANKS!
Yes. I've had success with the non-fat dry milk reconstituted. Make sure you heat it and follow the directions as listed. I double the amount of yogurt starter on the dry milk and it's been fine.
Okay, I'm a little slow.... HERE is the tutorial! Thanks so much!
How long does it keep in your frig?
It's good in the fridge about a week.
Just had yogurt with fresh strawberries and homemade granola- YUMMMMM!!!!
Thanks for this terrific recipe tutorial! Can this also be made using non-dairy sources, like almond milk and coconut milk? Those are usually the 2 milks I use to cook and bake since I'm allergic to dairy milk.
the tip about using labneh with pasta sounds heavenly! thanks.
Post a Comment