Saturday, June 30, 2012

Chef Tess Country Sausage, Hash Brown and Pepper-Cheese Scrambled Egg Breakfast Skillet...(The 52 Jar Method Continues)


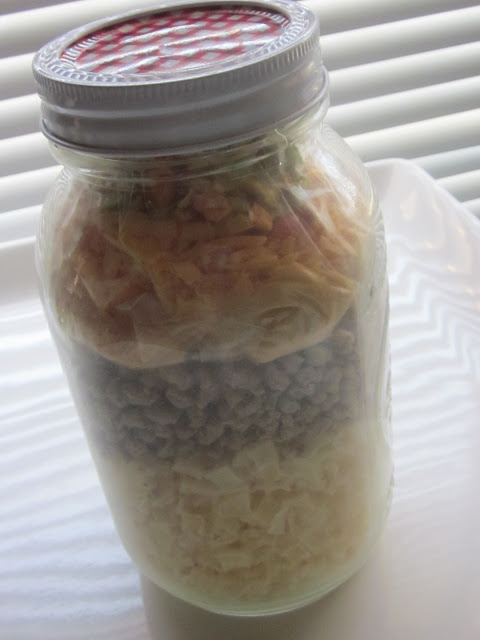
This meal in  a jar is too brilliant! You might pass out.  It's gluten free, just add water, and shelf stable 7-10 years.  It contains real sausage, potatoes, eggs, cheese, and vegetables. The thing I adore most of all about it is the fact that I don't have to plan on having any oil in the house to cook the hash browns. Yes. You read that correctly. No need to plan on extra oil in your food storage or cooking supplies anywhere. It's great for camping. It is all self-contained in the jar and ready to cook a meal. Are you excited to see the method?!
 If you're new to the 52 method meals in a jar you will need to see my Original Post on the safety of home vacuum-packing for long-term storage and convenience meals. Yes. that means you'll need to go here. I've had many follow-up posts on the  on the 52 Jar Method. Yes, the book is underway and the beginning bulk of recipes and outline for this food storage plan should be out in the cookbook I'm writing for Honeyville Farms. It will be published later this year. We are anticipating it hitting store shelves by December first.  In the meantime, because it is a Honeyville book, I am able to share the recipes here on the blog as long as I have some new and original ones in the book. I shared this with our Breakfast Meal-in-a-Jar classes and it was so well received by all who tasted it that I'm certain that it is indeed a winner.
I keep the egg mixture separate from the potato mixture since eggs take about 3 minutes to cook and hash browns need to be hydrated and cook with the sausage for 15 minutes.  


The first "must-have" for this meal to be amazing is the Scrambled Egg Mix (crystals). They cook up to taste just like a fresh scrambled egg. I've ranted about them in the past but just know that we are very picky about eggs around here, as only a chef could be...and they are outstanding.  One #10 can is right around 70$. At first that freaked me out until I realized that there were 103 eggs in a can. So that's about 6 a dozen. 6 dozen! Shelf stable and not going to kill my family from salmonella. Yup. I'm a fan.


With the eggs, we'll be using the beautiful technology of...
Freeze Dried Cheese.  Yes. It tastes like cheese, looks like cheese and works like cheese. It IS cheese. The only ingredient in the can is cheese.
I'm also using the real Sausage. It is shelf stable 10 years or more and remarkable. In this recipe, it is NOT okay to use the TVP sausage. It will not work for keeping your hash browns from sticking to the pan the way the real stuff does.
I'm not going to lie...this stuff is delicious.
Please be very careful to use an oxygen absorber for these jars. With the use of the eggs and the freeze dried sausage they are not optional. They are for your safety.  Now...to the Oxygen Absorber. What do they do?
Wikipedia says: "An oxygen absorber is a small packet of material used to prolong the shelf life of food. They are used in food packaging to prevent food color change, to stop oils in foods from becoming rancid, and also retard the growth of oxygen-using aerobic microorganisms such as fungi...
Oxygen supports the growth of microorganisms and causes changes in color and rancid odors in packaged foods. Plastic packaging is less able to exclude oxygen from packaged foods than are the older glass and metal containers. Oxygen absorbers absorb oxygen and effectively reduce the aerobic environment to 0% oxygen. Therefore aerobic bacteria and fungi are unable to grow in this environment. This will extend the shelf life of a food product for years. The advantages of oxygen satchels versus vacuum packaging are that the food products are not crushed or squeezed, as some products are of high value and are fragile, and its simplicity of use."
Yes I use them. There is an alternate method using a jar attachment and a Food Saver vacuum machine...but today, this is what you get to see. I get my oxygen absorbers from my favorite website for supplies,  Here.
Are you ready for breakfast yet?!
 Chef Tess' Country Sausage, Hash Brown and
 Pepper-Cheese Scrambled Egg Breakfast Skillet
Wide mouth quart jar:
2 c diced dehydrated potatoes
1 c Freeze Dried Sausage (no substitutions)
1tsp Chef Tess All Purpose Seasoning
Small sealable baggie on top of potatoes and sausage in the jar:
1/3 c Scrambled Egg Mix (no substitutions)
1/3 c  freeze dried cheddar cheese
1/3 c Freeze-dried bell peppers
2 T  freeze dried mushrooms
½ tsp Chef Tess Romantic Italian Seasoning

Top with an oxygen absorber (see the package of the oxygen absorber packets for specific safety on how long those are good out in the air). Seal lid on tightly, screwing on very securely. Make sure the oxygen absorber is not over the lip of the jar or you will not achieve a good seal. Jar lid will "pop" when the jar is sealed, after about 20 minutes. This is how you will know there is not any oxygen in your jar.
Directions to prepare Meal: In a large 12-inch non-stick skillet, combine the potatoes and sausage with 4 cups boiling water. Cover and allow hydrating 10-15 minutes until potatoes are tender.Drain any extra water, once the potatoes are tender. The fat from the sausage will keep the potatoes from sticking to the pan. Cook 10-15 minutes over medium heat, stirring once or twice but allowing the potatoes to brown well.  The secret is not stirring too often.  In a separate quart-size bowl, combine the contents of the egg baggie with 2/3 cup cool water, whisking well. Allow hydrating 5 minutes. In a small separate non-stick skillet on low heat, slowly cook the egg mixture, stirring often. Or, you can cook them in a corner of the skillet that the potatoes are in by simply pushing the hash brown mixture to one side. Serve eggs over the potato mixture. Yield 5 servings. Equal to 3/4 cup sausage hash brown mixture and 1/5 egg mixture (about 1 egg).

There you go! A Country Breakfast fit for a king. Enjoy!

Always My Very Best,
Your Friend Chef Tess

Monday, June 25, 2012

9 Grain Carrot Cake Pancakes with Butter Toffee Sour Cream Syrup

We love pancakes. What's not to love about fluffy confections that you can drizzle in syrup and eat any time of the day? My youngest son will, at any given time, drop everything and ask for pancakes. No doubt he got that love of pancakes from his adorable daddy.  My husband Ace would eat them every single day. Oh. He does. That is his breakfast almost every day. He's adorable that way. Adorable. Once in a very long while he'll ask for something else, but usually it's pancakes. Whenever I complain about his habit in that regard he'll usually shoot back his heart-melting puppy-dog expression and say, "Steph, when I find something I like, I stick with it." Sigh. Swoon. He loves me forever. Oddly enough, I get a little tired of the same old pancake. I like to switch things up. I also have a mad-sick-evil love for carrot cake. Don't ask me how it started. I don't know all the secrets of the universe that bring together two perfectly paired atoms in the cosmos. Why question fate? Why?  Enters {dramatically with 2001 Space Odyssey music playing boldly in the foreground}...the 9 grain carrot cake pancake of extreme glory drizzled with the ever evil-divine butter toffee sour cream syrup. Sigh. Swoon. I'll love them forever. Something is coming...something wonderful.
Are you ready for the big shocker on this? You can make them sugar free. Yup. This is actually sweetened naturally with a low calorie beauty. How cool am I feeling right now? I can't really tell you with a mouth full of carrot cake. Grin.

9 Grain Carrot Cake Pancakes
with Butter Toffee Sour Cream Syrup

1/3 cup granulated erythritol  (zero calorie natural sweetener)
1/2 tsp Chef Tess Wise Woman of the East Spice Blend
1 tsp vanilla
1/2 cup fine shredded carrot
2/3 cup water

Combine all ingredients and cook on a medium hot griddle as you would regular pancakes.
Now we need syrup right?
The first time I ever shared this Butter Toffee Sour Cream Syrup was when I posted the recipe for the Gluten Free Butterscotch Pecan Buckwheat Pancakes. Those are amazing drizzled with this syrup. I'm not going to lie. This syrup over the carrot cake pancakes nearly made me pass out. It is just a deliriously-divine combination.Yup. Incandescently happy. The being kissed by Mr. Darcy kind-of-happy. {Pride and Prejudice aside my darlings, I think he's adorable.}
That being said, here's the recipe for the butter toffee sour cream syrup.

Chef Tess' Butter Toffee Sour Cream Syrup

1/2 cup fat free sour cream
2T butter
1 cup sugar or  granulated erythritol  (zero calorie natural sweetener) 
1 tsp ultra gel
1/2 tsp English Toffee flavor oil
2T hot water
Directions: Combine all the ingredients in a sauce pan. Bring to a boil and boil 2 minutes until sugar is dissolved. Stir well. Serve warm over hot pancakes. Store any un-used portion in the fridge. Yields 1 1/2 cups.
Butter Toffee Sour Cream Syrup Mix
1 cup sugar or granulated erythritol  (zero calorie natural sweetener)
1 teaspoon cornstarch or ultra gel
1/2 cup hot water
To make the syrup, combine the dry ingredients and the flavored oil. Stir well. Add the hot water and bring to a simmer over low heat in a medium size heavy bottom sauce pan. Cook 2-3 minutes until sugar is dissolved. Do not over-cook or the syrup will get very thick. Serve over the pancakes. Store unused portion in the fridge after use. I doubt there'll be much left over. 
There you go. Make some carrot cake pancakes. Sigh. Swoon. You'll love them forever.

Always My Very Best,
Your Friend Chef Tess
Sunday, June 24, 2012

The Works. (The Bread of Life Section)

It has been a red-letter week. I wish I could go into more detail on that subject but at this point we're not really talking about too much. I've had some amazing experiences that have made made me sit in wonder at the awesome hand of the Lord in my life and the way that miracles have come at just the right moment to answer my prayers. It has been a week full of marvelous gifts. One that I will not ever forget. So. How's that for being ambiguous?

I will however, talk a little bit today about work. I've had a lot of friends recently who tell me, "I don't know how you do all you do! You're going and going all the time!" I think that perception is an interesting thing. For though I "go" a lot, I don't try to run faster than I have strength or fill my schedule so tight that I don't have time to ever speak to a friend for a few minutes. Yes. I work like crazy. I fall to my bed at night exhausted. I'm probably not alone in that though. Many people work that hard. There are details of my life I don't share on the blog. Many know them who are near to me. I think the thing that keeps me going in my journey on earth and the work that I'm earnestly engaged in, is the assurance I have behind it that the Lord is ever watchful of me and the support I receive from the Spirit. Am I always perfect at remembering the Lord? No. It is a constant battle to be in the world and keep the focus out of the world. It is a constant battle to remember who I am and what I have been asked to do as a follower of Christ. Wife, mother, sister, friend, teacher, and all the roles I play on this stage of life must be supported by the hand of a divine Father. If not, I will fail. 
 God's Grace is amazing. For, even after all I can do, I will never be able to work my way into salvation. Ever. God doesn't work that way. In Luke 2:17-18 (KJT) we read, " Even so faith, if it hath not works is dead, being alone. Yea, a man may say, Thou hast faith, and I have works: shew me faith without thy works, and I will show thee my faith by my works."
I think that scripture is most profound. There's much to be learned. However, I can't also help but think that works without faith are also dead. God will look into the heart and will know, even if nobody else on this earth ever does, what the intentions of my heart have been when I have put forth an effort on earth. I let myself think of that. I let it soak into my soul.
The battle rages on. Many will fall by the wayside. My hope is that you and I will someday sit down in the kingdom together and that when the Lord looks at me, I will look back at Him knowing that I have done a work that was accepted by and endorsed by His hand. That is all I can ever hope. You and I can't "do it all". I don't know how you do it all. I just know that I can do all things that are needed and necessary if I keep God in the equation. Nothing is too hard for the Lord. Thankfully.  Onward and upward my friends!

There it is.

Always My Very Best,
Your Friend Tess

Tuesday, June 19, 2012

How to Never Buy Yeast Again. The Everlasting Yeast No Knead Bread Tutorial.

This tutorial is for the Birds. Literally. The Birds are my darling students who brought me their first loaf of homemade bread the day after they came to one of my bread classes. Hence forth I'm calling them the Love Birds. Seriously. I love them. They've stayed in touch ever since. Mrs. Love Bird is an adorable woman who I've come to just cherish. Her husband reminds me very much of my dad. To make a long story short, when she showed up at a show with a loaf of her first Kamut bread she thought it was a little dry and we talked over e-mail.   Saturday, she was on loaf number four (or so) and brought it to me at my meal in a jar class. I was thrilled to see her progress! This is a woman who never once made bread until she met me.  Thrilled! Look at her no knead bread that she baked in her Solar Oven!
 Mrs. Love Bird. You're the best!


True confession. I've been toasting this bread for 3 days and I'm loving this. Thank you so much my darling!
You've made me smile!


At any rate, at the original bread class that the Love Birds attended, I mentioned the method I use for never having to buy yeast again and basically perpetuating an everlasting yeast. It is strengthened  by the length of it's existence and a remarkable skill to have for not only saving money but for any emergency situation or camping. The bread made with it is not a sour dough, but can be a sourdough if you let the yeast go too long between uses. I'm amazingly fond of this method for the fact that I'm a cheap-skate and I really don't like spending money on something that should be free. For thousands of years people made yeast-raised bread without commercial yeast. Somewhere along the way we've become totally dependant on the powdered active-dry and instant yeast in our bread making. This doesn't have to be the case. In fact, in my house it is usually the exception. The bread made with everlasting yeast has remarkable depth of flavor and beautiful results. I make bread often enough that I haven't had a problem with my lump of dough ever getting too sour or molding. It has been a dear friend for quite some time. I dare say...about 5 years. So, to the Love Birds and anyone like them who wants to see the finer details of this yeast method, here you go.


First, retain a small amount of dough from the next loaf of No knead 4 Ingredient Bread Anyone Can Make. I usually save about a half a cup of dough and keep it moist with 1/2 cup of cool water. Covered in a bucket 24 hours or less from the time I made my bread. It can be up to a week in the fridge, but in the summer here at room temperature I haven't gone longer than a day or two.
 I'm going with the old-school method here and just showing you what I do. I'm not going to weight the dough. You're just going to have to trust me. This is your yeast-dough-ball. It's is what I got from my last loaf of bread and is basically now the yeast you will use forever. Make friends because this can be around for many years to come.
 Dissolve the yeast-dough ball in 3 1/2 cups of cool water in a food-grade gallon size bucket with a lid or you can also use a large plastic bowl. I don't use metal because if the dough does sour, I don't want to deal with a mess. It hasn't so far, but ya know...there's always a first time.
Smoosh and swirl it around until it is a liquid mixture.
 To the bucket or bowl add 7 cups Hard White Wheat Bread Flour ( or you can use 8 1/2 cups California's Best Bread Flour ) and 2 tsp salt.
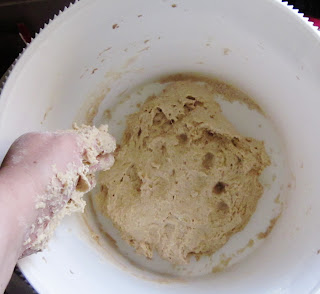
 Mix and combine the dough by hand about 2 minutes. You don't need to knead it. Just combine it.
 If it appears a little dry, add 1/4-1/2 cup more water.
 It should be moist enough to stick to your hands, but not moist enough to fall in pools of pathetic sadness on the bottom of your bucket. It will hold it's structure.
 Now that the dough is combined, cover it with a lid and let it sit at room temperature 12-14 hours. It can go up to 24 hours but not much longer. In cooler weather, it will take the full 24 hours to raise.
 This is what it will look like when you take off the cover.
 The dough will have some pretty nice gluten development.
 It should look almost stringy.
 Lightly flour your counter-top and transfer to dough to be made into 2 loaves of bread.


Retain one small handful of dough.
 Add 1/2 cup of cool water to the handful of dough and put it back in your bucket. Cover. Use within 24 hours for more bread or put the lump and water in your fridge after 24 hours for up to 1 week. It will become sourdough after that time and will need to be discarded or it can be used for a sourdough bread starter in any of the many recipes I've done here on the blog for sourdough .
 With the dough you have on your counter, follow the directions of the Sandwich loaf molding tutorial, but allow the loaves to raise about 3 hours (it may take up to 4 hours the first few times you use the yeast), covered at room temperature. The longer and more often you use your everlasting yeast-dough-ball the stronger it will be and that time will shorten dramatically.

Bake your bread in a hot oven or you can do like the Love Birds are doing and use this:  Baking Bread in a Solar Oven Tutorial. All I know is that the bread ends up being moist, delicious and well...amazing. You're going to love this method. It will save a lot of yeast money for other things...like grain to feed your family. There you go. Make some everlasting yeast. For more frugal ideas visit my friends over at Frugal Days Sustainable Ways and vote for my frugal tip. It's a great blog hop with great ideas for being frugal...and sustainable. Xoxo!

Always My Very Best,
Your Friend Chef Tess

Thursday, June 14, 2012

Simple Cake Mix 6 Grain Jam Crumble Snack Bars


You know what I love about summer? Nothing in Arizona. Well... not the life-sucking death-heat of the Sonora desert or the way my albino  (remember the Albino on Princess Bride?) skin  that turns bright pink the second I walk out of my house. I can tell you that there are days when I think I will burst into flame the second I walk pass the portal of my front door. Yes...I'm violently sucked into a brilliant vortex of white light and space aliens. "Take me to your leader Albino-Scum!"... I'm pretty sure I've watched too much of the Twilight Zone...and X-Files.  I also randomly imagine hairy long-nailed monsters on the wings of my airplane when I travel. Just for the record. I don't like window seats. I do however love those tiny bags of peanuts. They're so cute.

There is a perk to living in the surface of the sun valley of the sun. Phoenix is perfect for summer solar cooking. I love it! See. I DO love something about the heat. I pop my bad-boy Solar Oven on it's cart and wheel it into the yard, pointed the direction of the sun. Here it works likes a crock-pot and I can basically forget about dinner until it is time for dinner. Huge perk for me working full time now. Today however, I decided at 4 AM that it was cool enough in the house to bake some snack bars for the boys. They are home on summer vacation and I wanted them to have little fun goodies to wake up to. Yes...I do wake up that early almost every day. Yes. I know I'm crazy. That is what works for me to be home with the kids and still use the test kitchen. Ironically...I used to do that before I had kids but at a bakery. Somehow it seems more fun when I can still be in my PJ's and bake. Go figure. I haven't yet had any of my fuzzy-neon-pink cupcake-jammie material end up in the cookies. Now...that's funny because today I made jam bars. Not to be confused with jammie bars. Those are fuzzy. These are delicious.

I use my homemade cake mix and the evil-delicious blueberry confection known affectionately by me as Spiced Blueberry Amaretto Jam. You don't have to make your own homemade cake mix or jam. I'm not checking your cupboards. You make what works for you. One box of regular cake mix will work. I also use all natural granular erythritol instead of sugar in most of my baking. It is zero calorie and no carb. It's great for diabetics and for those watching their sugar.

Chef Tess 6 Grain Jam Crumble Bars
4 c 
homemade cake mix (or 1 box store bought)
1 c granulated sugar (or all natural
granular erythritol )
2 c 
6 grain rolled cereal
¼ c  whole flax seed
 ½ c brown sugar
1 egg
1 c melted butter (no substitutions on flavor)
2 c unsweetened jam (I used
Spiced Blueberry Amaretto Jam)

Directions: Pre-heat oven to 350 degrees. Yes. These can be baked in a solar oven. Pre-heat it to 350. That will take about 15 minutes.  In a large bowl combine all ingredients except the jam. The mixture will be thick. Reserve 1 ½ cup for the topping.     Using fingertips press the remaining mixture into the bottom of a 9 by 13 inch pan so it reaches all sides. 

  Spread the jam over the crust mixture in a thin layer.


  Pinch off pieces of the reserved mixture and scatter over the jam.


Bake until light brown and bubbling, 35-40 minutes. It will take 45-55 minutes in a solar oven. Allow to cool 30 minutes before cutting.


If you don't wait for them to cool before you cut them, they will just fall apart in mounds of hot buttery delicate grain-confection laced with jam. It's really hard to resist at that point but...ya know. Do what you want. I'm not checking your closets either. 
Yield 24 bars. Let's be honest. It makes 6 bars for a teenage boy.  There you go.

Always My Very Best,
 Your Friend Chef Tess

Saturday, June 9, 2012

Classy Bread and Fishing Poles

 After spending the better part of this week in Utah, I have to share some love. I will always love how amazing it is to bake bread at this high altitude. Oh my goodness. I love how quickly things rise here! I especially love that I have to adjust my baking time and temperature in order for bread to actually look pretty.

 I loved my bread class this week. Among the students there were many experienced and inexperienced bakers and I always find it amazing to see the light come on in young baking hearts. No matter what age the heart is, bread seems to touch so many. I loved seeing two adorable farming guys in my class. Yes, it did make me wish I had a daughter for them to marry. Jeff especially. Keep baking brother. I want to hear how things go with that bread! Shelly from Idaho...you too love. Keep me posted! Many drove from out of state to attend. Many groups from Idaho and a few from Montana. Oh my heart just could burst with love. You all made me feel so welcome and adored. So many who spent the entire weekend playing with me! Thank you!There were too many to mention by name, but I do have to say that the guys from our bread class, Jeff and Irvine (did I spell that name right?) brought the entire family to the classes the day after the bread class. I'm flattered. Eileen and Chris have raised a fine family and I got meet their beautiful daughter Sarah. By the way...I'm happy to report that they have a daughter just about Little Man's age. Fate. See?  I love you guys! All of you. Thank you so much for making it a beautiful couple of days.

At any rate. I feel so blessed. I'm going to admit it right here. I'm always humbled to have new friends and share something that is near and dear to my heart. I'm not going to lie. The best part of the week was having my sweet dad, The Pansy Man, and my sister, Auntie Em, roll into the parking lot with a trunk full of fishing poles and some stinky cheese. I quickly slipped out of my fancy dress clothes and into a comfortable pair of jeans and a flannel shirt. We found a local fishing pond there in Brigham City, Utah. Within a few minutes, dad caught this guy.


 I caught one too.
Time alone with dad and a fishing pole...priceless. There it is.


Always My Very Best,
Your Friend Chef Tess

Friday, June 1, 2012

No Knead 4 Ingredient Overnight Bread Anyone Can Make


This is epiphany bread. Ya know the stuff? The bread that is such a simple idea but one that changes how bread is made in your house. I've been working on this for a while and I think it is time to finally share it here. It has been played with enough now.  It is white bread. Don't panic. It can be done with whole grain. You just need to increase the water to 1 1/2 cups in the recipe. It will depend on how dry your flour is, and may need up to 1 3/4 cup cool water for the whole wheat bread. My favorite organic ancient grain for this is ...and it will need the full amount of water. I make this dough late in the evening before I go to bed and just leave the bucket in my kitchen overnight. It takes all of three minutes to combine all the ingredients and then it is ready to go.  Don't adjust the yeast. The beauty of the no-knead is that it takes a long slow fermentation time and that is what will develop a beautiful gluten structure in your bread. This slow ferment replaces mixing. It's crazy-cool! This recipe makes one loaf, so it is just right for smaller families or those just starting into bread making. It is a lot of fun! Oh...and really, it does't matter if you let it raise at night for 10 hours or during the day while you're gone to work. Let it fit into your schedule. 

NOTE: The temperature in your home will be a big factor in weather it will raise. Please allow an additional 2-3 hours if it is under 70 degrees at home. Winter months will be longer. Thank you!


My No Knead 4 Ingredient Overnight Bread
3 1/2 cups bread flour (measure exactly with a knife)
2 tsp salt
1/4 tsp instant yeast (or 1/2 tsp active dry yeast)
1 1/4 cup water (under 110 degrees)
Directions:
Combine the ingredients in a 1 gallon food-grade bucket or a large 1 gallon bowl with a lid, just until everything is mixed and smooth. It takes about 20-30 turns by hand to get it all combined. Cover with a lid and keep covered 10-12 hours at room temperature until you're ready to bake bread. Once it has raised overnight you have two options. Form into bread (or rolls, cinnamon rolls, whatever) OR it can be kept in the fridge up to 7 days and warmed to room temperature to use for bread or pizza etc. It takes about 45 minutes to an hour to get it up to room temperature (70 degrees). 
Form into a loaf  (see detailed tutorial here) and place on a lightly oiled baking stone or in an 8 inch loaf pan that has been greased. Allow to raise in a warm room until doubled, about 2 hours. Bake at 375 degrees 35-40 minutes (meat thermometer will register 165 degrees or more).  Enjoy!

There you go! Enjoy a simple new way to make bread! For  my gluten free bread that is quick and whole grain delicious...go here. It is just as quick and gets rave reviews! My other favorite no knead bread is Lisa's No Knead White Chocolate Pecan Bread. It is to die for. 


END Note: A few factors on the overnight no-knead bread that can have an affect on the lightness of the bread would be:
Temperature: raising the bread during the winter months will take up to an hour longer for the second raise in the pan because our houses are cooler now. If you're like me, we keep it around 70 during the winter and a good ten degrees colder inside will make a difference in how fast it raises....exponentially. Solution would be to turn on the oven to "warm". Place the dough that is in the loaf (ready to bake) in the oven, covering it with a mist of water. TURN OFF THE OVEN. It should raise in an oven around 100 degrees or less so don't leave it on! Once it has risen, pull the loaf out of the oven. Preheat the oven to 375 and then proceed to bake. 
Loaf formation: The molding technique Chef Tess Bakeresse: Sandwhich Loaf Molding and baking is a factor in how well the loaf will raise because it is optimal in trapping the air produced by the yeast. The more air that is trapped inside the loaf, the lighter the final loaf will be.
Freshness of the yeast and type of yeast: It is always a good idea to check the freshness of the yeast as well. If you are using the regular active dry yeast, 1/2 tsp is the correct measure but if it is older, it will take more (up to 1 tsp). One may add up to 1/4 cup of sugar or honey to the recipe to help get the yeast active if there is still a problem (especially during the winter months).
Type and mill of Flour: Finer milled Higher protein white wheat bread flour, Kamut flour or Hard Red wheat flours are the best for this recipe. They have a stronger amount of protein and will always yield a higher loaf. The finer ground the flour, the better the gluten development will be. Large pieces of fiber in the flour will cut the strands of gluten, and shorter strands of gluten will not connect well enough to hold air in the loaf. 


Always My Very Best,
Your Friend Chef Tess