Wednesday, April 29, 2009

The Cheeseball...melt.

Come a little bit closer. This is not the typical grilled cheese sandwich. I realized today that I have a perfect shortage of amazing sandwiches on my blog. How can a bread baking queen (of love and glory) not have about 50 gorgeous sandwich entries? I have one now. This is it. The melted cheese ball... (click on this picture for a full size view...it's totally amazing)...
Next time I'll double the filling for the photo (and myself). Just know that even with a smaller amount and my low fat kick, it was really outstanding. I literally took the gooey goodness of a cheese ball without nuts, and made it into the filling for a grilled cheese sandwich. That complex flavor was the perfect companion for the slices of homemade overnight started bread . I love it with seeds all over the crust. Did you miss that tutorial? ( seeded bread tutorial ).
The cheese ball recipe I got from my sister in law. All too often I will get some of my best recipes from my family and friends. This fact held true. Meet the Cheese ball. Please.
There are two things I loved about the cheese ball. First, it could be used as a spread or as a cheese ball. Second... freaked me out(in a good way) because it has crushed pineapple in the mixture, but it's the perfect combination of salty and sweet. Add to that the crunch of toasted bread and you have a winner. In fact, this is the only cheese ball cool enough to be wiped all over my bread, bagels, soft pretzels, homemade crackers and then grilled on toast. Now that is an honor worth blogging about. Right? The other good news...it has a really small list of ingredients. That can only help endear it to me.
Gwen's Cheese ball
("cheese ball" here is not actually a reference to my brother in law...grin...)
yields 2 average cheese balls
(or one giant mother-of-all-cheese balls...again not my brother-in-law)

2 packages cream cheese (8 oz each)
1 cup extra sharp cheddar cheese
1/4 cup minced celery
1/2 cup minced red onion
4 oz crushed pineapple (squeezed until all the juice is out and it's almost dry)
2 tsp pepper
2 tsp garlic
Allow cream cheese to soften to room temperature. Pot into a Kitchen Aid with paddle attachment. Combine all ingredients on speed 2 about 2 minutes. Scrape cheese mixture out of bowl and form into 2 rough balls. Put on a plate cover with plastic or a glass dome thingy...(sorry for the technical wizardry of the moment there) and chill in the fridge 2-4 hours before serving. I think it's best after 24 hours.
Grilled Cheese ball melt
Scoop 2-4 T of mixture onto a slice of bread. Spread mixture to edges and top with a second slice of bread. In a lightly oiled skillet, cook the sandwich over medium high heat until center is melted and the bread is toasted (4-6 minutes). Enjoy with a cup of cream of tomato soup. Haaa guess what I am blogging about next? Homemade cream of tomato soup that doesn't curdle. It can be done!
Enjoy.
There you go.

Monday, April 27, 2009

Vietnamese vegetarian phở


This is a Vietnamese soup... phở (called phở chay for the vegetarian variety I love). I actually eat if for breakfast on a regular basis. If I don't already seem weird enough after reading my blog, that must have sealed the deal. But look at this soup and tell me it wouldn't be welcome on the table even at breakfast! Ace has been known to eat this stuff by the gallon...but not at breakfast. I am alone in my early morning noodle-fest.

It's one of my favorite things on earth for a lot of reasons, but one thing that stands out most is the Q&E factor. That would be the "quick and easy" factor. It takes all of 3 minutes to cook the noodles because they are made of rice (typically rice and water and sometimes a little tapioca...which is astonishing and wonderful news to all my gluten free readers!) I use several cups of vegetable broth with some fresh cilantro, mint, green onions, mung bean sprouts, and carrots. Sometimes I go so far as to add meat, but I prefer the lighter "no meat" version...especially at breakfast when really, who wants a heavy meal? When it has meat, it is typically sliced super thin and cooked with the hot boiling broth. Also, the fresh herbs and things are served to the side quite often and then added according to a person's preference. If I am just serving it to the family, I do it in a large gallon pot. It just seems more practical. I've been told that the larger flat noodles and my use of green onions is more typical of the northern parts of Vietnam and that the vermicelli noodles are more southern. So there's your random fact of the day. Don't quote me, as I am not an expert on this. Seriously not. Just love the food. This is one of my recipes that I kinda "eyeball"...not super exact measurements for the pot of soup stuff...just to taste and feelings that day. Note that the herbs here are fresh. Wow does it make a huge difference! Thanks again to Wendy for the gorgeous herbs!
Vegetarian phở ( phở chay)
7 oz package of flat dry rice noodles (Shahe is the brand I like but there are tons out there)
6 cups boiling vegetable stock (or any meat stock works...beef being among the most popular)
1/2 bunch cilantro, chopped
1/2 cup chopped fresh mint
1/2 cups Thai Basil (or whatever you can find...or be given free huh Wendy?!)
1/2 cup thin sliced green onion
1/2 cups thin sliced or julienne carrots or mung bean sprouts (or both)
2T rice vinegar
2T fish sauce
1-2 tsp chili sauce (to taste)
lemon or lime wedges

Add the noodles to the boiling stock and cook 3 minutes. Add all remaining fresh ingredients and serve. Squeeze fresh lemon or lime juice over the soup and enjoy. It's that easy. No wonder I love it! I dare you to try it...just once for breakfast.
There you go. If you omit the fish sauce...it's gluten free!

Sunday, April 26, 2009

Bread of Life...Eat Your Brussel Sprouts.

I never have to tell my oldest son to eat his brussel sprouts. Given the opportunity, he will pick them over any vegetable in the entire store. It's been one of my giddy gleeful moments as a mom to see him proudly plop a bag of brussel sprouts on the rolling check-out belt... and then see the cashier lift an eyebrow. It never fails to raise eyebrows. The eyebrow is usually directly connected to the beaming look on my boy's face. "Are you excited to eat these?" (confusion and awe) is the question usually to follow. One cashier went so far as to ask me how much sugar I put on them to get that response from my kiddo. None. Granted, I do call them "monkey brains"...instead of sprouts. They know it's a vegetable though. I'm not corrupting them...entirely. But we will talk about that later.

This is the Bread of Life section...the spiritual side of Chef Tess. Feel free to read other stuff. I just like to share this side of me at least once a week as a solid post. So why bring up the green things on Sunday. Why? Well...to remind myself that the joy of motherhood isn't measured in a constant flow of glory, praise and adoration from my kids...but the small things from day to day that add up. I'm also going to remind myself to bask in the glorious glow of joy on brussel sprout days. We might not always have them.

It's the "thank you for the brussel sprouts" moments that keep me going. Things like a hug I got tonight and the words "thanks for being the mom...you're good at it" that feed my mothering soul. Isn't life really about the moments where I see that they are "getting" it. It's soooo epic. Even if he has green globs in his teeth from horkin' down brussel sprouts--it's nice to hear. The "someday you'll be glad I was such a mean mom" moments. Teaching them that sometimes it is an acquired taste...and to learn to get excited about things I know are good for them. Like where I taught them to eat the healthy stuff and be excited, or read the scriptures and be excited. Most importantly teaching them to pray... and be excited. We call that "putting on your helmet". Getting ready for the day's spiritual battles and getting your thoughts in the right place. They love it.
My final quote: "... recognize that the joy of motherhood comes in moments. There will be hard times and frustrating times. But amid the challenges, there are shining moments of joy and satisfaction." From: Ensign » 2008 » May ,Daughters of God by Elder M. Russell Ballard Of the Quorum of the Twelve Apostles

Thursday, April 23, 2009

The best dip I've ever had...so far...

We went to a pot luck tonight and this may be the best hot dip I have ever had. In my humble yet accurate opinion...you can't go wrong. This dip was amazing and I must say that Ace piled it on his plate in an amazing display of grimace proportion. It was beautiful to boot!
Way to go Lisa!...check out her blog for the complete recipe!

Homemade Hot Pockets

My life seems to revolve around dough balls...yet if you asked me if I really had other things to do, I undoubtedly would say yes. I have a hard time swallowing the idea of paying over a dollar a piece for a dough ball stuffed with twelve cents worth of cheese. It really seems totally impractical to me, especially since I seem to have the 30 minutes it takes to make the pockets...and plenty of cheese. I may in fact, have more cheese than should be humanly allowed in one fridge. We do like our cheese. So, today I made cheese, mushroom, herb and Alfredo stuffed hot pockets. Given the perfectly blissful influx of farm-fresh herbs from Wendy and the impeccable oyster mushrooms from the local Oriental market...on sale...I had to do it. Thankfully my family received these little dough balls with a full measure of satisfaction and joy. Meaning? Yes, I will make them again.

Start with oven rise pizza dough:
Oven rise pizza dough (like D'Journo for your freezer)
6 cups bread flour
2 1/4 cups water
1T baking powder
1T yeast
1T salt
1/4 cup oil.
Directions: Combine all ingredients in a mixer and knead 5 minutes. Let dough rest 5 minutes.
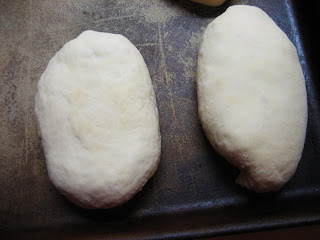
For hot pockets, divide the dough into 12 little balls...


After the wedge of cheese I filled with a 1/2 cup scoop of this filling.
Mushroom Alfredo filling
1 lb mushrooms, sliced (I used oyster mushrooms but any will do)
1 medium onion, chopped
2T garlic infused olive oil
1T garlic, minced
1/4 cup chopped fresh herbs (I used a combination of basil, thyme, parsley and rosemary)
1 cup prepared Alfredo sauce (yea, I used some pre-made stuff Tara gave me...it was easy!)
all purpose seasoning blend (I used my blend...to taste...about 2 tsp)
Directions:
Saute mushrooms and onion in oil over medium heat. Add the garlic after 5 or 6 minutes. Add all remaining ingredients and stir until well coated. Cool slightly before using as filling for hot pockets. 1/2 cup scoops are just about right.
Pull up the sides like this and pinch tightly...
To bake for dinner right now : Place seam side down on a lightly oiled sheet pan. I use stoneware. It seems to give a much crispier crust. Bake 425 degrees 20-25 minutes.
To freeze for dinner later: freeze baked pockets after cooling. OR Freeze the uncooked pockets on a sheet pan lined with parchment paper until solid (about 2 hours) transfer to gallon size freezer bag. Bake 425 degrees from frozen 30-35 minutes. If frozen baked...re-heat via microwave 1 1/2 half-2 minutes on high. Very fast and easy dinner or lunch. Much cheaper than the commercially made pockets with lots of additives and junk.
Enjoy your dough ball stuffed with cheese and saucy herb mushrooms. I know we did!

Feel free to goof around and find your own favorite hot pocket. We have had them with almost any flavor used for pizza or sandwiches. Such an insane number of ideas including but not limited to: Pepperoni, broccoli cheese, ham and cheese, pepper steak and cheese, garden veggies and cheese. Like I say, cheese stuffed dough balls. Main cost is the cheese. Oh and the meat (if you eat meat). Great convenience food. Little price.
There you go.

Wednesday, April 22, 2009

Green eggs and toast

In a huge celebration of Herbs and Eggs...a tour and tutorial, I am gleefully using the amazing eggs from Wendy's chickens...and her farm fresh herbs. Do you see my funky chicken dance in my hot pink fuzzy slippers. Hopefully not.

Yesterday I decided to make some green eggs and toast. I think they turned out insane. In a good way. I haven't had an egg like this in my life! Ever! Thanks Wendy!

Eggs right from the "farm"...no, not the nut house as I've heard it called by Wendy...lol.

First step was to make the pesto.
Basil-dill pesto
1/4 cup pine nuts (or walnuts)
1/2 cup lightly packed fresh basil
2T lightly packed dill
3T garlic infused olive extra virgin olive oil
1 pressed garlic clove
1/2 tsp kosher salt
1/4 tsp fresh cracked black pepper
1/2 cup fresh grated Parmesan cheese

Put all ingredients in a food processor and pulse until a thick paste. Yields about 1 cup. It goes a long way too! Use it on eggs, pasta, mixed with butter on garlic herb bread, in tomato sauces, on chicken...you name it. I love it mixed with melted butter and spread over rolls just before baking. It's amazing. Freezes beautifully too, so it's a great way to preserve that fresh basil flavor and use it all the time.

For green eggs: in a lightly oiled egg pan, put your eggs. Note: the yolks are awesome! Look how fresh they are! The fresher the egg the higher up the yolk will be...it doesn't spread...see?!

I loved adding some of the fresh dill to the eggs as they cooked. This complemented the basil pesto in a magical way. Oh heaven.


Eggs over easy means the yolk is still runny and the egg isn't browned, just cooked on a low temperature then gently rolled over. Honestly they take about 6 minutes start to finish. This was done with a tablespoon or two of the pesto added to the pan just after I rolled over the eggs. I didn't even butter the toast. Just had it to dip in the eggs. Crispy full flavored bread made into toast with some country fresh farm eggs...it just doesn't get much simpler or perfect than this.

There you go. Thanks again Wendy!

Tuesday, April 21, 2009

Tortilla Tutorial with String Cheese

12 years ago I went to a church activity where a Mexican mother was teaching how to make tortillas. I absorbed it totally into my life. She was named Alba. It was a great class. See, I'm not above learning something new. I try to learn something new everyday...which usually means I actually do it about once a week.

Several months ago, my loving and adorable mother asked me to do a tutorial on tortillas. I am not totally all together perfect yet. I just remembered it today. So, as it is Tuesday and my cousin "String Cheese" who goes to ASU comes over just to hang out with me (yea, I know...she must REALLY like me)...on Tuesdays...we made tortillas together. This is the official tutorial for the rest of you who don't love me enough to drop everything and come over on Tuesdays. Or, just have other things in your life right now and have recently added a little bit of guilt to that list...I love you! Don't worry. I love the one on one with String Cheese. She plays a string instrument...and loves cheese. String Cheese... She's the coolest cousin.

I think she really loved seeing the blogging process first hand. She was laughing at me a lot...and that was just before we started cooking...then she was rolling!

She also loved her tortilla with extra, extra, extra cheese...go figure.

We used a tortilla mix... but you can also make your own!

Tess' Homemade Tortilla Mix:

5 cups flour
1T salt
1T baking powder
1/2 tsp garlic powder,optional
1/2 tsp ground cumin, optional
1/2 tsp ground oregano, optional
1 cup butter (or shortening or lard-- I use butter)

Cut butter into flour, baking powder, salt, and seasoning with the paddle in an electric mixer, (with a food processor, cut the recipe in half and proceed, with 2 1/2 cups flour, 1/2 cup butter.. use the blade attachment, are you getting this?) Mix until the butter is in fine pieces smaller than peas. Totally okay to use the mix! This is store bought. I used it today with String Cheese...
If you use the store bought mix, use the water to mix ratio suggested on the bag. For mine...In a separate container BOIL 2 cups water (full recipe) or 1cup cuisinart. Dump boiling water into the flour mixture and combine with paddle about 1 minute on medium speed (food processor, 25-30 seconds). remove dough from the bowl and form into 12-18 balls, depending on the size of the tortillas you want. 12 will make 8-10 inch tortillas, 18 will make 4-6 inch tortillas.

Roll the tortillas into rounds...starting with an oval seems to work pretty well...I don't know why. String Cheese did an exceptional job!

Hold up that uncooked tortilla so the folks at home can see how cool you are!

No need to use flour on the board. Just roll out into a 6-8 inch tortilla and cook on a moderate skillet (medium heat) until done (about 2 minutes on each side). It should bubble up like this...and look this artsy too...

Cover with moist dishcloth to keep tender. I usually roll one out while one is cooking, and enlist the help of my two sons who adore the tortilla project! They don't make super round ones just yet, but it is so cute to see them getting all freaked out about their little tortillas! I think adults do a lot better...and String Cheese totally proved me right (as usual).

Serve warm with fresh salsa and lots of cheese...double that for any cool cousins who love cheese. Enjoy!

There you go. Thanks for the fun String Cheese!

Ugly loaves... oven temperature

This is an Alien...eeek! Not something I see a lot of around these parts. I wanted to show this though because it is a very common problem when it comes to bread. The mutant loaf. I think it has super powers from radiation therapy. Pretty sure. Yea, she looks like a princess now, but wait until I turn her sideways...
Eeee-eee-eee... It raised really nicely over the pan. That is a goooo thing. What I didn't like was the overhangin' and the random dough that outgrew it's shell...

The sliced loaf really reveals it's odd shape. That's all I'll say about that.
It's like the wrong pair of jeans cutting me in half...boink. I have a friend who calls those "muffin top jeans"...

The main cause for this loaf looking like this? I didn't pre-heat my oven and I had a little too much dough in the pans. So, as the loaf rose, the oven temperature wasn't hot enough to kill the yeast action or to set up the protein fast enough for the loaf to set and hold in the shape. Note to self... don't be lazy about the pre-heat. I don't usually get lazy...and now, looking at this little princess, I remember why.
There you go.

Monday, April 20, 2009

Herbs and Eggs...a tour and tutorial

I visited a good friend's garden today and she graced me with some of her amazing herbs and eggs. Unlike the quail eggs from the previous post, these are real eggs. REAL. I actually saw the chickens they came from...which is amazing for a city chick like myself...and the birds. So take a peek at this garden. This is only a corner. I totally loved it. It made me miss my dad...a lot.
This is cilantro, also known as coriander. It's used in a lot of Mexican cooking but also a ton of Middle Eastern and Asian as well as Polynesian. It's very popular here in the southwestern USA.


Now the gorgeous Basil...

Ready for all things Italian, a lot of French cooking and also a few Oriental dishes. I love it with chicken, eggs, and in my stuffed savory French Toast.


This is Dill. Hello Dill. It has the seed pods growing out already which means soon Wendy will also have seeds for making pickles...but right now she also has the greens with are good for eggs, poultry, ...Cottage Cheese Dill rolls It may be one of my all time favorite herbs!


Then came the English Thyme. It is amazing! Anywhere you use dill, you can also use thyme. I love it with poultry, eggs, roasts, various vegetables like squash and carrots. As a general rule, add the fresh chopped herbs at the end of cooking. This will ensure the best flavor. Dry herbs at at the beginning of cooking for a stew or sauce to allow the flavors to be released.


Wendy had 3 kinds of onions growing. It's her son's scout project! How cool is that?!


Look at these bad birds. They walk the walk. Squawk the squawk...and gave out some nice eggs. Thanks little guys!


Nice chicks finish last. Wait...I think it's finish with fresh herbs. I'm not confusing anyone am I?

More detailed recipes and herb information to come soon. In the meantime, thanks be to Wendy! I had fun touring your little corner of paradise!

There you go!

Quail Eggs...random thoughts.

I had my first official run in with quail eggs on Friday night. I don't know what to make of or with them...

Normally I really like a good egg over easy...but quail eggs are too small. Totally impractical.
Tough eggs to crack too. Look at Tara trying to get this bad boy open. It's like opening a leather egg. Not so good. They look like malted eggs. I love malted eggs. However these are not malted. How many times can I say malted?! Why aren't quail eggs malted? Argh. That human tragedy aside, these didn't have an expiration date, so we where both too leery to eat the finished product for fear of food borne illness. So sad. Just look how freaky cute they are! It would almost be worth it...almost. Until I saw a quail egg...twice.

Compared to a dessert fork, they look just insanely small...and they are. A three egg omelet for a gnome maybe? Anyone else remember that old movie "The Gnome Mobile"? You know the one with the singing fairy gnomes that try to save the forest? Hmmm. Totally random, but a gnome would fit on the end of this fork along with the quail egg...and a mushroom. Keep that in mind the next time you find quail eggs. Invite a gnome over for brunch. It's good karma. At a dollar a dozen, it would be totally cheap to feed them quail eggs as well. At least if you get your quail eggs at our local Oriental market. They also had 6$ a pound frog legs and salt and vinegar pork rinds...and funky fruit. Didn't see any gnome for sale though. That's probably a good sign.
I see gnomes in snow-bird's yards all the time...but snow-birds and pink flamingos don't lay quail eggs. Those gnomes are fools.

Have a gnome for brunch...it's good for you. Just make sure it's a live gnome and not one of those ceramic dolls. Ceramic ones won't eat expired quail eggs either.

There you go.

Sunday, April 19, 2009

Bread of Life Section...Baby Love

This is the Sunday devotional. Totally optional reading, but a glimpse into what my heart is all about. If you're not a religious person, don't feel like you have to read it.

A dear friend of mine named Heather had a new baby a few months ago and on several occasion has loaned her to me just so I could get my baby "fix". I love this little baby "Ellie". I don't know how anyone could look at such a soul and ever doubt that they have seen a real miracle. Each child is so unique. Each born with limitless potential. I have been borrowing babies a lot lately. Mostly from lack of having a baby of my own. I've started to see the value that I can be to a new mom, ragged from lack of sleep and in need of some relief. I didn't really see until today what that meant to God for me to take up some of the "slack" down here on earth.

I had the chance to teach the women's Relief Society today at church. We have a lay ministry so it's unpaid...in earthly money(but blessings unmatched). I always seem to get a ton of inspiration and insight into myself when I teach. Most often the church lessons are the ones that change me the most. Today I taught a lesson called "God Will Be With You Forever and Ever". It was about trials of Faith and never being separated from God's love. It was about our spiritual birthrights. One of which was and is His love. One of my personal big challenges...inability to have more babies. I love them, but my body rejects pregnancy in every way. I had been feeling really guilty for not having more children. I just feel like I have so much love to give and yet, here I am with such a small family. So, today the Spirit of God just hit me especially hard. It was that not only was God aware of me, but that He didn't love me less because I didn't have 10 babies. I have 2--both considered medical miracle babies. Doctors still can't tell me exactly why they are here...but God can. He told me today in my heart. I guess there are just days like today when I feel especially enveloped in God's love. Especially cherished and appreciated. It was a good strong spiritual day. In a world of confusion, that is no small feat.

Just in case you are ever wondering if He knows you, the answer is yes. Nothing could stop a true Father from loving His child. I see him as that loving cherishing father. Like I look at my boys...and Ellie...but a million times more love. That is what today was about. I'm Feeling the love and basking in it.

There you go.

Thursday, April 16, 2009

Homemade Ranch Dressing

Need Ranch Dressing but don't want all the added chemicals and junk? Here's something you'll really like. It's been Cobb salads here for a long time. Ace is on a kick. He gets those sometimes and wants something specific quite often. How it came to be Cobb salad, I'm not sure. But, they must have ranch dressing, and not just any will do, it has to be just perfectly thin and thick at the same time. A good clingin' dressin' (no that's not a Star Trek reference) . Here's my recipe:

Homemade Ranch de Chef Tess
1 cup low fat mayo
1 cup low fat buttermilk (or milk, but I like buttermilk)
2 tsp onion powder
1/2 tsp garlic granules
2 T fresh chopped parsley (or 1 T dry)
salt and fresh cracked pepper
dash of dill or paprika if desired.

That 's it folks. Mix it all up until smooth. Aren't you glad I just saved you a ton on bottled dressing? So for southwest ranch, add 1tsp chile powder. For bacon ranch, add 1/4 tsp liquid smoke and 2T crumbled bacon. For good blue cheese, add 1/4 cup crumbled blue cheese.
There you go!