Tuesday, June 30, 2009

All American Sparklers

I don't even really have to explain how totally American a chocolate covered marshmallow on a stick is do I? Even better if the stick is edible, like a pretzel rod. This is what we did today to add to our creative kids cooking week. Tomorrow it will involve a vegetable...probably.
Shove large soft marshmallows onto a pretzel rod. Do you think I should be more technical?

Dip it in melted chocolate. I used Guittard chocolate, but feel free to use your favorite brand. I have a hard and fast rule that not only can the chocolate not get any hotter than my finger tip, but also that I must lick my finger to test the temperature. That of course, is the only reason for licking my fingers. Washing after each lick and drying thoroughly ensures that no water gets in the chocolate (which would cause it to seize up). Keep it sanitary people.
Sprinkle generously with sugar free non-caloric sprinkles. If I had those, I would totally use them...but they would probably taste like a vegetable.

Cool well and then try to keep the kids from eating them all in one sitting. Have fun creating!
Oh...really, tomorrow we will be doing something with a vegetable. My kids actually really like healthy food too.
There you go.

Monday, June 29, 2009

Homemade bubbles


We're continuing our kids kitchen crafts with a great way to save money and still have some fun. How much money does it cost to buy bubbles for everyone? I love making bubbles with my kids. You can make a huge amount of bubbles for less than the cost of one bottle of dish soap. Plus...the kids get to make their own bubble wands. Who wouldn't like that? Make them any shape or color you wish. Most important...make memories!

Adapted from : “Kitchen Krafts,” Friend, Aug 1998, 19 by Ruth Harmon
Make Your Own Bubbles
(Note: Do this activity outdoors. In the Arizona heat we make them in the bathtub.)
2/3 cup good quality liquid dish washing detergent
4 cups water
large container (for dipping the straw frame)
pipe cleaners
plastic drinking straws 7 3/4″ (19.7 cm) long

1. In a bowl (I use a quart mason jar...but I am just 1950's enough to have those just laying around the house), mix the dish washing detergent with the water and pour into the container.
Get your pipe cleaners and straws out.
2. Thread the pipe cleaners through each straw and tie both ends and twist tied, making a square with a handle out of the pipe cleaner.

3. Take your wand and put it into the solution. As you slowly take it out, a film will form on the frame. Hold your arms out in front of you and slowly blow. The air will force the film off and make bubbles. The bubble will form a sphere and drift away. (usually these bubble wands only make one or two bubbles at a time).
This was mentioned this morning on the Fox 10 azam segment, but we ran out of time for recipe. For more kids activities, check out this link:
http://www.myfoxphoenix.com/dpp/azam/home_play_dough_062909
There you go.

Homemade Play Dough


Did you see me with my cute little kiddos on Fox this morning? http://www.myfoxphoenix.com/dpp/azam/home_play_dough_062909

They are so wonderful down there at the studio! I can't even tell you how important they made my little ones feel. It was like being part of the family! So, if you are joining me from Fox 10, here are the recipes from the segment. We made play dough. Treasure Rocks and Homemade bubbles.

Soft Play Dough3 cups four
1/2 cup salt
2 packages of Kool-aid or flavor aid
2 cups boiling water (that is important... it has to be boiling!!!)
3 T oil.

Combine flour, salt and kool-aid in a large bowl. I use kool aid so my hands don't smell like commercially made play dough. As much fun as it is to play with, I'm not a huge fan of the smell. Though I am told that when they had the 50 yr anniversary of play-doh, a perfume company actually came out with cologne that was the smell of play dough. Whimsical reminder of childhood scents...or just weird. I'm not sure. I don't want to smell like Gumby.

In a microwave safe container, combine oil and water. Bring to a boil, about 2 minutes.

Pour into the dry ingredients.


Mix until combined. Allow to cool. Oh that is so important. No burning little fingers. I don't want any law suits. Geeesh! When cool, knead for 3-4 minutes until totally smooth.

I love using different flavors of kool aid and then mixing them with different flavor extracts for freaky awesome smelling lumps of love dough. For example, here we have cherry-almond, blue raspberry-coconut, and minted-lemonade. Who else makes gourmet play dough? I'm telling you that you will the be coolest dough personage ever. You'll smell like a Smurf-berry too. Just a reminder, this dough doesn't contain preservatives, so please refrigerate. I keep it in used Crystal Light containers. Yes, just another way to reduce, reuse and recycle.

Do you have a child with gluten allergies who can't have wheat flour? Here is the recipe for cornstarch play dough:

Gluten free play dough1 cup cornstarch
1/2 cup salt
1 cup cool water
1 kool aid packet
2T oil
combine ingredients in a microwave safe dish. On high microwave 1 minute. Stir well. Microwave again 1 minute, dough will start to get lumpy. Mix well. Microwave one more minute. Mix well and allow to cool. When cool enough to touch, knead 3-5 minutes until smooth.

This one is edible and just as fun as play dough but without the salty effect. Kids love it!

Candy Dough2 1/2 cups flour
2 cups sugar
2 cups boiling water
2 kool-aid packets.
3 T oil

Follow the same directions for the soft play dough, but use the candy dough ingredients.

There you go.

Sunday, June 28, 2009

Bread of Life...Creative Little Hands

It's Sunday morning. I share part of my soul on Sunday. With the upcoming week of fostering the creative genius in children and adults alike, I wanted to share my gratitude for my ability to create. I try to be in contact with my spirit and feelings in order to become my most creative self. I try to foster this in my children. Creativity is a process. There is work and planning involved. I purposely allow time for silence. Creativity follows almost immediately, because we stop, listen, and respond.

" Creative work is a special expression, “a more excellent way” (1 Cor. 12:31),... Creative expression can also represent the celebration of our gratitude to God for our gifts and talents.
When by wise self-management we are creative, then we mortals taste what Pascal called “the dignity of causality,” the capacity to cause that which had not existed in quite that way before! Something pertaining to truth and beauty occurs that would not have happened quite that way without us! Thus as “agents unto” ourselves we use the power that is in us to do good, but also to do it well, whether our creativity involves the use of our voice, our hands, our muscles, or our conceptual powers."(Neil A. Maxwell)

It is my hope that this week that the creativity we share will be in fact a celebration of our gratitude to God for our gifts and talents. May God bless you and whisper amazing inspiration to your hearts. May that inspiration lead you to create something of transcendent beauty. I hope you will share it with me.

There you go.

Saturday, June 27, 2009

Treasure Rocks

This week with summer vacation in full swing and my kids bouncing off the walls, I decided to bring out the good recipes. Artistic genius has to be nurtured. So, I love to have the kids take raw materials and create something. Monday I will be on Fox 10 Arizona morning making play dough, treasure rocks, and bubbles with my kids. In case you're confused, this is a food blog. Those are rocks. Totally not food. Sorry. I won't however appologize for the fun we had making them. I call them treasure rocks because the rock "dough" is wrapped around a little toy and then allowed to dry. What we ended up with where these cool rocks! It's a great project for kids and moms too. I've used them in the children's ministry music time with little notes inside telling the kids what song we will be singing next. Children loved coming up during church and breaking open a rock. Rock of Ages. So many lessons for kids and grown ups alike. They are awesome for dinosaur birthday parties, Earth science lessons, asteroids and space rocks. You name it. So here's the beginning of fun week. Kids kitchen crafts and projects. I know it's Saturday. It will go Saturday to Saturday. Let's get those little ones discovering their creative genius! I'll look forward to seeing pictures of your adventures.

"This recipe was enough to make 12 average size stones.
adapted from : http://www.escapadedirect.com/treasurestone.html

Treasure Rocks
1 cup flour
1/2 cup salt
1/2 cup water
1 cup sand
1 cup rocky dirt

gold paint or pearl powder(optional)

Mix all ingredients together (except paint). Place a small toy or object in the middle of the some of the dough and shape it into a stone. Air dry 2-5 days. You may hasten the drying process by placing rocks on a cooling rack placed on a cookie sheet and bake at the lowest setting you have on your oven, 150 degree, 15-30 minutes or so. Be sure to only use oven on non-plastic toys in the rocks. To add to the "rocky texture" I rolled some of the rocks in dry sand before I dried them. Others I coated lightly with a little streak of gold acrylic paint to look like there was gold in the rock. Have fun!

Friday, June 26, 2009

Cream of Wheat...Starting With Wheat.

Sometimes I do some simple basics, not only because we live on simple basics around here, but also because I know a lot of cooks who need the basics. I originally started this blog for my kids and students. Any student needs the basics in order to have a good foundation. This one is for my beginners. I love you guys! Cream of Wheat made from the whole grain at home, is nutritionally the best option. I think the flavor is off the charts. There isn't a hint of bitterness from rancid old ground wheat if you make it fresh. It's sweeter from the fresh wheat. It has all the benefits of whole grain! I know my kids are more apt to eat it if they help grind it. It's a funny thing. The other plus? At my local health food store, a pound of wheat is just under 50 cents. That makes 15 servings of hot cereal. How's that for cheap eats?

Here's my hand grinder. It's not the fancy amazing model, but it does the job for cream of wheat. Oh the nice model is on my list of things to get. Right now we make due with this guy.
I love hard white wheat, but red would work here. You could also add other grains like barley. Malt-o-meal is just that...barley and wheat. They toast the barley before they grind it.
I grind it once on a rough setting. If I cooked it at this point it would be called "cracked wheat". It's much more coarse, but a wonderful texture.
I run it through the mill on a finer setting. Did I mention my kids love to watch this process? Especially if I say things like "stop...save me! I'm too devastatingly beautiful to be put through the grinder". They laugh hysterically.
At this point, it looks like commercially prepared cream of wheat.
I like my cream of wheat not too thick and not to thin. Call me Goldie-locks. It takes 1/3 cup of the cream of wheat to 1 cup of water. I also use a pinch of sea salt.
Bring the water and salt to a boil. Add the cream of wheat in a stream, whisking with a whisk. Stir for 5-7 minutes until thick. It will look like this...
Serve with honey and cinnamon if you want or enjoy the savory version with pepper and butter.

Simple basics. There you go.

Thursday, June 25, 2009

This is more news!

I will not freak out. Okay...yes I will. I'm giddy. This upcoming Monday on Fox 10 Arizona Morning, 9:45, I will be making some homemade play doughs, homemade rocks and bubbles with my kids! I am not only flattered that they want me back so quickly, but also excited to share my amazing children. This will be a great one to catch for all those sweet moms and caregivers out there who are feeling the burn now that summer is in full swing and kids are off school. I will, of course be posting the link to their website following the show so everyone out of state can see it. For those in town, don't forget to tune in. If you missed my last segment, you can find it here :Oh That Was Fun!

There you go!

Fried Green Tomatoes

Ace has been begging me to make more fried green tomatoes. Given his initial snobbery at the mere mention of the dish, I find his begging most exciting. Okay. I admit, I like seeing him beg for food anyway. It makes up for the bad experience we had last week with my foot rub (Baker's Hands... ). A few weeks ago I ventured in to new territory when I tried making fried green tomatoes for the first time. I had heard that they where delicious. I had also heard that they where an acquired taste. I was willing to give them a try. Thank goodness for Organic Tomato Farming and access to the tomatoes. I've never seen green tomatoes in the farmer's market here. It has been insane fun trying new things with them like Green Tomato Marmalade. I don't want to offend any true Southern cooks with my lack of knowledge in this area. I honestly had no idea how to make them other than breading them and frying them in oil. I've since been told that they are best fried in butter and using cornmeal in the breading (Thanks Shellee!). I actually adored them with the cornmeal, but still used very little butter. Ace ate 3 plates and dipped them in Homemade Ranch Dressing. If I was in the South, I probably would fit in nicely. I love Elvis. I pickle stuff. I now make fried green tomatoes. I found them tart and crisp and loved the buttery flavor. I only ate a few, due to the deep fried nature of the beasts. Will I make them again? Yes. Yes I will.

How did I make them? Again, if your from the South and these are different from how you make them...I apologize. This is how I did it.
Dip thick slices of green tomato in buttermilk or egg and then a mixture of flour and cornmeal (50/50) with black pepper and salt. Fry in butter or oil 5-7minutes until golden brown (3 minutes on each side). Serve hot with ranch dressing if desired.

There you go.

Monday, June 22, 2009

Peanut butter-cup bars


Remember Princess Butter-cup? Ahhh the Princess Bride. I used to be able to quote every line from the movie "The Princess Bride". I wanted her long flowing blond hair, perfect skin and her beautiful...farm boy. Wow life hasn't changed. Farm boy is still adorable. I do mess with a Sicilian when death is on the line...especially if the Sicilian dares reach for one of my butter-cup bars. It's a battle of wits everyday. Winner takes the whole pan of bars and sits in the fire swamp until the R.O.U.S's need a swift whack with a sword. Yes. Miracle Max's wife says that the chocolate coating makes it go down easier. Of course she is talking about the chocolate coating on the butter cup bars.

Actually my first encounter with peanut butter bars was my Junior High cafeteria. Oh...I can still smell the grease if I think about it too much. These bars however, where a delicious treat (even coming from the cafeteria). They may in fact be the only food I ever remember with fondness from my school days. I'm so sorry nice lunch lady. It's not personal. At any rate, the last pan of these I made I took to the youth I work with at church. It was last ditch effort to get the bars out of my house so they would stop staring at me. The girls loved them. The boys almost licked the pan clean. Reminding me once again of Princess Bride. "Farm boy...I'd like to see my face shining in it by morning. As you wish." But I really meant ...I Love you. I think this recipe deserves to be on the blog.


Peanut Butter Cup Bars
1 cup melted butter
2 cups graham cracker crumbs
2 cups powdered sugar
1 cup creamy peanut butter


Chocolate coating:
1 1/2 cup milk chocolate chips
2T creamy peanut butter

extra peanut butter chocolate chips for garnish (optional)

Combine melted butter, graham cracker crumbs, powdered sugar and peanut butter until well combined. Press into a 9 by 13 inch bar pan. For coating, melt chocolate chips and peanut butter in the microwave for 1-2 minutes until just melted. Stir until completely melted and pour over bars in the pan. Sprinkle with peanut butter chips if desired. Wait for 24 hours for full potency. Really. Let them set for 24 hours. Cut and enjoy. Yield 72 small bars.

Sunday, June 21, 2009

Bread of Life...Fathers

It's Father's day. I try to dig deep on Sunday and share a little of my soul. Today I wanted to talk about Ace. He's one of the biggest parts of my soul. I married him over 13 years ago and have shared a good part of my life with him. I took a long drive with him yesterday in the magic mini-van with my loud children and my Mother in Law (who I adore). Don't try that without ear plugs. Really. I'm pretty sure it caused permanent damage. At any rate, we drove down to where Ace works. It's a one and a half hour drive one way. I've never once heard him complain about the drive. Never once. I am thankful I have a husband who is willing to work hard to provide for his family. He does what is required. He keeps a positive attitude. I am so thankful. I know there are a lot who don't do what they should for their families. I count myself very blessed.


Ace, You are honest and loving. You are smart, but don't make others feel stupid. You are an encourager and a true friend. You tell it like it is. So, this Father's day I want to say thank you Ace. You are an amazing Father and husband. Thanks for teaching my boys by example what a good Father does. We love you!

I hope everyone has a wonderful Father's Day.

Thursday, June 18, 2009

Barbara's Oatmeal Cookies


I would be a slacker and a dork if I didn't at one point include these wonderful little nibbles into the mix here on the blog. Nothing brings me closer to my grandma Barbara than slipping on the only article of clothing that I have from her, a purple gingham apron. Yesterday I caught myself taking her oatmeal cookie recipe out of it's carefully guarded box. I have little boys. I guard stuff. Seeing her handwriting transports me back in time, if only for a moment. There I was in her warm kitchen. She sifted stuff. I was known back then as Stephy-Jean. Oh dear...that may be as hillbilly a name as ever there was one. When it all comes down to it, some of my most cherished childhood and teenage memories are forever enshrined in that tiny little kitchen of hers. It wasn't ever "un-cool" for me to hang out with her. Though I know for certain she loved all her children and grandchildren...I'm pretty sure we all felt like we where her "one" favorite. So yesterday...I baked some cookies with grandma. I miss her. Heaven must be the most amazing place with her there. If you don't miss your grandma yet, consider yourself blessed beyond measure. Call her maybe. I bet she would love to hear from you. Go by and make some cookies.
If she's gone...perhaps you could make some memories with your own little ones. I'm sure they would love it.
Grandma Barbara's Oatmeal Cookies
1 1/4 cup butter
3/4 cup packed brown sugar
1/2 cup sugar
1 egg
1 tsp vanilla
1 1/2 cup flour
1 tsp baking soda
1/2 tsp salt
1/2 tsp cinnamon
1/4 tsp nutmeg
3 cups rolled oats
Preheat oven to 375 degrees. Cream butter and sugar until combined. Add eggs and vanilla. In separate bowl combine dry ingredients. Mix the dry ingredients with the wet, just until combined. Drop by rounded tablespoon onto ungreased cookie sheet. Bake 375 degrees for 10-11 minutes.
There you go. Love you Grandma.

Tuesday, June 16, 2009

Baker's Hands...

Well now...here's a random thought. I think it's time I had one.

I have beautiful feet. How's that for random?


With housework, canning and bread making I have pretty much pulled a full shift on my lovely size 10's. Despite their giant size...they are gorgeous. Mind you, I don't usually complain about anything. I make it a point to be positive. It's very rare Ace hears me complain, but today I did. My feet where killing me. Honestly, I need to get some of those gel pads for my shoes. The pads made for shoes. Side note...I actually have a dear sister who used to think that Preparation-H was for sore feet. Boy oh boy was she upset to find out that those pads had nothing to do with bunions. At any rate...where was I? Oh...Ace. We where in the magic mini-van driving into town and I mentioned in a very non-complaining way that my feet where a little sore from the efforts of the day. I have an amazingly thoughtful husband. He looked over to me and with a very concerned tone asked, "When we get home, how would you feel about a nice foot rub?"...I almost cried I was so happy. The thought actually entered my mind, "I have the world's most perfect husband". Then he said, "It will really strengthen your hands..." Then it hit me...he wanted me to give him a foot rub.


Silence....
I'm a baker.
My hands are already strong. He had to seriously talk to the hand. I also had some serious head pivots and a full on attitude. " OH no you didn't! You did not just say that to me."

I'm still waiting for my foot rub. I don't think my attitude helped. However...He'll be waiting for his foot rub until next June. Or maybe not...

Later on he did clean the toilet. To this domestic Queen, that is almost worth a foot rub. Almost...

That's all I have to say about that.

Basic Bread Painting Technique


I was recently approached by the James Dillon the editor of Baking Business magazine in Australia. He asked if they could do a feature article on the bread painting technique. Aside from being amazed and flattered, I realized that this could benefit several thousand bakers across the continent of Australia and perhaps help them add some new products and cash to their bottom line. If all goes well, this will be in the August issue reaching close to nine thousand in the baking industry. Best wishes to all the hard working bakers. God loves you. I also would love to be featured in http://www.wildyeastblog.com/. We'll see if they think my baking is up to snuff.

Well, the time has come once again for our Tutorial Tuesday. This is one I have been practicing for several years. I originally saw it in a French baking book (though I really had to dig to find out what they where doing) and knew I could make this work for me. The book is called "Special and Decorative Breads" by A. Couet and E. Kayser. The book was a gift from my mother and it spoke to my creative spirit...in every way. This week I wanted to show something that adds a whole new dimension of elegance and charm to any loaf of bread. Some have called it breathtaking. I adore it. It is basically a tinted egg wash that gives the appearance of being baked on the loaf. It is called loaf painting. I do it using an extract of wheat or barley. When I saw it in the book it was done using instant coffee granules and water. I prefer using the natural colors of the grain. I have a few other techniques for yellow, green, reds, and whites. I thought we could start with the basics here. Hopefully you will return again and again for more ideas on natural coloring. In the meantime, lets just jump right into this exciting technique!


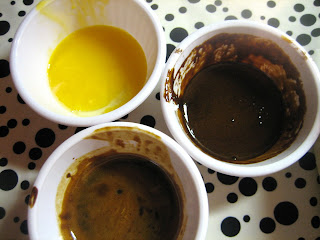
For the wheat or barley, take the 1 cup whole grain and put it dry in a frying pan. Toast it until it is almost black. Add 1-2 cups water and steep as you would for coffee, about 15 minutes. Drain, reserving the liquid.
Return the liquid to the stove and continue to reduce until a concentrated form.
You will also need one egg yolk, a few new paintbrushes, and a loaf of bread, already baked. I bake it just until it reaches an internal temperature of 165 degrees. Keep your oven on. 350 degrees.


Mix a small amount of the egg yolk with the concentrate. The more you add, the lighter the color on your bread will be.


I keep a darker and lighter shade for contrasting colors. I also have a container with just egg yolk. Reserve the white for the final step!

Make your initial design with the lighter color. Then return the loaf of bread to the oven for 5 minutes.

Remove from the oven and paint with your darker color for contrast and details. I use the egg yolk for the lightest areas that I still want to have a little color.


Return to the oven and bake an additional 5 minutes. This will set the color. Remove from the oven and lightly brush with egg white. Return to the oven again for 5 final minutes. It will have a nice gloss.


Here is another loaf with the initial lighter color.

Baked for 5 minutes. I then added the finer dark details with the darker shade and returned it to the oven for 5 more minutes to set the color.


There you have it. The simple basics of bread painting. I hope you will share your successes with me! I'd love to see your work! Imagine the possibilities!

There you go.


Oh, as a side note I wanted to add that my Advanced Pastry instructor from SCI would probably love to see this. It's been 14 years and I was one of her first students, but Tracy Dewitt, thank you for inspiring my creative spirit. I think of her often with great fondness. Check out Tracy here (http://forums.worldpastryforum.com/forum/topics/team-dewitt-2009-nationals ).


Monday, June 15, 2009

Yes, We Can!...Salsa and Tomato Sauce

"Yes, We Can" is a famous phrase now isn't it? I don't care what your political views are...that was an inauguration speech to put in the books. I try to steer clear of political statements on my blog. However, I couldn't resist this one. Yes, we can. Around here, "we can" means we put away our summer bounty in these shiny little jars and in the winter we have homemade goodies. Home canning is freaky fun. This week it's been an inordinate amount of tomatoes. I had some empty jars and a few extra hours with some idle handed kids. I had to put them to work for fear their brains would turn to mush. I don't know if I can look at tomatoes the same anymore after seeing the growing process first hand working on the farm (hint hint Organic Tomato Farming ) . After pulling weeds, trimming branches and plucking the fruit myself, I can finally say I appreciate these little bad boys.
And what did I can? Hot salsa and tomato sauce.
Here's a little known fact...tomatoes need added acid for boiling water bath canning. I got educated from the book "Canning for Dummies" by Karen Ward. I would love to hug her! She gave me so much canning confidence! She covered everything from equipment to food safety. Her recipes have all turned out superb (no I have not tried all of them...). If you have the means, I highly recommend picking it up. Her salsa recipe is the bomb-dig-a-dee. Ace sucked it down like it was soup.
Jalapeno Salsa (from Karen Ward's "Canning for Dummies")
2 lb tomatoes, peeled and chopped to measure 3 cups
7 oz can diced jalapeno chilies
1 onion, peeled and chopped
6 cloves of minced garlic
2T fine chopped fresh cilantro
2 tsp oregano
1 1/2 tsp kosher salt
1/2 tsp cumin (I used 1 1/2 tsp)
1 cup apple cider vinegar
Directions:
Prepare your canning jars and two piece caps according to the manufacturer's instructions. Keep the jars and lids hot.
Place all the ingredients in a 5 to 6 quart pot. Bring mixture to a boil over high heat, stirring to combine. Reduce the heat to low an simmer uncovered, for 10 minutes.
Ladle your hot salsa into the prepared jars, leaving head space of 1/4 inch. Wipe the jar rims; seal the jars with two piece caps, hand tightening the bands. Process the filled jars in a water boiling water bath for 10 minutes from the point of boiling. Remove the jars from the boiling water with a jar lifter. Place them on a clean kitchen towel or paper towels away from draft. After the jars cool, test the seals. If you find jars that haven't sealed, refrigerate them and use them within 2 months. Yield 3 pints.
As for the tomato sauce...very little of it actually made it to the jars...

There you go.

Thursday, June 11, 2009

Red Bell Pepper Relish

One of my favorite sandwiches on earth has 3 ingredients. Fresh Organic tomatoes, mayonnaise, and red bell pepper relish. These things coupled with hunks of my homemade bread are enough to bring tears of joy to my eyes. It's honestly one of those simple pleasures in life.

Bell pepper relish is one of those crazy sauces that once you've tasted it, you will crave it forever. Its tangy and sweet and remarkably simple to make. I make jars of it and use my home cannery so I can enjoy it all year round. I make it in the summer when bell peppers are in season! Yes it's that time. I'm loading up.

The main ingredients are bell peppers and onions. I chop them by hand, but use a food processor if you want. It goes much faster.
Red Bell Pepper Relish
6 red bell pepper, chopped
1 1/2 cup red onions, minced
1 cup balsamic vinegar
1/2 cup sugar(or honey)
1T salt
1/2 tsp celery seed
1/4 cup minced garlic
1 tsp ground fennel seed
Directions: Mix all ingredients in a large pot and simmer 30 minutes. Spoon into clean hot jars, fill with the cooking liquid, leaving 1/8th inch head space and seal. Process in boiling water-bath caner for 10 minutes. Yield about 4 1/2 pint jars.

If you don't jar it for the winter...you can just put it in the fridge for up to one month.
Smear it on a slice of bread with some mayonnaise.


I add thick slices of those gorgeous Organic Tomato Farming treasures. Thank you Jim for letting me raid the farm! I'm in heaven now.


There you go. Love in sandwich form.